
Hello programming world, today it looks like you are interested in trying to implement a navigational drawer within you application. Within this tutorial we are going to be focusing on drawer implementation with Kotlin but if you are interested in learning how in Java or Swift. NavigationDrawer or also known NavigationView which is a panel that shows you the menu but is hidden until the user swiping from the left or right or user touches the hamburger icon( )
To begin the development open your Android IDE and select “Empty Actvity” then select the “NEXT” button.
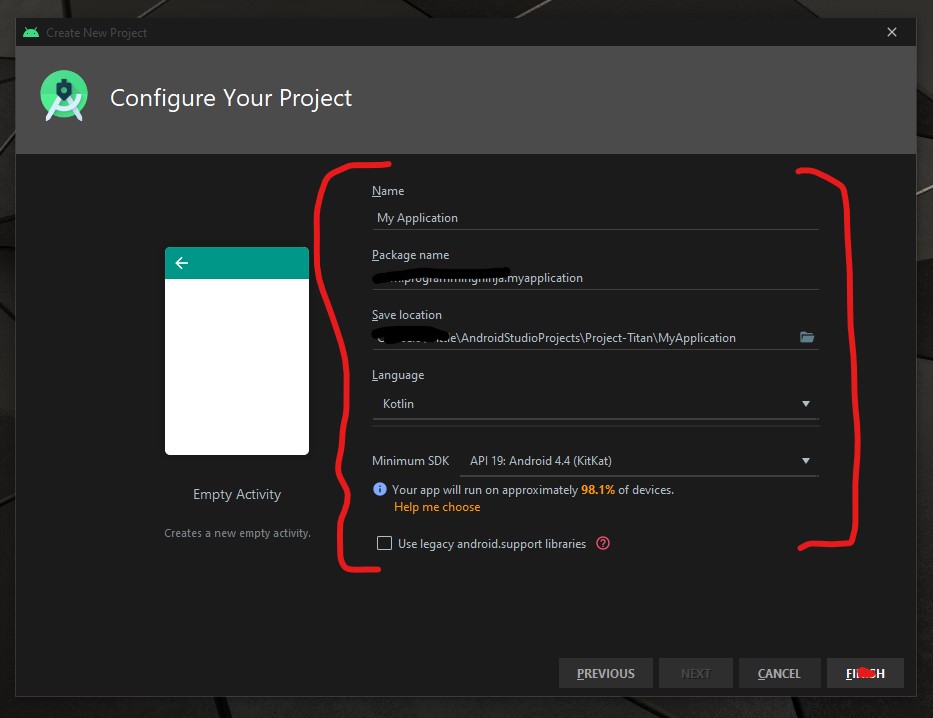
Now it is time to configure the project with changing the following fields Name and Language as seen in the image below.
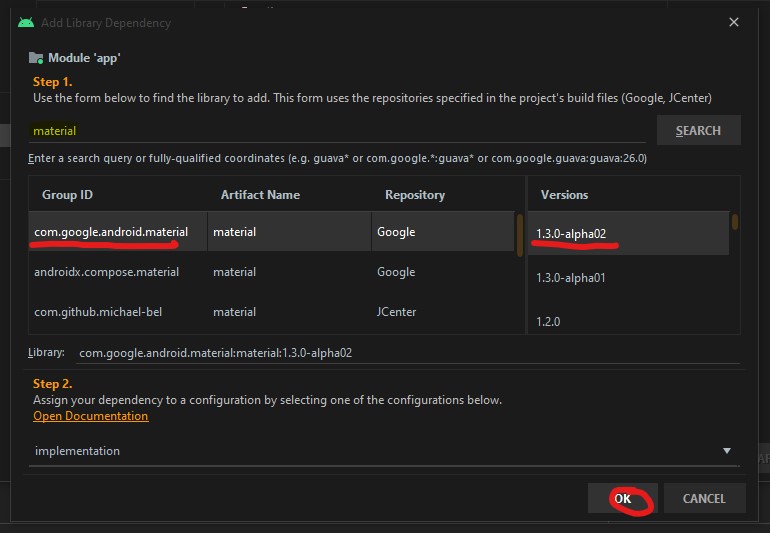
Now we need to add the material dependency into the project which has the NavigationView and then sync the project. You do have two options to accomplish this task.
the first way is adding to the build.gradle (Module: app)
implementation 'com.google.android.material:material:1.3.0-alpha02'
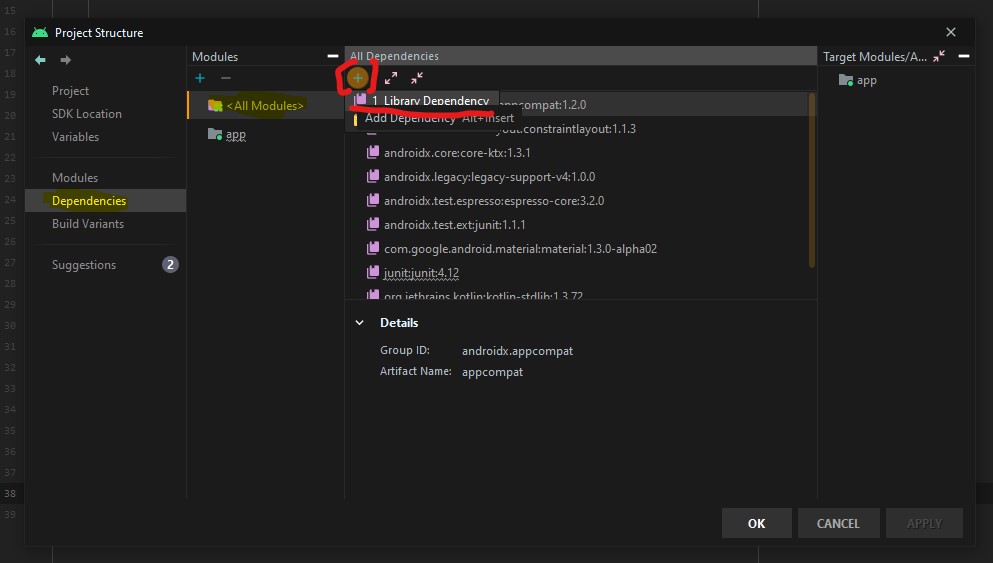
Or the second way is using the “Dependencies” selector. To achieve this select File -> Package Structure.. (Ctrl+Alt+Shift+S) ->
Now that the dependency is add we are going to focus on the main activity layout and this is where the navigation menu is going to be displayed.
<androidx.drawerlayout.widget.DrawerLayout
        xmlns:android="http://schemas.android.com/apk/res/android"
        xmlns:tools="http://schemas.android.com/tools"
        xmlns:app="http://schemas.android.com/apk/res-auto"
        android:layout_width="match_parent"
        android:layout_height="match_parent"
        android:id="@+id/drawer"
        tools:openDrawer="start"
        tools:context=".MainActivity">

    <RelativeLayout
            android:layout_width="wrap_content"
            android:layout_height="wrap_content">

        <androidx.appcompat.widget.Toolbar
                android:layout_width="match_parent"
                android:layout_height="wrap_content"
                android:id="@+id/tb_toolbar"
                app:title="Coeus Drawer Demo"
                app:titleTextColor="@color/cardview_light_background"
                android:background="@color/colorAccent" />

        <FrameLayout
                android:layout_width="match_parent"
                android:layout_height="match_parent"
                android:id="@+id/frame_container" />
    </RelativeLayout>

    <com.google.android.material.navigation.NavigationView
            android:layout_width="wrap_content"
            android:layout_height="match_parent"
            android:id="@+id/nv_menu"
            app:menu="@menu/ico_menu"
            app:headerLayout="@layout/nav_header"
            android:layout_gravity="start" />
</androidx.drawerlayout.widget.DrawerLayout>
Now that we have the DrawerLayout as the parent view and this draw the view for the child items
- Line 20
- Line 29
Within the NavigationView there are two attributes that we need there purpose as follow
- Line 33*: declare items which we need to show in the navigation view, the list of menu
- Line 34*: define the layout which is the header layout in the navigation view, the top part of the navigation view which is mostly used to describe user details or app details (Lets create the layout that is be referenced here, please see code beow)
***Note: when short to creating to new resource “ALT+SHIFT+ENTER”
<?xml version="1.0" encoding="utf-8"?>
<androidx.appcompat.widget.LinearLayoutCompat
    xmlns:android="http://schemas.android.com/apk/res/android"
    android:layout_width="match_parent"
    android:layout_height="wrap_content"
    android:orientation="vertical"
    android:background="@color/colorAccent">

    <androidx.appcompat.widget.AppCompatImageView
            android:layout_width="wrap_content"
            android:layout_height="wrap_content"
            android:id="@+id/img_user_image"
            android:src="@mipmap/ic_launcher_round"/>

    <androidx.appcompat.widget.AppCompatTextView
            android:layout_width="wrap_content"
            android:layout_height="wrap_content"
            android:id="@+id/tv_user_name"
            android:text="User Name"
            android:textSize="30dp"
            android:textColor="@color/cardview_light_background" />

    <androidx.appcompat.widget.AppCompatTextView
            android:layout_width="wrap_content"
            android:layout_height="wrap_content"
            android:id="@+id/tv_user_details"
            android:text="user details"
            android:textSize="20dp"
            android:textColor="@color/cardview_light_background" />
</androidx.appcompat.widget.LinearLayoutCompat>
No we need to modify ActionBar within the style.xml so we don’t run into a complication since we are using our own type of toolbar. We will be modifying the line 2 from DarkActionBar to NoActionBar
<!-- Base application theme. -->
    <style name="AppTheme" parent="Theme.AppCompat.Light.NoActionBar">
        <!-- Customize your theme here. -->
        <item name="colorPrimary">@color/colorPrimary</item>
        <item name="colorPrimaryDark">@color/colorPrimaryDark</item>
        <item name="colorAccent">@color/colorAccent</item>
    </style>
Now that we have completed the layout and now need to focus on the kotlin class (.kt). Select the MainActivity class and everything is going to take place within the OnCreate(), so we’ll begin by setting our new toolbar as the actionbar.
val tb = findViewById<Toolbar>(R.id.tb_toolbar)
setSupportActionBar(tb)
Now it is time to set the actionBar to fire the toggle state, the user wants to ‘open’ and ‘close’ the navigation view.
val nav: NavigationView? = findViewById(R.id.nv_menu)
val drawer: DrawerLayout? = findViewById(R.id.drawer)
val toggle: ActionBarDrawerToggle? = ActionBarDrawerToggle(this, drawer,tb, R.string.open, R.string.close) //create string arguements
Setup a handler to respond to click events on the navigation elements and swap out the fragment. This can be put into the activity directly:
***To understand what a fragment check out the fragment post:
supportFragmentManager.beginTransaction().replace(R.id.frame_container, HomeFragment()).commit()
nav?.setCheckedItem(m_home)
And set the specific action on menuItem clicks. Here, we are showing the toast message for anything that doesn’t have a fragment already create. Ideally, you this is where can start a new activity, or open fragment etc.
nav?.setNavigationItemSelectedListener(object : NavigationView.OnNavigationItemSelectedListener {
     var temp: Fragment? = null

     override fun onNavigationItemSelected(item: MenuItem): Boolean {
          when (item.itemId) {
              m_home -> temp = HomeFragment()
              m_calls -> Toast.makeText(applicationContext, "You have clicked the call", Toast.LENGTH_SHORT).show()
              m_settings -> Toast.makeText(applicationContext, "You have clicked the settings", Toast.LENGTH_SHORT).show()
          }
supportFragmentManager.beginTransaction().replace(R.id.frame_container, temp!!).commit()
drawer.closeDrawer(GravityCompat.START)
                return true
            }
        })
What is the user press back button, the application should check the navigationView and make sure the drawer is closed first and then the app. For this, we will override the onBackPressed() method.
override fun onBackPressed() {
        if (drawer.isDrawerOpen(GravityCompat.START)) {
            drawer.closeDrawer(GravityCompat.START)
        } else {
            super.onBackPressed()
        }
    }
Now check for any errors and if all is good then let’s run the app. If everything compiles correctly then it should be working fine. There is much more in NavigationView like icons in the menu items etc. Try to explore more and share us with on our twitter or slack channel.


