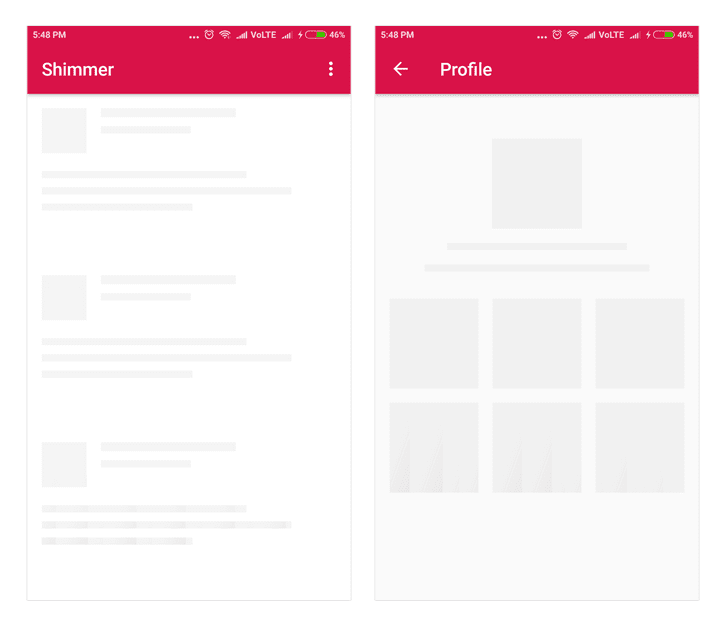
You may or may not have been aware of certain UX effects within the Facebook application that fires when attempting to retrieve a large amount of data from the network. This library was created by the developers over at Facebook so big shout out to their developer team. This library serves to provide an alternative method of notifying the user that data is being retrieved rather than using the old traditional ProgressBar. There is no surprise that later on Facebook released an open-source library called shimmer which any developer can now implement the shimmer effect.
In this article, we are demonstrating how to execute the shimmer in any android application. We are going to attempt to fetch data from the API using the dependency Fast Android Networking and then display the data in the recycler view. So let’s get to what you’re interested in the code.
Begining the Application
So fire up the Android Studio and create a new project:
- Select Empty Acivity and select next
- Name: Application Name
- Package Name: com.programmingninja.applicationame
- Language: Kotlin
- Minimum SDK: API 19
- “FINISH”
Adding ‘Dependencies’
Add the following dependencies in your app level build.gradle and sync
dependencies {
    implementation fileTree(dir: "libs", include: ["*.jar"])
    implementation "org.jetbrains.kotlin:kotlin-stdlib:$kotlin_version"
    implementation 'androidx.core:core-ktx:1.3.1'
    implementation 'androidx.appcompat:appcompat:1.1.0'
    implementation 'androidx.constraintlayout:constraintlayout:1.1.3'
    implementation 'androidx.recyclerview:recyclerview:1.2.0-alpha05'
    implementation 'com.github.bumptech.glide:glide:4.11.0'
    testImplementation 'junit:junit:4.12'
    androidTestImplementation 'androidx.test.ext:junit:1.1.1'
    androidTestImplementation 'androidx.test.espresso:espresso-core:3.2.0'

    //adding dependencies
    implementation 'com.github.bumptech.glide:glide:4.11.0'
    implementation 'com.facebook.shimmer:shimmer:0.5.0@aar'
    implementation 'com.amitshekhar.android:android-networking:1.0.2'
    implementation 'androidx.recyclerview:recyclerview:1.2.0-alpha05'
}
Within the ‘values’ folder need to add the color code to use in the application. Note adding this background color should be grey or any non-white color since the shimmering effect won’t be visible if you are using a white background.
<color name="colorGrey">#dddddd</color>
Find the AndroidManifest file and add the following permission within the <manifest></manifest> block
<uses-permission android:name="android.permission.INTERNET" />
To give you some background on the dependencies we add the first is for the media management for loading images. Then we have the Facebook shimmering dependency along with Fast-Android-Networking and using the recyclerview in the project.
Now we are going to create a new layout called layout_item.xml within the layout folder. Please add the following code:
<?xml version="1.0" encoding="utf-8"?>
<androidx.constraintlayout.widget.ConstraintLayout xmlns:android="http://schemas.android.com/apk/res/android"
    xmlns:tools="http://schemas.android.com/tools"
    android:layout_width="match_parent"
    android:layout_height="wrap_content"
    xmlns:app="http://schemas.android.com/apk/res-auto"
    android:id="@+id/item_container">

    <androidx.appcompat.widget.AppCompatImageView
        android:layout_width="60dp"
        android:layout_height="60dp"
        android:id="@+id/img_item_avatar"
        android:padding="4dp"
        app:layout_constraintTop_toBottomOf="parent"
        app:layout_constraintStart_toStartOf="parent"
        app:layout_constraintBottom_toTopOf="parent" />

    <androidx.appcompat.widget.AppCompatTextView
        android:layout_width="0dp"
        android:layout_height="wrap_content"
        android:id="@+id/tv_item_id"
        style="@style/TextAppearance.AppCompat.Medium"
        android:layout_marginStart="8dp"
        android:layout_marginTop="4dp"
        app:layout_constraintEnd_toEndOf="parent"
        app:layout_constraintStart_toEndOf="@+id/img_item_avatar"
        app:layout_constraintTop_toTopOf="parent"
        tools:text="Pokemon No" />

    <androidx.appcompat.widget.AppCompatTextView
        android:layout_width="0dp"
        android:layout_height="wrap_content"
        android:id="@+id/tv_item_name"
        style="@style/TextAppearance.AppCompat.Large"
        android:layout_marginStart="8dp"
        android:layout_marginTop="4dp"
        app:layout_constraintEnd_toEndOf="parent"
        app:layout_constraintStart_toStartOf="@id/tv_item_id"
        app:layout_constraintTop_toBottomOf="@id/tv_item_id"
        tools:text="Pokemon Name" />

    <androidx.appcompat.widget.AppCompatTextView
        android:layout_width="0dp"
        android:layout_height="wrap_content"
        android:id="@+id/tv_item_email"
        app:layout_constraintEnd_toEndOf="parent"
        app:layout_constraintStart_toStartOf="@id/tv_item_name"
        app:layout_constraintTop_toBottomOf="@id/tv_item_name"
        tools:text="Pokemon Attribute" />
</androidx.constraintlayout.widget.ConstraintLayout>
Now create another layout within the folder called layout_shimmer and then add the following code:
<?xml version="1.0" encoding="utf-8"?>
<androidx.constraintlayout.widget.ConstraintLayout
    xmlns:android="http://schemas.android.com/apk/res/android"
    xmlns:app="http://schemas.android.com/apk/res-auto"
    xmlns:tools="http://schemas.android.com/tools"
    android:id="@+id/shimmer_container"
    android:layout_width="match_parent"
    android:layout_height="60dp">

    <androidx.appcompat.widget.AppCompatImageView
        android:layout_width="60dp"
        android:layout_height="0dp"
        android:id="@+id/img_shim_avatar"
        android:background="@color/colorGrey"
        android:padding="4dp"
        app:layout_constraintBottom_toBottomOf="parent"
        app:layout_constraintStart_toStartOf="parent"
        app:layout_constraintBottom_toTopOf="parent" />

    <androidx.appcompat.widget.AppCompatTextView
        android:layout_width="0dp"
        android:layout_height="wrap_content"
        android:id="@+id/tv_shim_id"
        android:background="@color/colorGrey"
        style="@style/TextAppearance.AppCompat.Medium"
        android:layout_marginStart="8dp"
        android:layout_marginTop="4dp"
        app:layout_constraintEnd_toEndOf="parent"
        app:layout_constraintTop_toTopOf="parent"
        app:layout_constraintStart_toEndOf="@+id/img_shim_avatar"
        tools:text="#025" />

    <androidx.appcompat.widget.AppCompatTextView
        android:layout_width="0dp"
        android:layout_height="wrap_content"
        android:id="@+id/tv_shim_name"
        android:background="@color/colorGrey"
        style="@style/TextAppearance.AppCompat.Large"
        android:layout_marginStart="8dp"
        android:layout_marginTop="4dp"
        app:layout_constraintEnd_toEndOf="parent"
        app:layout_constraintStart_toStartOf="@+id/tv_shim_id"
        app:layout_constraintTop_toBottomOf="@id/tv_shim_id"
        tools:text="Pikachu" />

    <androidx.appcompat.widget.AppCompatTextView
        android:layout_width="0dp"
        android:layout_height="wrap_content"
        android:id="@+id/tv_shim_email"
        android:background="@color/colorGrey"
        app:layout_constraintEnd_toEndOf="parent"
        app:layout_constraintStart_toStartOf="@+id/tv_shim_name"
        app:layout_constraintTop_toBottomOf="@id/tv_shim_name"
        tools:text="Electric"/>

</androidx.constraintlayout.widget.ConstraintLayout>
Let’s tackle the activity_main.xml in the layout folder and add the below code but before adding let’s provide some context to the XML:
- We are going to add the ShimmerFrameLayout
- Within the shimmerframelayout we are going to add some placeholders inside a LinearLayout.
- Note: that the added placeholder displays multiple times to create the appearance as a list
Then we will add a recyclerview that will display the list of data fetched after executing the network request from the API.
<?xml version="1.0" encoding="utf-8"?>
<androidx.constraintlayout.widget.ConstraintLayout
    xmlns:android="http://schemas.android.com/apk/res/android"
    xmlns:app="http://schemas.android.com/apk/res-auto"
    xmlns:tools="http://schemas.android.com/tools"
    android:layout_width="match_parent"
    android:layout_height="match_parent"
    tools:context=".MainActivity">

    <com.facebook.shimmer.ShimmerFrameLayout
        android:layout_width="match_parent"
        android:layout_height="match_parent"
        android:id="@+id/frame_shimmer"
        android:orientation="vertical"
        android:layout_gravity="center">
        <!-- Add 20 Placeholder -->
        <androidx.appcompat.widget.LinearLayoutCompat
            android:layout_width="match_parent"
            android:layout_height="wrap_content"
            android:orientation="vertical">
            <include layout="@layout/layout_shimmer" />
            <include layout="@layout/layout_shimmer" />
            <include layout="@layout/layout_shimmer" />
            <include layout="@layout/layout_shimmer" />
            <include layout="@layout/layout_shimmer" />
            <include layout="@layout/layout_shimmer" />
            <include layout="@layout/layout_shimmer" />
            <include layout="@layout/layout_shimmer" />
            <include layout="@layout/layout_shimmer" />
            <include layout="@layout/layout_shimmer" />
            <include layout="@layout/layout_shimmer" />
            <include layout="@layout/layout_shimmer" />
            <include layout="@layout/layout_shimmer" />
            <include layout="@layout/layout_shimmer" />
            <include layout="@layout/layout_shimmer" />
            <include layout="@layout/layout_shimmer" />
            <include layout="@layout/layout_shimmer" />
            <include layout="@layout/layout_shimmer" />
            <include layout="@layout/layout_shimmer" />
            <include layout="@layout/layout_shimmer" />
        </androidx.appcompat.widget.LinearLayoutCompat>
    </com.facebook.shimmer.ShimmerFrameLayout>

    <androidx.recyclerview.widget.RecyclerView
        android:layout_width="match_parent"
        android:layout_height="match_parent"
        android:id="@+id/list_view"
        android:visibility="gone" />

</androidx.constraintlayout.widget.ConstraintLayout>
Create we need to create a data class User:
import com.google.gson.annotations.SerializedName

data class User (
    @SerializedName("id")
    val id: Int = 0,
    @SerializedName("name")
    val name: String = "",
    @SerializedName("email")
    val email: String = "",
    @SerializedName("avatar")
    val avatar: String = ""
)
Then create an adapater to c
import android.view.LayoutInflater
import android.view.View
import android.view.ViewGroup
import androidx.appcompat.view.menu.ActionMenuItemView
import androidx.recyclerview.widget.RecyclerView
import com.bumptech.glide.Glide
import com.programmingninja.crius.R
import kotlinx.android.synthetic.main.layout_item.view.*

class Adapter(private val users: ArrayList<User>) : RecyclerView.Adapter<Adapter.DataViewHolder>() {
    class DataViewHolder(itemView: View) : RecyclerView.ViewHolder(itemView) {
        fun bind(user: User) {
            itemView.tv_item_id.text = "No: ${user.id}"
            itemView.tv_item_name.text = "Hello: ${user.name}"
            itemView.tv_item_email.text = "E: ${user.email}"
            Glide.with(itemView.img_item_avatar.context).load(user.avatar).into(itemView.img_item_avatar)
        }
    }

    override fun onCreateViewHolder(parent: ViewGroup, viewType: Int) = DataViewHolder(LayoutInflater.from(parent.context).inflate(R.layout.layout_item, parent, false))

    override fun getItemCount(): Int = users.size

    override fun onBindViewHolder(holder: DataViewHolder, position: Int) {
        holder.bind(users[position])
    }

    fun addData(list: List<User>) {
        users.addAll(list)
    }
}
After completing the adapter now select your MainActivity and now time to complete the following kt file:
To keep in mind to start the shimmering effect as soon as the application opens, we add the startShimmer() within the onResume() activity lifecycle and then we stop it with stopShimmer() within the onPause() activity lifecycle method.
import androidx.appcompat.app.AppCompatActivity
import android.os.Bundle
import android.view.View
import android.widget.Toast
import androidx.recyclerview.widget.DividerItemDecoration
import androidx.recyclerview.widget.LinearLayoutManager
import com.androidnetworking.AndroidNetworking
import com.androidnetworking.error.ANError
import com.androidnetworking.interfaces.ParsedRequestListener
import com.programmingninja.crius.helper.Adapter
import com.programmingninja.crius.helper.User
import kotlinx.android.synthetic.main.activity_main.*

class MainActivity : AppCompatActivity() {

    private lateinit var adapter: Adapter

    override fun onCreate(savedInstanceState: Bundle?) {
        super.onCreate(savedInstanceState)
        setContentView(R.layout.activity_main)
        setupUI()
        setAPICall()
    }

    private fun setAPICall() {
        AndroidNetworking.initialize(applicationContext)
        AndroidNetworking.get("https://5e510330f2c0d300147c034c.mockapi.io/users").build()
            .getAsObjectList(User::class.java, object : ParsedRequestListener<List<User>> {
                override fun onResponse(responses: List<User>) {
                    frame_shimmer.stopShimmer()
                    frame_shimmer.visibility = View.GONE
                    list_view.visibility = View.VISIBLE
                    adapter.addData(responses)
                    adapter.notifyDataSetChanged()
                }

                override fun onError(anError: ANError?) {
                    frame_shimmer.visibility = View.GONE
                    Toast.makeText(this@MainActivity, "Something went wrong", Toast.LENGTH_LONG).show()
                }
            })
    }

    private fun setupUI() {
        list_view.layoutManager = LinearLayoutManager(this)
        adapter = Adapter(arrayListOf())
        list_view.addItemDecoration(DividerItemDecoration(list_view.context,(list_view.layoutManager as LinearLayoutManager).orientation))
        list_view.adapter = adapter
    }

    override fun onResume() {
        super.onResume()
        frame_shimmer.startShimmer()
    }

    override fun onPause() {
        frame_shimmer.stopShimmer()
        super.onPause()

    }
}
Take forcus on the following code below to stop the shimmering effect and get the recyclerview to become visible after the network request is executed and data populate in the recyclerview
override fun onResponse(responses: List<User>) {
    frame_shimmer.stopShimmer()
    frame_shimmer.visibility = View.GONE
    list_view.visibility = View.VISIBLE
    adapter.addData(responses)
    adapter.notifyDataSetChanged()
}
Done
This is all that is needed to fire the application. Hope you enjoyed the read if you need anything else message me for additional assistance.


