Did someone say Navigation to the rescue: Android Jetpack

If you been around the block a few times with Android development you probably already know that there is an issue with Navigation. If you don’t trust me you will soon find out but don’t worry I am going to let you in on a little hint to overcome many of the challenges that arise doing the development process. Note unless the app you are developing isn’t complex avoid this altogether but let get serious if you are developing for the public it is sure to become more convoluted as you go. Complexity can range from any of the following: Fragment transactions, deep linking to different parts within the app, passing values/arguments securely and safely, and much more. This is where our friend JetPack’s nav component steps in because its purpose brings solutions to the above complexity. From this article, you can expect how to solve those issues.
Terms and Definition to keep
- NavHost
- a container that has any or all the information it may need to handle the navigation actions
- NavController
- This component performs the navigation between destinations,
- NavigationalUI
- This component simply connects the navigation with some material component (for example the BottomNavigationView and DrawerLayout)
Fragment Transactions
With the nav component, there’s no need to manually handle fragment transactions (praise him), and it takes care of everything internally. To successfully go from FragmentA to FragmentB and now all you need to do is call the corresponding navigation action at runtime.
navController.navigate(R.id.actionId)
//or something like this
navController.navigate(R.id.destinationId)
The Back & Up Navigation
With the nav component and using the single activity model, the Activity’s role becomes more of an entry point to the app that delegates the handling of its content rather than being its owner. A NavHost, it is hooked up to the navigation graph which represents the single source of truth, and this where all the destinations, actions, arguments and deep links are defined
When using fragments as destinations, you can use the NavHostFragment class as a NavHost. Let’s take a look at how the activity layout may look like it
<FrameLayout>
    <fragment
         android:id="@+id/mainNavHostFragment"
         android:name="androidx.navigation.fragment.NavHostFragment"
         android:layout_width="match_parent"
         android:layout_height="match_parent"
         app:defaultNavHost="true"
         app:navGraph="@navigation/main_navigation_grah"/>
</FrameLayout
Since the navigation graph is the single source of truth for all navigation within the app, the navigation component does the right thing when the user navigates back or up. Not only does it handles this, but it correctly takes care of things such as the back stack, transactions, pop behavior, and transaction animations.
Passing Data Securely & Safely
If you have ever pass data between Fragments can be tedious as well as error-prone and this is not including the things that can go wrong or at least get confusing while refactoring the code. Ideally, we like to pass and retrieve arguments in an easy manner without having to worry about their keys, and read them safely.
The navigation component brings a solution to this using the Gradle plugin [androidx.navigation.safeargs]. It basically generates some boilerplate code to make any developer’s life easier. As you will see with the example below when a user navigates from FragmentA to FragmentB while passing a mandatory argument and an optional argument. What classes are generated:
-
FragmentADirections.ActionFragmentAToFragmentB
- Inner class with a constructor that takes in the mandatory arguments and setters for the optional arguments
-
FragmentADirections
- Has a method [actionFragmentAToFragmentB] that takes in the mandatory arguments and returns an instance of
FragmentADirections.ActionFragmentAToFragmentB
- Has a method [actionFragmentAToFragmentB] that takes in the mandatory arguments and returns an instance of
-
FragmentBArgs
- Has getters for the different arguments
So to begin, within the navigation graph, the destinations are defined along with the action (this transition is from FragmentA to FragmentB) and the arguments
<fragment
	android:id="@+id/fragmentA"
	android:name="com.test.FragmentA"
	android:label="Fragment A">
	<action
		android:id="@+id/action_FragmentA_to_FragmentB"
		app:destination="@+id/fragmentB"/>

</fragment>

<fragment
	android:id="@+id/fragmentB"
	android:name="com.test.FragmentB"
	android:label="Fragment B">

	<!--Mandatory Argument-->
	<argument
		android:name="id"
		app:argType="integer" <!--Argument Type-->
		/>

	<!--Optional Argument-->
	<argument
		android:name="data"
		android:defaultValue=""
		app:argType="string" <!--Argument Type-->
		/>
</fragment>
In addition, within FragmentA, performs the navigation while passing the arguments.
//creating  a NavDirection instance for the mandatory argument
val directions = FragmentADirections.actionFragmentAToFragementB(10)

// if there is n optional argument you can pass it
directions.setData("")

//Navigate to the new FragmentB
navController.navigate(directions)
Now reading
val id: Int = FragmentBArgs.fromBundle(arguments).id
val data: String = FragmentBArgs.fromBundle(arguments).data
Deep Links
Deep linking inside any application can get complicated as the app get more complex. Issues such as how to structure these deep links, how to pass the required information, and how to build the right back stack arise. In the nav component, deep linking is a first-class citizen, and both types are supported: Explicit () and Implicit ().
-
Explicit
- Used for notifications, app widgets, actions, and slices. Consider these used for pending intent based.
//prepare the arguments to pass to any notification expectation
val arg = Bundle().apply {
    putString("StringKey", "a string value")
    putInt("IntKey", 0)
}

//preparing intent, while selecting the graph & destination
val pendingIndent = NavDeepLinkBuilder(context)
    .setGraph(R.navigation.main_navigation_graph)
    .setDestination(R.id.destinationFragment)
    .setArguments(arg)
    .createPendingIntent()

//prepaing notification
val notification = NotificationCompat.Builder(context, NavigationApplication.NOTIFICATION_CHANNEL_ID)
    .setSmallIcon(R.drawable.notification_icon)
    .setContentTitle("Explicit Deep Link")
    .setContentText("Click on the following notification")
    .setContentIntent(pendingIndent)
    .setAutoCancel(true)
    .build()

//Display notification
NotificationManagerCompat.from(context).notify(10, notification)
-
Implicit
- Used for handling web URLs and custom scheme URIs.
<fragment
    android:id="@+id/destinationFragment"
    android:name="com.example.destinationFragment"
    android:label="@string/title_destination_fragment">
    <action ... />
    <deepLink
        android:id="@+id/custom_scheme_uri_deeplink"
        app:uri="android-app://path/subpath/{data}" />
    <deepLink
        android:id="@+id/web_url_deeplink"
        app:uri="www.husaynhakeem.com/path/subpath" />
</fragment>
Now we need to review the manifest and tweak it a bit. Within the activity tag of the Activity that contains the above destination fragment, the line below needs to be added.
<activity android:name="com.example.Activity">
    <nav-graph android:value="@navigation/main_navigation_graph" />
</activity>
Testing Navigation
The navigation component comes with a dependency just for testing android.arch.navigation:navigation-testing:$nav_version. But unfortunately, there seems to be very little (to say the least) documentation around it online, I wasn’t personally able to find any projects (not even the google sample apps) that use it, and a GoogleIO talk from earlier this year briefly brings up the topic but doesn’t go into any of its details. But the promise is that testing will be developed further in future releases, allowing developers to test their app’s destinations in isolation without worrying about potential issues such as fragment transactions.
All in All
There’s no doubt that the navigation component brings a lot to the table, it has several other great features I didn’t mention in this article such as nesting graphs, methods curated for Kotlin usage -based on extension functions-, and an easy to use navigation graph editor. But despite this, the navigation component seems to leave some open questions unanswered, especially one that’s bugging me: Passing data back to a previous destination (similar to startActivityForResult and onActivityResult).
The navigation component is currently still in Alpha, it’ll be interesting to see how it evolves, and I also look forward to playing with its testing component when there are more resources around it. But for the time being, I think it would be fun to test its limits in a real-world application.
- Published in Android, Java, Kotlin, Programming Languages
Android Navigation Drawer

Hello programming world, today it looks like you are interested in trying to implement a navigational drawer within you application. Within this tutorial we are going to be focusing on drawer implementation with Kotlin but if you are interested in learning how in Java or Swift. NavigationDrawer or also known NavigationView which is a panel that shows you the menu but is hidden until the user swiping from the left or right or user touches the hamburger icon( )
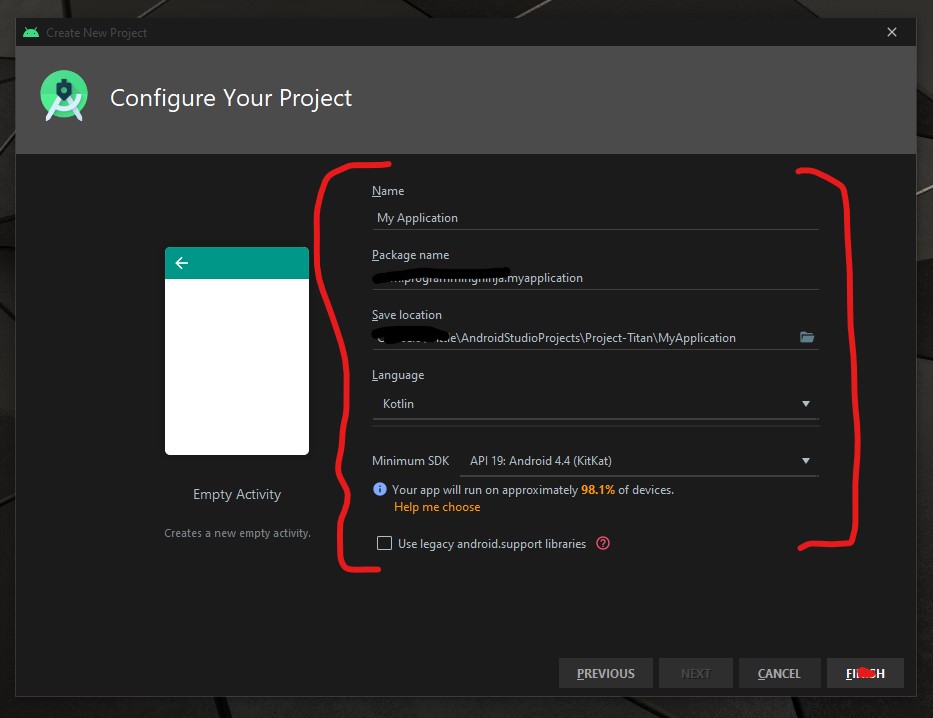
To begin the development open your Android IDE and select “Empty Actvity” then select the “NEXT” button.
Now it is time to configure the project with changing the following fields Name and Language as seen in the image below.
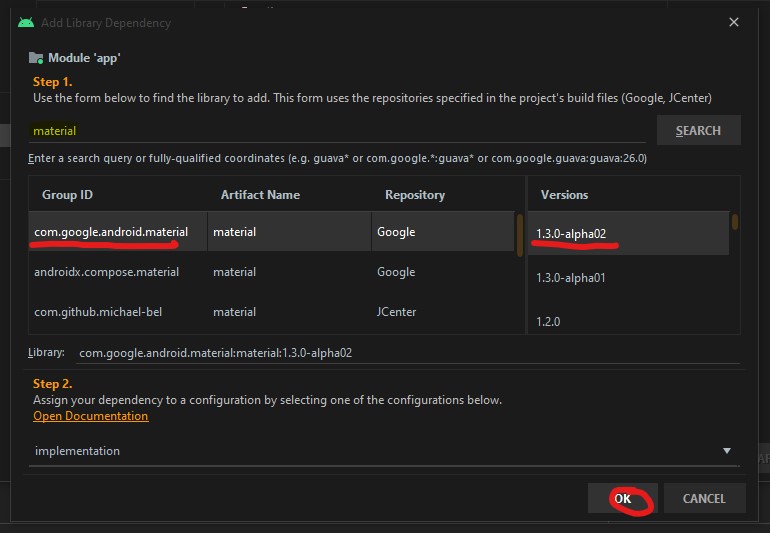
Now we need to add the material dependency into the project which has the NavigationView and then sync the project. You do have two options to accomplish this task.
the first way is adding to the build.gradle (Module: app)
implementation 'com.google.android.material:material:1.3.0-alpha02'
Or the second way is using the “Dependencies” selector. To achieve this select File -> Package Structure.. (Ctrl+Alt+Shift+S) ->
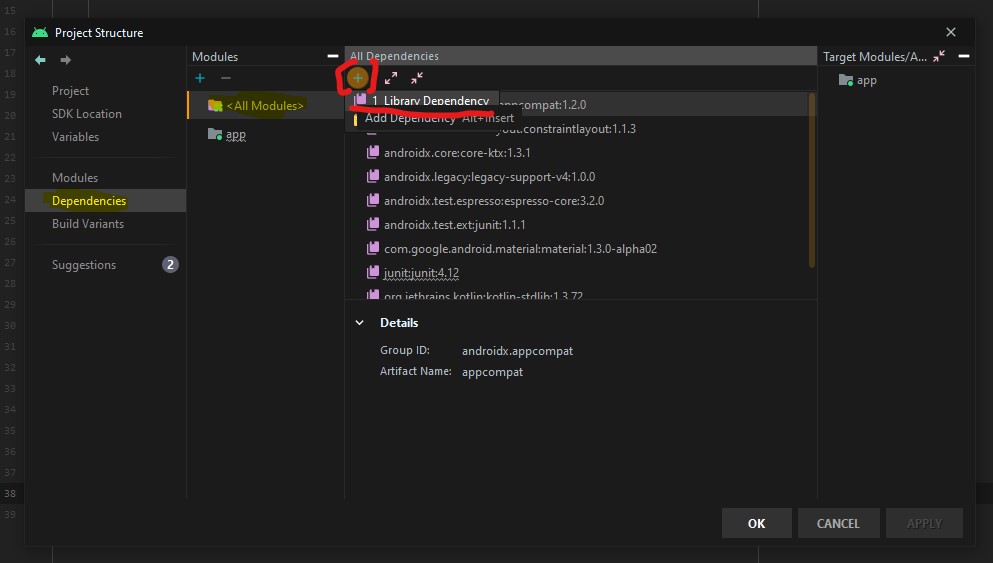
Now that the dependency is add we are going to focus on the main activity layout and this is where the navigation menu is going to be displayed.
<androidx.drawerlayout.widget.DrawerLayout
        xmlns:android="http://schemas.android.com/apk/res/android"
        xmlns:tools="http://schemas.android.com/tools"
        xmlns:app="http://schemas.android.com/apk/res-auto"
        android:layout_width="match_parent"
        android:layout_height="match_parent"
        android:id="@+id/drawer"
        tools:openDrawer="start"
        tools:context=".MainActivity">

    <RelativeLayout
            android:layout_width="wrap_content"
            android:layout_height="wrap_content">

        <androidx.appcompat.widget.Toolbar
                android:layout_width="match_parent"
                android:layout_height="wrap_content"
                android:id="@+id/tb_toolbar"
                app:title="Coeus Drawer Demo"
                app:titleTextColor="@color/cardview_light_background"
                android:background="@color/colorAccent" />

        <FrameLayout
                android:layout_width="match_parent"
                android:layout_height="match_parent"
                android:id="@+id/frame_container" />
    </RelativeLayout>

    <com.google.android.material.navigation.NavigationView
            android:layout_width="wrap_content"
            android:layout_height="match_parent"
            android:id="@+id/nv_menu"
            app:menu="@menu/ico_menu"
            app:headerLayout="@layout/nav_header"
            android:layout_gravity="start" />
</androidx.drawerlayout.widget.DrawerLayout>
Now that we have the DrawerLayout as the parent view and this draw the view for the child items
- Line 20
- Line 29
Within the NavigationView there are two attributes that we need there purpose as follow
- Line 33*: declare items which we need to show in the navigation view, the list of menu
- Line 34*: define the layout which is the header layout in the navigation view, the top part of the navigation view which is mostly used to describe user details or app details (Lets create the layout that is be referenced here, please see code beow)
***Note: when short to creating to new resource “ALT+SHIFT+ENTER”
<?xml version="1.0" encoding="utf-8"?>
<androidx.appcompat.widget.LinearLayoutCompat
    xmlns:android="http://schemas.android.com/apk/res/android"
    android:layout_width="match_parent"
    android:layout_height="wrap_content"
    android:orientation="vertical"
    android:background="@color/colorAccent">

    <androidx.appcompat.widget.AppCompatImageView
            android:layout_width="wrap_content"
            android:layout_height="wrap_content"
            android:id="@+id/img_user_image"
            android:src="@mipmap/ic_launcher_round"/>

    <androidx.appcompat.widget.AppCompatTextView
            android:layout_width="wrap_content"
            android:layout_height="wrap_content"
            android:id="@+id/tv_user_name"
            android:text="User Name"
            android:textSize="30dp"
            android:textColor="@color/cardview_light_background" />

    <androidx.appcompat.widget.AppCompatTextView
            android:layout_width="wrap_content"
            android:layout_height="wrap_content"
            android:id="@+id/tv_user_details"
            android:text="user details"
            android:textSize="20dp"
            android:textColor="@color/cardview_light_background" />
</androidx.appcompat.widget.LinearLayoutCompat>
No we need to modify ActionBar within the style.xml so we don’t run into a complication since we are using our own type of toolbar. We will be modifying the line 2 from DarkActionBar to NoActionBar
<!-- Base application theme. -->
    <style name="AppTheme" parent="Theme.AppCompat.Light.NoActionBar">
        <!-- Customize your theme here. -->
        <item name="colorPrimary">@color/colorPrimary</item>
        <item name="colorPrimaryDark">@color/colorPrimaryDark</item>
        <item name="colorAccent">@color/colorAccent</item>
    </style>
Now that we have completed the layout and now need to focus on the kotlin class (.kt). Select the MainActivity class and everything is going to take place within the OnCreate(), so we’ll begin by setting our new toolbar as the actionbar.
val tb = findViewById<Toolbar>(R.id.tb_toolbar)
setSupportActionBar(tb)
Now it is time to set the actionBar to fire the toggle state, the user wants to ‘open’ and ‘close’ the navigation view.
val nav: NavigationView? = findViewById(R.id.nv_menu)
val drawer: DrawerLayout? = findViewById(R.id.drawer)
val toggle: ActionBarDrawerToggle? = ActionBarDrawerToggle(this, drawer,tb, R.string.open, R.string.close) //create string arguements
Setup a handler to respond to click events on the navigation elements and swap out the fragment. This can be put into the activity directly:
***To understand what a fragment check out the fragment post:
supportFragmentManager.beginTransaction().replace(R.id.frame_container, HomeFragment()).commit()
nav?.setCheckedItem(m_home)
And set the specific action on menuItem clicks. Here, we are showing the toast message for anything that doesn’t have a fragment already create. Ideally, you this is where can start a new activity, or open fragment etc.
nav?.setNavigationItemSelectedListener(object : NavigationView.OnNavigationItemSelectedListener {
     var temp: Fragment? = null

     override fun onNavigationItemSelected(item: MenuItem): Boolean {
          when (item.itemId) {
              m_home -> temp = HomeFragment()
              m_calls -> Toast.makeText(applicationContext, "You have clicked the call", Toast.LENGTH_SHORT).show()
              m_settings -> Toast.makeText(applicationContext, "You have clicked the settings", Toast.LENGTH_SHORT).show()
          }
supportFragmentManager.beginTransaction().replace(R.id.frame_container, temp!!).commit()
drawer.closeDrawer(GravityCompat.START)
                return true
            }
        })
What is the user press back button, the application should check the navigationView and make sure the drawer is closed first and then the app. For this, we will override the onBackPressed() method.
override fun onBackPressed() {
        if (drawer.isDrawerOpen(GravityCompat.START)) {
            drawer.closeDrawer(GravityCompat.START)
        } else {
            super.onBackPressed()
        }
    }
Now check for any errors and if all is good then let’s run the app. If everything compiles correctly then it should be working fine. There is much more in NavigationView like icons in the menu items etc. Try to explore more and share us with on our twitter or slack channel.
- Published in Android, Kotlin, Programming Languages