Using WooCommerce in 2021

Getting WooCommerce ’21
Starting from scratch or upgrading your site to incorporate WooCommerce is no problem. From adding products and managing orders to offering coupons and creating reports, WooCommerce packs a lot of punch. There are plenty of exciting new WooCommerce plugins and extensions available to make your client’s online storefront attract and retain more customers.
From a web development perspective, WooCommerce offers tons of options to get your client’s storefront up and running. The sooner their storefront is live, the sooner they can start reeling in customers and giving them the shopping experience they need to keep them coming back for more. Sell products, services, subscriptions or bookings.
WooCommerce Settings
Needing to attract new and recurring customer is simple by using categories, product tags and attributes. As a site grows so does the demand and features the lives within the site and WooCommerce allows the configuration to be modified to meet customer expectations. No fear if you decide to sell and ship to different countries or even accept different currency with various payment gateway preferences. With that what all can you do with WooCommerece:
- Change countries to sell and ship to
- payment gateway preferences
- difference checkout options
- Dont forget coupons and/or discounts
Product Adding
From adding to organizing along with special offerings in your shop. Well guess who does it with very little knowledge, WooCommerce does. After installing WooCommerce simply select the “Products” within your dashboard. Furthermore WooCommerce walks the user through adding a product: name, description, category assignment.
Defined Product types :
- Downloadable products
- Shippable products
- virtual products
- Variable products
Using Coupons
How to promote the business and attract more customer to stop and buy? It simple offer discounts with coupons. Once on the dashboard select couplns and follow the prompts:
- Create your own details along with coupons codes
- Designate how oftern the coupon can be used by a customer
- Assign restrictions for example minimum or maximum total of an order
Advance Features
Also within WooCommerce there are ton of advance features to launch a business.
- Theme Customizations
- various woocommerce themes can be purchased and customized
- Shipping
- Designate options like pickup, local delivery or shipping
- PayPal Acceptance
- Enable PayPal checkout along with all major credicards
- Social Login
- Account creation/login process by allowing customers to use logins from the popular social media platforms
- Analytics
- Deep eCommerce insights including checkout flow analysis, sales by product and category, average order value, and more.
- Cart & Checkout add-ons
- Cross-sell related products after a customer adds an item to their cart using Cart Add-ons. Then offer upsells like insurance, gift wrapping, and more at checkout using Checkout Add-ons
Order Managements
Nothing is like getting a notification of a successful order being placed but managing and fulfiling the order isn’t as exciting. No worries through because WooCommerce simplifies this process when dealing with order management. Within the dashboard you can review the order process display, for example filtering orders by customer or date along with soting on any of the following with ascending/descending with order number, date or total. In addition with the email customizer you can setup and configure ceamless communcation with customers.
WooCommerce Reporting
Need a second set of eyes on the business growth, marketing strageries, as well as buget playing then you hired the right person, WooCommerce. WooCommerce delievers reporting like order and customer reports that are represeneted in various graph and charts that makes it easier to comprehend.
- Published in blog, E-Commerce
Did someone say Navigation to the rescue: Android Jetpack

If you been around the block a few times with Android development you probably already know that there is an issue with Navigation. If you don’t trust me you will soon find out but don’t worry I am going to let you in on a little hint to overcome many of the challenges that arise doing the development process. Note unless the app you are developing isn’t complex avoid this altogether but let get serious if you are developing for the public it is sure to become more convoluted as you go. Complexity can range from any of the following: Fragment transactions, deep linking to different parts within the app, passing values/arguments securely and safely, and much more. This is where our friend JetPack’s nav component steps in because its purpose brings solutions to the above complexity. From this article, you can expect how to solve those issues.
Terms and Definition to keep
- NavHost
- a container that has any or all the information it may need to handle the navigation actions
- NavController
- This component performs the navigation between destinations,
- NavigationalUI
- This component simply connects the navigation with some material component (for example the BottomNavigationView and DrawerLayout)
Fragment Transactions
With the nav component, there’s no need to manually handle fragment transactions (praise him), and it takes care of everything internally. To successfully go from FragmentA to FragmentB and now all you need to do is call the corresponding navigation action at runtime.
navController.navigate(R.id.actionId)
//or something like this
navController.navigate(R.id.destinationId)
The Back & Up Navigation
With the nav component and using the single activity model, the Activity’s role becomes more of an entry point to the app that delegates the handling of its content rather than being its owner. A NavHost, it is hooked up to the navigation graph which represents the single source of truth, and this where all the destinations, actions, arguments and deep links are defined
When using fragments as destinations, you can use the NavHostFragment class as a NavHost. Let’s take a look at how the activity layout may look like it
<FrameLayout>
    <fragment
         android:id="@+id/mainNavHostFragment"
         android:name="androidx.navigation.fragment.NavHostFragment"
         android:layout_width="match_parent"
         android:layout_height="match_parent"
         app:defaultNavHost="true"
         app:navGraph="@navigation/main_navigation_grah"/>
</FrameLayout
Since the navigation graph is the single source of truth for all navigation within the app, the navigation component does the right thing when the user navigates back or up. Not only does it handles this, but it correctly takes care of things such as the back stack, transactions, pop behavior, and transaction animations.
Passing Data Securely & Safely
If you have ever pass data between Fragments can be tedious as well as error-prone and this is not including the things that can go wrong or at least get confusing while refactoring the code. Ideally, we like to pass and retrieve arguments in an easy manner without having to worry about their keys, and read them safely.
The navigation component brings a solution to this using the Gradle plugin [androidx.navigation.safeargs]. It basically generates some boilerplate code to make any developer’s life easier. As you will see with the example below when a user navigates from FragmentA to FragmentB while passing a mandatory argument and an optional argument. What classes are generated:
-
FragmentADirections.ActionFragmentAToFragmentB
- Inner class with a constructor that takes in the mandatory arguments and setters for the optional arguments
-
FragmentADirections
- Has a method [actionFragmentAToFragmentB] that takes in the mandatory arguments and returns an instance of
FragmentADirections.ActionFragmentAToFragmentB
- Has a method [actionFragmentAToFragmentB] that takes in the mandatory arguments and returns an instance of
-
FragmentBArgs
- Has getters for the different arguments
So to begin, within the navigation graph, the destinations are defined along with the action (this transition is from FragmentA to FragmentB) and the arguments
<fragment
	android:id="@+id/fragmentA"
	android:name="com.test.FragmentA"
	android:label="Fragment A">
	<action
		android:id="@+id/action_FragmentA_to_FragmentB"
		app:destination="@+id/fragmentB"/>

</fragment>

<fragment
	android:id="@+id/fragmentB"
	android:name="com.test.FragmentB"
	android:label="Fragment B">

	<!--Mandatory Argument-->
	<argument
		android:name="id"
		app:argType="integer" <!--Argument Type-->
		/>

	<!--Optional Argument-->
	<argument
		android:name="data"
		android:defaultValue=""
		app:argType="string" <!--Argument Type-->
		/>
</fragment>
In addition, within FragmentA, performs the navigation while passing the arguments.
//creating  a NavDirection instance for the mandatory argument
val directions = FragmentADirections.actionFragmentAToFragementB(10)

// if there is n optional argument you can pass it
directions.setData("")

//Navigate to the new FragmentB
navController.navigate(directions)
Now reading
val id: Int = FragmentBArgs.fromBundle(arguments).id
val data: String = FragmentBArgs.fromBundle(arguments).data
Deep Links
Deep linking inside any application can get complicated as the app get more complex. Issues such as how to structure these deep links, how to pass the required information, and how to build the right back stack arise. In the nav component, deep linking is a first-class citizen, and both types are supported: Explicit () and Implicit ().
-
Explicit
- Used for notifications, app widgets, actions, and slices. Consider these used for pending intent based.
//prepare the arguments to pass to any notification expectation
val arg = Bundle().apply {
    putString("StringKey", "a string value")
    putInt("IntKey", 0)
}

//preparing intent, while selecting the graph & destination
val pendingIndent = NavDeepLinkBuilder(context)
    .setGraph(R.navigation.main_navigation_graph)
    .setDestination(R.id.destinationFragment)
    .setArguments(arg)
    .createPendingIntent()

//prepaing notification
val notification = NotificationCompat.Builder(context, NavigationApplication.NOTIFICATION_CHANNEL_ID)
    .setSmallIcon(R.drawable.notification_icon)
    .setContentTitle("Explicit Deep Link")
    .setContentText("Click on the following notification")
    .setContentIntent(pendingIndent)
    .setAutoCancel(true)
    .build()

//Display notification
NotificationManagerCompat.from(context).notify(10, notification)
-
Implicit
- Used for handling web URLs and custom scheme URIs.
<fragment
    android:id="@+id/destinationFragment"
    android:name="com.example.destinationFragment"
    android:label="@string/title_destination_fragment">
    <action ... />
    <deepLink
        android:id="@+id/custom_scheme_uri_deeplink"
        app:uri="android-app://path/subpath/{data}" />
    <deepLink
        android:id="@+id/web_url_deeplink"
        app:uri="www.husaynhakeem.com/path/subpath" />
</fragment>
Now we need to review the manifest and tweak it a bit. Within the activity tag of the Activity that contains the above destination fragment, the line below needs to be added.
<activity android:name="com.example.Activity">
    <nav-graph android:value="@navigation/main_navigation_graph" />
</activity>
Testing Navigation
The navigation component comes with a dependency just for testing android.arch.navigation:navigation-testing:$nav_version. But unfortunately, there seems to be very little (to say the least) documentation around it online, I wasn’t personally able to find any projects (not even the google sample apps) that use it, and a GoogleIO talk from earlier this year briefly brings up the topic but doesn’t go into any of its details. But the promise is that testing will be developed further in future releases, allowing developers to test their app’s destinations in isolation without worrying about potential issues such as fragment transactions.
All in All
There’s no doubt that the navigation component brings a lot to the table, it has several other great features I didn’t mention in this article such as nesting graphs, methods curated for Kotlin usage -based on extension functions-, and an easy to use navigation graph editor. But despite this, the navigation component seems to leave some open questions unanswered, especially one that’s bugging me: Passing data back to a previous destination (similar to startActivityForResult and onActivityResult).
The navigation component is currently still in Alpha, it’ll be interesting to see how it evolves, and I also look forward to playing with its testing component when there are more resources around it. But for the time being, I think it would be fun to test its limits in a real-world application.
- Published in Android, Java, Kotlin, Programming Languages
Using let or var within Swift

I know I know I know before you say anything I understand this statement is probably ridiculous. However, this topic could aid someone or more likely open the floor to discuss concepts in general so without hesitation, we will dive into it.
let and var so what are they and their differences
As you probably already know both let and var are for creating variables within Swift. Now with let it helps create an immutable variable(s) so consider it a constant but var is used for creating a mutable variable(s). Nonetheless, a variable created by either of them holds a reference or a value.
The difference between the two is that when a developer creates a constant with let the value must be assigned before you can use it. While when you declare a variable with var it can be used before or after an assignment or never use it as well as reassigning it on the fly.
Mutate function parms
function parameters are constants by default. Trying to change their value within the function body results in a compile-time error.
func pokedex(for name: String) {
   name = "charmander"
}

pokedex(for: "mex")

//Line 2 cannot assign to value is let constant
Test: Build & Compile
struct Pokemon {
   var name: String
   let weakness: String
}

let trainerAPokemon = Pokemon(name: "Charmander", weakness: "water")
trainerAPokemon .name = "Bulbasaur"
trainerAPokemon .weakness = "fire"

var trainerBPokemon = Pokemon(name: "Pikachu", weakness: "rock")
trainerBPokemon.name = "Squirtle"
trainerBPokemon.weakness = "electricity"
In the example above we are using a struct. Whenever you try to muate them they get copied with mutation applied to them and reassigned back.
Now let’s review everything within the block. The let variable within the struct cant is mutated as it would mean you are mutating the value of an immutable variable. However, our friend the var variable within the struct can be mutated.
- Line 7
- cannot assign to the property trainerAPokemon because it is a let constant
- Line 8 & 12
- cannot assign to the property weakness because it is a let constant
Test: Build & Compile
class Pokedex {
   var name: Int
   let num: String

   init(name: String, num: Int) {
      self.name = name
      self.num = num
   }
}

let trainerA = Pokedex(name: "Lucario", num: 448)
trainerA.name = "Squirtle"
trainerA.num = 7

var trainerB = Pokedex(name: "Bulbasaur", num: 1)
trainerB.name = "Gengar"
trainerB.num = 94
In the example above we are now using a classes. When attempting to mutate them, the object stored elsewhere in memory gets mutated while the reference to it remains the same.
You can modify a class’s members whether or not the variable referencing it is mutable
- Line 13 & 17
- cannot assign to property num because it is a let constant
- Published in blog, iOS, Programming Languages, Swift
Show/Hide On-Screen Keyboard

Android R is also known as Android 11 release brought a few new APIs to the table and one of them is the new WindowInset which expands the control that we as developers have over the window insets. This includes the navigation and status bar as well as an on-screen keyboard.
This new release provides a direct way to check these state changes that now toggle and listen for changes in the visibility of the window insets. These options now allow the developer to control and react to the animation when the visibility state changes (but this is not going to be covered within this article).
Getting Started
When writing this post, Android 11 been running on more than 1% of devices, but thanks to the magic of AndroidX the APIs are also usable on several other devices with earlier versions. This post focus on using AndroidX implementation but you will find the equivalent APIs to use in documentation.
implementation "androidx.core:core-ktx:1.5.0-alpha05
Now we are going to insert the following code into the build.gradle file, under all the dependencies. (Note: Any version of 1.5.0 or later will work and please check for the latest version. Apply accordingly)
Show/Hide Keyboard
To start we need to access the WindowInsetsController. When the view is passed it doesn’t have to be an EditText directly but can be any view in the same hierarchy as the focused editText.
//note: ci is my shorthand for controllerInsets
val ci = ViewCompat.getWindowInsetsController(view)
Now that we have initialized the view let show the keyboard on the screen:
ci?.show(WindowInsetsCompat.Type.ime())
Let’s hide the keyboard now:
ci?.hide(WindowInsetsCompat.Type.ime())
Keyboard Visibility
If you have ever tried to check the keyboard visibility in the past then you have probably messed with the global layout listeners because there was no other way. Well, hold on to your trousers because finally there is a proper way to do it.
//start by accessing the root window insets
val insets = ViewCompat.getRootWindowInsets(view)

//Now check the visibility of the IME window
insets?.isVisible(WindowInsetsCompat.Type.ime())
Catching Keyboard Changes
To catch the changes with the keyboard visibility, then we have to let the device know that the app is now responsible for the content view of the insets.
//add the following now
WindowCompat.setDecorFitsSystemWindows(window, false)
This will force the view to be drawn behind the on-screen keyboard as well as other system UI, however, now that we are listening for the keyboard changes we can move any other conflicting views accordingly.
Conclusion
Controlling the on-screen keyboard is common in Android development, so the APIs are long overdue. Understand that this now provides us (developers) a more reliable and efficient way to control any type of window insets going forward. Also, note that AndroidX allows us to use these APIs with older Android versions as well.
- Published in Android, Java, Kotlin, Programming Languages
Using Enum w/Swift

understand enum is nothing fancy and all languages have their version of it. Let’s first understand what is enumeration which is a data type consisting of a set of named values also referred to as members. Apple definition states:
An enumeration defines a common type for a group of related values and enables you to work with those values in a type-safe way within your code.
Swift makes enumerations (enums) very flexible and does not have to provide a value for each case. If a “raw” value is provided for each enumeration case, the value can be a string, a character, integer or floating-point type.
Enum Syntax
implementing enumerations is done with enum keyword and place the definition within your implementation.
enum EnumImplementation {

    // place enum definition
}
//Enum Type Example
enum PokemonGender :String {
    case male
    case female
}
//Enum No Type Example
enum PokemonGender {
    case male
    case female
}
We have created some defined values within the enumeration which are Male and Female and they are now enumeration cases. Use the case keyword to introduce new enumeration cases.
Note: alternative implementation does exist.
Each enumeration definition defines a brand new type. Obviously naming conventions should be respects so names starting with capital letter.
Moving on we can now set a variable to the enum case: var gender: PokemonGender = PokemonGender.male or we can shorten it to var gender = PokemonGender.male
Enums Partying w/Switch Statements
Note: When using enums with switch statements there is no need to use a default case because all the possible enums members are taken care of. This way our enums just needs to be checked an and if all the membeers of the enum are exhuasted then create a default case.
switch gender {
   case .male: print("Gender is male")
   case .female: print("Gender is female")
   //a default case is not needed
}
Defined Values:
Enum case cannot have a raw value if the enum doesn’t have a raw type
Note: enum defined type cannot have other datatypes within the cases
enum PokemonGender {

    //wrong(error): enum case cannot have a raw value if the enum does not have a raw type
    case male = 1

    //correct
    case female

}
You could use enum with defined values if enum is having a “raw” type:
enum PokemonType: Int{

    case Fire = 1, Water, Grass
}
This now enumerates the values and assigns the pokemon their type. Note that with this declaration we have also added the var type after the name enum. To get the value stored in that in the enum member, you need to access its rawValue property as println("Result -> \(type.Water.rawValue)") //prints "2"
Now let’s consider the above enum of Pokemon Type. If fire equals 1, water is given a value of 3, and if grass is not given any value, then the raw value of grass will give you 4
Enum PokemonType: Int {

    case Fire = 1, Water = 3, Grass
}

print(PokemonType.Grass) //prints "4"
Methods and Enum
You may be thinking that enums and methods are foreign friends but that is not the case. Enums can have methods that use enum cases:
enum DOTW:String {

   case Sunday
   case Monday
   case Tuesday
   case Wednesday
   case Thursday
   case Friday
   case Saturday

   func day() ->String {
      return self.rawValue
   }

}

print(DOTW.Monday.day()) //prints Monday
Important: Enums can have methods, subscripts, and computed properties. But it cannot have stored properties
- Published in iOS, Programming Languages, Swift
Shimmering in Android
You may or may not have been aware of certain UX effects within the Facebook application that fires when attempting to retrieve a large amount of data from the network. This library was created by the developers over at Facebook so big shout out to their developer team. This library serves to provide an alternative method of notifying the user that data is being retrieved rather than using the old traditional ProgressBar. There is no surprise that later on Facebook released an open-source library called shimmer which any developer can now implement the shimmer effect.
In this article, we are demonstrating how to execute the shimmer in any android application. We are going to attempt to fetch data from the API using the dependency Fast Android Networking and then display the data in the recycler view. So let’s get to what you’re interested in the code.
Begining the Application
So fire up the Android Studio and create a new project:
- Select Empty Acivity and select next
- Name: Application Name
- Package Name: com.programmingninja.applicationame
- Language: Kotlin
- Minimum SDK: API 19
- “FINISH”
Adding ‘Dependencies’
Add the following dependencies in your app level build.gradle and sync
dependencies {
    implementation fileTree(dir: "libs", include: ["*.jar"])
    implementation "org.jetbrains.kotlin:kotlin-stdlib:$kotlin_version"
    implementation 'androidx.core:core-ktx:1.3.1'
    implementation 'androidx.appcompat:appcompat:1.1.0'
    implementation 'androidx.constraintlayout:constraintlayout:1.1.3'
    implementation 'androidx.recyclerview:recyclerview:1.2.0-alpha05'
    implementation 'com.github.bumptech.glide:glide:4.11.0'
    testImplementation 'junit:junit:4.12'
    androidTestImplementation 'androidx.test.ext:junit:1.1.1'
    androidTestImplementation 'androidx.test.espresso:espresso-core:3.2.0'

    //adding dependencies
    implementation 'com.github.bumptech.glide:glide:4.11.0'
    implementation 'com.facebook.shimmer:shimmer:0.5.0@aar'
    implementation 'com.amitshekhar.android:android-networking:1.0.2'
    implementation 'androidx.recyclerview:recyclerview:1.2.0-alpha05'
}
Within the ‘values’ folder need to add the color code to use in the application. Note adding this background color should be grey or any non-white color since the shimmering effect won’t be visible if you are using a white background.
<color name="colorGrey">#dddddd</color>
Find the AndroidManifest file and add the following permission within the <manifest></manifest> block
<uses-permission android:name="android.permission.INTERNET" />
To give you some background on the dependencies we add the first is for the media management for loading images. Then we have the Facebook shimmering dependency along with Fast-Android-Networking and using the recyclerview in the project.
Now we are going to create a new layout called layout_item.xml within the layout folder. Please add the following code:
<?xml version="1.0" encoding="utf-8"?>
<androidx.constraintlayout.widget.ConstraintLayout xmlns:android="http://schemas.android.com/apk/res/android"
    xmlns:tools="http://schemas.android.com/tools"
    android:layout_width="match_parent"
    android:layout_height="wrap_content"
    xmlns:app="http://schemas.android.com/apk/res-auto"
    android:id="@+id/item_container">

    <androidx.appcompat.widget.AppCompatImageView
        android:layout_width="60dp"
        android:layout_height="60dp"
        android:id="@+id/img_item_avatar"
        android:padding="4dp"
        app:layout_constraintTop_toBottomOf="parent"
        app:layout_constraintStart_toStartOf="parent"
        app:layout_constraintBottom_toTopOf="parent" />

    <androidx.appcompat.widget.AppCompatTextView
        android:layout_width="0dp"
        android:layout_height="wrap_content"
        android:id="@+id/tv_item_id"
        style="@style/TextAppearance.AppCompat.Medium"
        android:layout_marginStart="8dp"
        android:layout_marginTop="4dp"
        app:layout_constraintEnd_toEndOf="parent"
        app:layout_constraintStart_toEndOf="@+id/img_item_avatar"
        app:layout_constraintTop_toTopOf="parent"
        tools:text="Pokemon No" />

    <androidx.appcompat.widget.AppCompatTextView
        android:layout_width="0dp"
        android:layout_height="wrap_content"
        android:id="@+id/tv_item_name"
        style="@style/TextAppearance.AppCompat.Large"
        android:layout_marginStart="8dp"
        android:layout_marginTop="4dp"
        app:layout_constraintEnd_toEndOf="parent"
        app:layout_constraintStart_toStartOf="@id/tv_item_id"
        app:layout_constraintTop_toBottomOf="@id/tv_item_id"
        tools:text="Pokemon Name" />

    <androidx.appcompat.widget.AppCompatTextView
        android:layout_width="0dp"
        android:layout_height="wrap_content"
        android:id="@+id/tv_item_email"
        app:layout_constraintEnd_toEndOf="parent"
        app:layout_constraintStart_toStartOf="@id/tv_item_name"
        app:layout_constraintTop_toBottomOf="@id/tv_item_name"
        tools:text="Pokemon Attribute" />
</androidx.constraintlayout.widget.ConstraintLayout>
Now create another layout within the folder called layout_shimmer and then add the following code:
<?xml version="1.0" encoding="utf-8"?>
<androidx.constraintlayout.widget.ConstraintLayout
    xmlns:android="http://schemas.android.com/apk/res/android"
    xmlns:app="http://schemas.android.com/apk/res-auto"
    xmlns:tools="http://schemas.android.com/tools"
    android:id="@+id/shimmer_container"
    android:layout_width="match_parent"
    android:layout_height="60dp">

    <androidx.appcompat.widget.AppCompatImageView
        android:layout_width="60dp"
        android:layout_height="0dp"
        android:id="@+id/img_shim_avatar"
        android:background="@color/colorGrey"
        android:padding="4dp"
        app:layout_constraintBottom_toBottomOf="parent"
        app:layout_constraintStart_toStartOf="parent"
        app:layout_constraintBottom_toTopOf="parent" />

    <androidx.appcompat.widget.AppCompatTextView
        android:layout_width="0dp"
        android:layout_height="wrap_content"
        android:id="@+id/tv_shim_id"
        android:background="@color/colorGrey"
        style="@style/TextAppearance.AppCompat.Medium"
        android:layout_marginStart="8dp"
        android:layout_marginTop="4dp"
        app:layout_constraintEnd_toEndOf="parent"
        app:layout_constraintTop_toTopOf="parent"
        app:layout_constraintStart_toEndOf="@+id/img_shim_avatar"
        tools:text="#025" />

    <androidx.appcompat.widget.AppCompatTextView
        android:layout_width="0dp"
        android:layout_height="wrap_content"
        android:id="@+id/tv_shim_name"
        android:background="@color/colorGrey"
        style="@style/TextAppearance.AppCompat.Large"
        android:layout_marginStart="8dp"
        android:layout_marginTop="4dp"
        app:layout_constraintEnd_toEndOf="parent"
        app:layout_constraintStart_toStartOf="@+id/tv_shim_id"
        app:layout_constraintTop_toBottomOf="@id/tv_shim_id"
        tools:text="Pikachu" />

    <androidx.appcompat.widget.AppCompatTextView
        android:layout_width="0dp"
        android:layout_height="wrap_content"
        android:id="@+id/tv_shim_email"
        android:background="@color/colorGrey"
        app:layout_constraintEnd_toEndOf="parent"
        app:layout_constraintStart_toStartOf="@+id/tv_shim_name"
        app:layout_constraintTop_toBottomOf="@id/tv_shim_name"
        tools:text="Electric"/>

</androidx.constraintlayout.widget.ConstraintLayout>
Let’s tackle the activity_main.xml in the layout folder and add the below code but before adding let’s provide some context to the XML:
- We are going to add the ShimmerFrameLayout
- Within the shimmerframelayout we are going to add some placeholders inside a LinearLayout.
- Note: that the added placeholder displays multiple times to create the appearance as a list
Then we will add a recyclerview that will display the list of data fetched after executing the network request from the API.
<?xml version="1.0" encoding="utf-8"?>
<androidx.constraintlayout.widget.ConstraintLayout
    xmlns:android="http://schemas.android.com/apk/res/android"
    xmlns:app="http://schemas.android.com/apk/res-auto"
    xmlns:tools="http://schemas.android.com/tools"
    android:layout_width="match_parent"
    android:layout_height="match_parent"
    tools:context=".MainActivity">

    <com.facebook.shimmer.ShimmerFrameLayout
        android:layout_width="match_parent"
        android:layout_height="match_parent"
        android:id="@+id/frame_shimmer"
        android:orientation="vertical"
        android:layout_gravity="center">
        <!-- Add 20 Placeholder -->
        <androidx.appcompat.widget.LinearLayoutCompat
            android:layout_width="match_parent"
            android:layout_height="wrap_content"
            android:orientation="vertical">
            <include layout="@layout/layout_shimmer" />
            <include layout="@layout/layout_shimmer" />
            <include layout="@layout/layout_shimmer" />
            <include layout="@layout/layout_shimmer" />
            <include layout="@layout/layout_shimmer" />
            <include layout="@layout/layout_shimmer" />
            <include layout="@layout/layout_shimmer" />
            <include layout="@layout/layout_shimmer" />
            <include layout="@layout/layout_shimmer" />
            <include layout="@layout/layout_shimmer" />
            <include layout="@layout/layout_shimmer" />
            <include layout="@layout/layout_shimmer" />
            <include layout="@layout/layout_shimmer" />
            <include layout="@layout/layout_shimmer" />
            <include layout="@layout/layout_shimmer" />
            <include layout="@layout/layout_shimmer" />
            <include layout="@layout/layout_shimmer" />
            <include layout="@layout/layout_shimmer" />
            <include layout="@layout/layout_shimmer" />
            <include layout="@layout/layout_shimmer" />
        </androidx.appcompat.widget.LinearLayoutCompat>
    </com.facebook.shimmer.ShimmerFrameLayout>

    <androidx.recyclerview.widget.RecyclerView
        android:layout_width="match_parent"
        android:layout_height="match_parent"
        android:id="@+id/list_view"
        android:visibility="gone" />

</androidx.constraintlayout.widget.ConstraintLayout>
Create we need to create a data class User:
import com.google.gson.annotations.SerializedName

data class User (
    @SerializedName("id")
    val id: Int = 0,
    @SerializedName("name")
    val name: String = "",
    @SerializedName("email")
    val email: String = "",
    @SerializedName("avatar")
    val avatar: String = ""
)
Then create an adapater to c
import android.view.LayoutInflater
import android.view.View
import android.view.ViewGroup
import androidx.appcompat.view.menu.ActionMenuItemView
import androidx.recyclerview.widget.RecyclerView
import com.bumptech.glide.Glide
import com.programmingninja.crius.R
import kotlinx.android.synthetic.main.layout_item.view.*

class Adapter(private val users: ArrayList<User>) : RecyclerView.Adapter<Adapter.DataViewHolder>() {
    class DataViewHolder(itemView: View) : RecyclerView.ViewHolder(itemView) {
        fun bind(user: User) {
            itemView.tv_item_id.text = "No: ${user.id}"
            itemView.tv_item_name.text = "Hello: ${user.name}"
            itemView.tv_item_email.text = "E: ${user.email}"
            Glide.with(itemView.img_item_avatar.context).load(user.avatar).into(itemView.img_item_avatar)
        }
    }

    override fun onCreateViewHolder(parent: ViewGroup, viewType: Int) = DataViewHolder(LayoutInflater.from(parent.context).inflate(R.layout.layout_item, parent, false))

    override fun getItemCount(): Int = users.size

    override fun onBindViewHolder(holder: DataViewHolder, position: Int) {
        holder.bind(users[position])
    }

    fun addData(list: List<User>) {
        users.addAll(list)
    }
}
After completing the adapter now select your MainActivity and now time to complete the following kt file:
To keep in mind to start the shimmering effect as soon as the application opens, we add the startShimmer() within the onResume() activity lifecycle and then we stop it with stopShimmer() within the onPause() activity lifecycle method.
import androidx.appcompat.app.AppCompatActivity
import android.os.Bundle
import android.view.View
import android.widget.Toast
import androidx.recyclerview.widget.DividerItemDecoration
import androidx.recyclerview.widget.LinearLayoutManager
import com.androidnetworking.AndroidNetworking
import com.androidnetworking.error.ANError
import com.androidnetworking.interfaces.ParsedRequestListener
import com.programmingninja.crius.helper.Adapter
import com.programmingninja.crius.helper.User
import kotlinx.android.synthetic.main.activity_main.*

class MainActivity : AppCompatActivity() {

    private lateinit var adapter: Adapter

    override fun onCreate(savedInstanceState: Bundle?) {
        super.onCreate(savedInstanceState)
        setContentView(R.layout.activity_main)
        setupUI()
        setAPICall()
    }

    private fun setAPICall() {
        AndroidNetworking.initialize(applicationContext)
        AndroidNetworking.get("https://5e510330f2c0d300147c034c.mockapi.io/users").build()
            .getAsObjectList(User::class.java, object : ParsedRequestListener<List<User>> {
                override fun onResponse(responses: List<User>) {
                    frame_shimmer.stopShimmer()
                    frame_shimmer.visibility = View.GONE
                    list_view.visibility = View.VISIBLE
                    adapter.addData(responses)
                    adapter.notifyDataSetChanged()
                }

                override fun onError(anError: ANError?) {
                    frame_shimmer.visibility = View.GONE
                    Toast.makeText(this@MainActivity, "Something went wrong", Toast.LENGTH_LONG).show()
                }
            })
    }

    private fun setupUI() {
        list_view.layoutManager = LinearLayoutManager(this)
        adapter = Adapter(arrayListOf())
        list_view.addItemDecoration(DividerItemDecoration(list_view.context,(list_view.layoutManager as LinearLayoutManager).orientation))
        list_view.adapter = adapter
    }

    override fun onResume() {
        super.onResume()
        frame_shimmer.startShimmer()
    }

    override fun onPause() {
        frame_shimmer.stopShimmer()
        super.onPause()

    }
}
Take forcus on the following code below to stop the shimmering effect and get the recyclerview to become visible after the network request is executed and data populate in the recyclerview
override fun onResponse(responses: List<User>) {
    frame_shimmer.stopShimmer()
    frame_shimmer.visibility = View.GONE
    list_view.visibility = View.VISIBLE
    adapter.addData(responses)
    adapter.notifyDataSetChanged()
}
Done
This is all that is needed to fire the application. Hope you enjoyed the read if you need anything else message me for additional assistance.
Happy Learning!!
- Published in Android, Kotlin, Programming Languages
Android, SQLite & Kotlin

The name of the database in Android is SQLite. SQLite is the name of the open-source sql database that stores the data in the text file in the device. Here, we will be review and explaining how to execute them with the Kotlin language.
Before diving into the implementation we are going to review a little in details regarding the SQLite class. There are many methods available in the SQLiteDatabase class but the ones we will use are below
| Method | Description |
| execSQL(): Unit | Executes the SQL query, this is not to be mistaken for a select query |
| insert(): Long | Insert a record into the database |
| update(): Int | Fires the update request on a select row |
| delete(): | |
| query(): Cursor | Returns a cursor over the resultset |
HandlerDB
First we are going to create a class that extends to the SQLiteOpenHelper and override its onCreate(), onUpgrade() functions.
- CreatePerson – will insert the data by passing the ContentvValues to object to the insert() method
- UpdatePerson – will update the record by passining the ContentValues to the update() method
- DeletePerson – will delete the record by passing the Content
- ViewPerson – Will create a list adding the records to return to the view
package com.programmingninja.coeus.helper

import android.content.ContentValues
import android.content.Context
import android.database.Cursor
import android.database.sqlite.SQLiteDatabase
import android.database.sqlite.SQLiteException
import android.database.sqlite.SQLiteOpenHelper
import com.programmingninja.coeus.model.PersonModel
import java.time.LocalDateTime

import kotlin.collections.ArrayList

class HandlerDB (context: Context): SQLiteOpenHelper(context, DATABASE_NAME,null,DATABASE_VERSION) {
    companion object {
        private val DATABASE_VERSION = 1
        private val DATABASE_NAME = "ProjectTitan"
        private val TABLE_NAME = "Person"
        private val KEY_ID = "userid"
        private val KEY_USERNAME = "username"
        private val KEY_FIRST_NAME = "firstname"
        private val KEY_LAST_NAME = "lastname"
    }

    override fun onCreate(db: SQLiteDatabase?) {
        //creating the table and columns
        val CREATE_PERSON_TABLE = ("CREATE TABLE $TABLE_NAME (" +
                "$KEY_ID TEXT PRIMARY KEY," +
                "$KEY_USERNAME TEXT," +
                "$KEY_FIRST_NAME TEXT," +
                "$KEY_LAST_NAME TEXT," +
                "timestamp DEFAULT CURRENT_TIMESTAMP)")
        db?.execSQL(CREATE_PERSON_TABLE)
    }

    override fun onUpgrade(db: SQLiteDatabase?, oldVersion: Int, newVersion: Int) {
        db!!.execSQL("DROP TABLE IF EXISTS $TABLE_NAME")
    }

    //method to read data
    fun ViewPerson(): List<PersonModel> {
        val personList:ArrayList<PersonModel> = ArrayList()
        val personCandidates = "SELECT * FROM $TABLE_NAME"
        val db = this.readableDatabase

        val cursor: Cursor?
        try {
            cursor = db.rawQuery(personCandidates, null)
        } catch (e: SQLiteException) {
            db.execSQL(personCandidates)
            return ArrayList()
        }

        var userId: String
        var userName: String
        var fName: String
        var lName: String

        if (cursor.moveToFirst()) {
            do {
                userId = cursor.getString(cursor.getColumnIndex("userid"))
                userName = cursor.getString(cursor.getColumnIndex("username"))
                fName = cursor.getString(cursor.getColumnIndex("firstname"))
                lName = cursor.getString(cursor.getColumnIndex("lastname"))

                val person = PersonModel(userId = userId, userName = userName, fName = fName, lName = lName)
                personList.add(person)
            } while (cursor.moveToNext())
        }
        return personList
    }

    //method to create data
    fun CreatePerson(person: PersonModel): Long {
        val db = this.writableDatabase
        val cv = ContentValues()
        cv.put(KEY_ID, person.userId)
        cv.put(KEY_USERNAME, person.userName)
        cv.put(KEY_FIRST_NAME, person.fName)
        cv.put(KEY_LAST_NAME, person.lName)

        //now insert into the db
        val successfulInsert = db.insert(TABLE_NAME, null, cv)
        db.close()
        return successfulInsert
    }

    //method to update data

    fun UpdatePerson(person: PersonModel): Int {
        val db = this.writableDatabase
        val cv = ContentValues()

        cv.put(KEY_USERNAME, person.userName)
        cv.put(KEY_FIRST_NAME, person.fName)
        cv.put(KEY_LAST_NAME, person.lName)

        val whereClause = "${KEY_ID} = ?"
        val whereArgs = arrayOf(person.userId.toString())

        //attempt to update the record
        val successfulUpdate = db.update(TABLE_NAME, cv, whereClause, whereArgs)
        db.close()
        return successfulUpdate
    }

    //method to delete data
    fun DeletePerson(person: PersonModel): Int {
        val db = this.writableDatabase
        val cv = ContentValues()
        cv.put(KEY_ID, person.userId)

        val whereClause = "${KEY_ID} = ?"
        val whereArg = arrayOf(person.userId.toString())
        //delete candidate
        val successfulDelete = db.delete(TABLE_NAME, whereClause, whereArg)
        db.close()
        return successfulDelete
    }
}
activity_main.xml
Now we are going to work on the main xml layout. This is going to be the main display the user interacts with
<?xml version="1.0" encoding="utf-8"?>
<androidx.constraintlayout.widget.ConstraintLayout
    xmlns:android="http://schemas.android.com/apk/res/android"
    xmlns:app="http://schemas.android.com/apk/res-auto"
    xmlns:tools="http://schemas.android.com/tools"
    android:layout_width="match_parent"
    android:layout_height="match_parent"
    tools:context=".MainActivity">

    <androidx.appcompat.widget.LinearLayoutCompat
        android:layout_width="match_parent"
        android:layout_height="match_parent"
        android:layout_marginBottom="8dp"
        android:layout_marginEnd="8dp"
        android:layout_marginStart="8dp"
        android:layout_marginTop="8dp"
        android:orientation="vertical">

        <TableLayout
            android:layout_width="match_parent"
            android:layout_height="wrap_content">
            <TableRow>
                <androidx.appcompat.widget.AppCompatTextView
                    android:layout_width="wrap_content"
                    android:layout_height="wrap_content"
                    android:hint="User ID"
                    android:layout_column="1"/>
                <androidx.appcompat.widget.AppCompatTextView
                    android:layout_width="wrap_content"
                    android:layout_height="wrap_content"
                    android:id="@+id/tv_userId"
                    android:layout_marginLeft="20dp"
                    android:layout_marginStart="20dp"
                    android:width="150dp"/>
            </TableRow>
            <TableRow>
                <androidx.appcompat.widget.AppCompatTextView
                    android:layout_width="wrap_content"
                    android:layout_height="wrap_content"
                    android:hint="Username"
                    android:layout_column="1"/>
                <androidx.appcompat.widget.AppCompatEditText
                    android:layout_width="match_parent"
                    android:layout_height="wrap_content"
                    android:id="@+id/et_userName"
                    android:layout_marginLeft="20dp"
                    android:layout_marginStart="20dp"
                    android:width="150dp"/>
            </TableRow>
            <TableRow>
                <androidx.appcompat.widget.AppCompatTextView
                    android:layout_width="wrap_content"
                    android:layout_height="wrap_content"
                    android:hint="First Name"
                    android:layout_column="1"/>
                <androidx.appcompat.widget.AppCompatEditText
                    android:layout_width="match_parent"
                    android:layout_height="wrap_content"
                    android:id="@+id/et_fName"
                    android:layout_marginLeft="20dp"
                    android:layout_marginStart="20dp"
                    android:width="150dp"/>
            </TableRow>
            <TableRow>
                <androidx.appcompat.widget.AppCompatTextView
                    android:layout_width="wrap_content"
                    android:layout_height="wrap_content"
                    android:hint="Last Name"
                    android:layout_column="1"/>
                <androidx.appcompat.widget.AppCompatEditText
                    android:layout_width="match_parent"
                    android:layout_height="wrap_content"
                    android:id="@+id/et_lName"
                    android:layout_marginLeft="20dp"
                    android:layout_marginStart="20dp"
                    android:width="150dp"/>
            </TableRow>

        </TableLayout>
        <androidx.appcompat.widget.LinearLayoutCompat
            android:layout_width="match_parent"
            android:layout_height="wrap_content"
            android:layout_marginTop="20dp">

            <ListView
                android:id="@+id/listView"
                android:layout_width="wrap_content"
                android:layout_height="350sp"
                android:longClickable="false" />
        </androidx.appcompat.widget.LinearLayoutCompat>

        <androidx.appcompat.widget.LinearLayoutCompat
            android:layout_width="wrap_content"
            android:layout_height="wrap_content"
            android:layout_marginTop="40dp"
            android:orientation="horizontal"
            android:layout_gravity="center">
            <androidx.appcompat.widget.AppCompatButton
                android:layout_width="wrap_content"
                android:layout_height="wrap_content"
                android:text="View"
                android:id="@+id/pressMe"
                android:onClick="ViewRecord" />
            <androidx.appcompat.widget.AppCompatButton
                android:layout_width="wrap_content"
                android:layout_height="wrap_content"
                android:text="Save"
                android:onClick="SaveRecord" />
            <androidx.appcompat.widget.AppCompatButton
                android:layout_width="wrap_content"
                android:layout_height="wrap_content"
                android:text="Update"
                android:onClick="UpdateRecord" />
            <androidx.appcompat.widget.AppCompatButton
                android:layout_width="wrap_content"
                android:layout_height="wrap_content"
                android:text="Delete"
                android:onClick="DeleteRecord" />
        </androidx.appcompat.widget.LinearLayoutCompat>
    </androidx.appcompat.widget.LinearLayoutCompat>
</androidx.constraintlayout.widget.ConstraintLayout>
Update Person Alert
//creat the layout to display an alertdialog to update request item
<?xml version="1.0" encoding="utf-8"?>
<LinearLayout xmlns:android="http://schemas.android.com/apk/res/android"
    android:layout_width="match_parent"
    android:layout_height="match_parent"
    android:padding="10dp"
    android:orientation="vertical">

    <androidx.appcompat.widget.AppCompatTextView
        android:layout_width="match_parent"
        android:layout_height="wrap_content"
        android:id="@+id/tv_userId_update"
        android:ems="10"
        android:text="User Id"/>

    <androidx.appcompat.widget.AppCompatEditText
        android:layout_width="match_parent"
        android:layout_height="wrap_content"
        android:id="@+id/et_nameUser_update"
        android:ems="10"
        android:hint="username"/>

    <androidx.appcompat.widget.AppCompatEditText
        android:layout_width="match_parent"
        android:layout_height="wrap_content"
        android:id="@+id/et_firstname_update"
        android:ems="10"
        android:hint="first name"/>

    <androidx.appcompat.widget.AppCompatEditText
        android:layout_width="match_parent"
        android:layout_height="wrap_content"
        android:id="@+id/et_lastname_update"
        android:ems="10"
        android:hint="Last Name"/>
</LinearLayout>
Delete Person Alert
<?xml version="1.0" encoding="utf-8"?>
<LinearLayout xmlns:android="http://schemas.android.com/apk/res/android"
    android:layout_width="match_parent"
    android:layout_height="match_parent"
    android:orientation="vertical"
    android:padding="10dp">

    <androidx.appcompat.widget.AppCompatTextView
        android:layout_width="match_parent"
        android:layout_height="wrap_content"
        android:id="@+id/tv_userId_delete"
        android:textSize="20dp"
        android:text="userid" />

    <androidx.appcompat.widget.AppCompatTextView
        android:layout_width="match_parent"
        android:layout_height="wrap_content"
        android:id="@+id/tv_Name_delete"
        android:textSize="20dp"
        android:text="Name"/>

</LinearLayout>
MainActivity.kt
Now we are focusing on the MainActivity.kt class and we are going to add the following code. In this class, the following functions are going to be added:
- saveRecord() function which creates the records.
- viewRecord() function will read all the records and displays them into ListView,
- updateRecord() function updates the record on the basis on id, and
- deleteRecord() function deletes the record.
The val db = DatabaseHandler(this) creates the instance of HandlerDB class calls the SQLite database logic.
package com.programmingninja.coeus

import android.content.DialogInterface
import androidx.appcompat.app.AppCompatActivity
import android.os.Bundle
import android.view.View
import android.widget.AdapterView
import android.widget.EditText
import android.widget.TextView
import android.widget.Toast
import androidx.appcompat.app.AlertDialog
import androidx.appcompat.widget.AppCompatButton
import androidx.appcompat.widget.AppCompatEditText
import androidx.appcompat.widget.AppCompatTextView
import com.programmingninja.coeus.helper.HandlerDB
import com.programmingninja.coeus.helper.MyListadapter
import com.programmingninja.coeus.model.PersonModel
import kotlinx.android.synthetic.main.activity_main.*
import kotlinx.android.synthetic.main.activity_main.view.*
import kotlinx.android.synthetic.main.update_person.*
import java.util.*

class MainActivity : AppCompatActivity() {
    override fun onCreate(savedInstanceState: Bundle?) {
        super.onCreate(savedInstanceState)
        setContentView(R.layout.activity_main)
    }

    //method for reviewing records
    fun ViewRecord (view:View) {
        //creating the instance of the db handler
        val dbHandler = HandlerDB(this)
        //calling the person view
        val person: List<PersonModel> = dbHandler.ViewPerson()
        val personArrayId = Array<String>(person.size){"0"}
        val personArrayUsername = Array<String>(person.size){""}
        val personArrayFirst = Array<String>(person.size){""}
        val personArrayLast = Array<String>(person.size){""}

        for ((index, p) in person.withIndex()) {
            personArrayId[index] = p.userId
            personArrayUsername[index] = p.userName
            personArrayFirst[index] = p.fName
            personArrayLast[index] = p.lName
        }
        //creating custom adapter
        val listAdapter = MyListadapter(this, personArrayId, personArrayUsername, personArrayFirst, personArrayLast)
        listView.adapter = listAdapter
        listView.onItemClickListener = AdapterView.OnItemClickListener {
                adapterView, view, position, id ->
            //Toast.makeText(applicationContext, "${person[position].userId}",Toast.LENGTH_LONG).show()
            UpdateRecord(person[position].userId)
        }
        listView.onItemLongClickListener = AdapterView.OnItemLongClickListener {
            adapterView, view, position, l ->
            DeleteRecord(person[position].userId, person[position].fName + " " +  person[position].lName)
        }
    }
    //method for deleting a record
     fun DeleteRecord(deleteUserId: String, deleteUserName: String): Boolean {
        //create AlertDisplay
        val alertDialog = AlertDialog.Builder(this)
        val inflater = this.layoutInflater
        val dv = inflater.inflate(R.layout.delete_person, null)

        alertDialog.setView(dv)

        val delete_id = dv.findViewById<AppCompatTextView>(R.id.tv_userId_delete)
        val delete_name = dv.findViewById<AppCompatTextView>(R.id.tv_Name_delete)
        delete_id.text = deleteUserId
        delete_name.text = deleteUserName
        val deletePersonId = delete_id.text

        alertDialog.setTitle("Delete User")
        alertDialog.setMessage("Are you sure you want to delete the user")
        alertDialog.setPositiveButton("Yes, Delete", DialogInterface.OnClickListener { _,_->
            //creating the instance of the handler
            val db = HandlerDB(this)

            //calling the delete method within the handler
            val status = db.DeletePerson(PersonModel(deletePersonId.toString(),"","",""))
            if (status > -1) {
                Toast.makeText(applicationContext, "User has been deleted", Toast.LENGTH_LONG).show()
                val buttonPress = findViewById<AppCompatButton>(R.id.pressMe)
                buttonPress.performClick()
            }
        })

        alertDialog.setNegativeButton("Cancel", DialogInterface.OnClickListener { _, _->

        })
        val b = alertDialog.create()
        b.show()
        return false
    }

    //method for updating a record
     fun UpdateRecord(updatingUser: String) {
        val alertBuilder = AlertDialog.Builder(this)
        val inflater = this.layoutInflater
        val dv = inflater.inflate(R.layout.update_person, null)
        val uPersonUserId = dv.findViewById(R.id.tv_userId_update) as AppCompatTextView
        val uPersonUsername = dv.findViewById(R.id.et_nameUser_update) as AppCompatEditText
        val uPersonFirstName = dv.findViewById<AppCompatEditText>(R.id.et_firstname_update)
        val uPersonLastName = dv.findViewById(R.id.et_lastname_update) as AppCompatEditText
        uPersonUserId.text = updatingUser
        val updatePersonId = uPersonUserId.text
        val updatePersonUsername = uPersonUsername.text
        val updatePersonFirst = uPersonFirstName.text
        val updatePersonLast = uPersonLastName.text

        alertBuilder.setTitle("Update Person")
        alertBuilder.setMessage("Update person data")
        alertBuilder.setPositiveButton("Update", DialogInterface.OnClickListener { _, _->
            //creating an instance of the handler class
            val db = HandlerDB(this)
            if (!updatePersonUsername.isNullOrEmpty() && !updatePersonFirst.isNullOrEmpty() && !updatePersonLast.isNullOrEmpty()) {
                val status = db.UpdatePerson(PersonModel(updatePersonId.toString(), updatePersonUsername.toString(), updatePersonFirst.toString(), updatePersonLast.toString()))

                if (status>-1) {
                    Toast.makeText(applicationContext,"Record Update", Toast.LENGTH_LONG).show()
                    val buttonPress = findViewById<AppCompatButton>(R.id.pressMe)
                    buttonPress.performClick()
                }
            } else {
                Toast.makeText(applicationContext, "username, first and last name required", Toast.LENGTH_LONG).show()
            }
        })

        alertBuilder.setNegativeButton("Cancel", DialogInterface.OnClickListener { di, which ->  })
        alertBuilder.setView(dv)
        val b = alertBuilder.create()
        b.show()
    }

    //method for saving the records
    fun SaveRecord (view: View) {
        val id = UUID.randomUUID()
        val uName = et_userName.text.toString()
        val fName = et_fName.text.toString()
        val lName = et_lName.text.toString()
        val db_handler: HandlerDB = HandlerDB(this)

        if (uName.trim().isNotEmpty() || fName.trim().isNotEmpty() || lName.trim().isNotEmpty()) {
            val status = db_handler.CreatePerson(PersonModel(id.toString(), uName, fName, lName))
            if (status > -1) {
                Toast.makeText(applicationContext, "Person saved", Toast.LENGTH_LONG).show()
                et_userName.setText("")
                et_fName.setText("")
                et_lName.setText("")
            }
        } else {
            Toast.makeText(applicationContext, "Username, First Name and Last Name is required", Toast.LENGTH_LONG).show()
        }
    }
}
PersonModel.kt
package com.programmingninja.coeus.model

class PersonModel (var userId: String, val userName: String, val fName: String, val lName: String) {
}
custom_list.xml
//create a custom row layout for displauong the list items in the ListView
<?xml version="1.0" encoding="utf-8"?>
<LinearLayout xmlns:android="http://schemas.android.com/apk/res/android"
    android:layout_width="match_parent"
    android:layout_height="match_parent"
    android:orientation="vertical"
    android:id="@+id/lLayout">
    <androidx.appcompat.widget.AppCompatTextView
        android:layout_width="match_parent"
        android:layout_height="wrap_content"
        android:id="@+id/tv_userId"
        android:text="User Id"
        android:textAppearance="@style/TextAppearance.AppCompat.Medium" />

    <androidx.appcompat.widget.AppCompatTextView
        android:layout_width="match_parent"
        android:layout_height="wrap_content"
        android:id="@+id/tv_nameU"
        android:text="Username"
        android:textAppearance="@style/TextAppearance.AppCompat.Medium" />

    <androidx.appcompat.widget.AppCompatTextView
        android:layout_width="match_parent"
        android:layout_height="wrap_content"
        android:id="@+id/tv_nameF"
        android:text="First Name"
        android:textAppearance="@style/TextAppearance.AppCompat.Medium" />

    <androidx.appcompat.widget.AppCompatTextView
        android:layout_width="match_parent"
        android:layout_height="wrap_content"
        android:id="@+id/tv_nameL"
        android:text="Last Name"
        android:textAppearance="@style/TextAppearance.AppCompat.Medium" />

</LinearLayout>
MyListadapter
//Now, we create the adapter that will populate the data model within the listview
package com.programmingninja.coeus.helper

import android.app.Activity
import android.content.Context
import android.view.View
import android.view.ViewGroup
import android.widget.ArrayAdapter
import androidx.appcompat.widget.AppCompatTextView
import com.programmingninja.coeus.R

class MyListadapter (private val context: Activity, private val idUser: Array<String>, private val nameUser: Array<String>, private val userFirst: Array<String>, private val userLast: Array<String>)
    : ArrayAdapter<String>(context, R.layout.custom_list, nameUser)
{
    override fun getView(position: Int, view: View?, parent: ViewGroup): View {
        val inflater = context.layoutInflater
        val rowView = inflater.inflate(R.layout.custom_list, null, true)

        val idUserTxt =  rowView.findViewById(R.id.tv_userId) as AppCompatTextView
        val nameUserTxt =  rowView.findViewById(R.id.tv_nameU) as AppCompatTextView
        val nameFTxt =  rowView.findViewById(R.id.tv_nameF) as AppCompatTextView
        val nameLTxt =  rowView.findViewById(R.id.tv_nameL) as AppCompatTextView

        idUserTxt.text = "User Id: ${idUser[position]}"
        nameUserTxt.text = "Username: ${nameUser[position]}"
        nameFTxt.text = "First Name: ${userFirst[position]}"
        nameLTxt.text = "Last Name: ${userLast[position]}"
        return rowView
    }
}
- Published in Android, Kotlin, Programming Languages
When over Switch in Kotlin

Good afternoon Programming Community, I am glad to welcome you to another Kotlin edition. we will look upon the replacement of switch with the when keyword. Firstly, we will look on to some examples of switch and after that, we will look at how the when keyword makes our task or code easier and more understandable. So, let’s get started.
Standard Conditional
if (number == 1) {
   println("value: 1")
} else if (nummber == 2) {
   println("value: 2")
} else if (number == 3) {
   println("value: 3")
} else if (number == 4) {
   println("value 4")
} else {
   println("value greater 5")
}
A traditional switch is basically just a statement that can substitute a series of simple if/else that make basic checks as displayed above. However it cannot replace all sort of if/else sequences but just those which compare a value with some constant. So, you can only use a switch to perform an action when one specific variable has a certain precise value.
To remove this difficulty, switch-case was introduced, where we pass the variable to be compared with-in the switch statement (in our example, that variable is number) and compare it with various case statements present corresponding to it and do the operation.
‘switch’
switch (number) {
   case 1:
      println("value: 1")
      break;
   case 2:
      println("value: 2")
      break;
   case 3:
      println("value: 3")
      break;
   case 4:
      println("value: 4")
      break;
   default:
      println("value greater 5")
      break;
}
So, in the above code in order to print the numbers in word, you have to use various conditional statements and this results in a large number of lines of code. Think of a situation when you have to print the words representation of numbers up to 100 or 1000. If you are using conditional statements then you have to use 1000 conditional statements.
In the above code, number is passed in switch statement and cases are used to compare that number. For example, if the number is 1 then case 1 will be executed, if number is 2 then case 2 will be executed and so on. But if the number is not equal to any of the case present then the default block will be executed.
‘when’
when {
   number == 1 -> {
       println("value: 1")
   }
   nummber == 2 -> {
       println("value: 2")
   }
   number == 3 -> {
       println("value: 3")
   }
   number == 4 -> {
       println("value 4")
   }
   else -> {
       println("value greater 5")
   }
}
So, if you are moving from Java to Kotlin, then you will find some changes in the syntax part also. In Java we use switch but in Kotlin, that switch gets converted to when. when is also used for conditional representation but it does the things in a very smarter and easier way. Whenever you are having a number of possibilities then you can use when in your code.
In the above code, like in switch, the number is passed in when and then we compare that number with various options available. In our case, if the number == 1, then “one” will be printed and so on. If more than one match is found then the match that occurs first will be considered only. If no match to the number is found then the else part will be executed.
When in doubt use ‘when’
- no complex case/break groups, only the condition followed by ->
- it can group two or more equivalent choices, separating them with a comma
Wrapping Things Up
we learned how to use when in place of switch in Kotlin. We saw that, if we are having a number of possibilities for a particular variable then we can make use of when to handle all the possibilities. Also, we can use when for multiple or more than one choices.
- Published in Android, Kotlin, Programming Languages
Identifiers & Keywords

Identifiers C#
Identifiers are the name given to entities such as variables, methods, classes, etc. They are tokens in a program which uniquely identify an element. For example,
int value
From code above value is the variable which is why we call it the identifier. As you will find out later int is consider a “reserved” keyword so should not be used as an identifier unless the prefix @ is present.
Naming Conventions Rule Of Thumb
- Keywords should not be identifiers
- No whitespaces
- Case sensitivity : so
firstnameFirstnamefirstNameFirstNamethese are 4 different identifiers - Must begin with a letter, underscore or
@
Keywords C#
Keywords are predefined sets of reserved words that have special meaning in a program. The meaning of keywords can not be changed, neither can they be directly used as identifiers in a program. For example,
long phoneNumber
From the code above long is considered the keyword whilephoneNumber is the variable or the identifier. In C# long has a special meaning. Keywords such as long, int, bool, string etc are not allowed to be used as identifiers. However when there is a will then we have a way so even though keywords are “reserved” words, tha can be used as indentifiers if you add @ as the prefix long @int
Note: Though you can use the prefix
@I suggest as good practice and coding etiquette that you do not do that. It is what we call bad “juju”
- Published in .NET & .NET Core, C#, Programming Languages
Android Navigation Drawer

Hello programming world, today it looks like you are interested in trying to implement a navigational drawer within you application. Within this tutorial we are going to be focusing on drawer implementation with Kotlin but if you are interested in learning how in Java or Swift. NavigationDrawer or also known NavigationView which is a panel that shows you the menu but is hidden until the user swiping from the left or right or user touches the hamburger icon( )
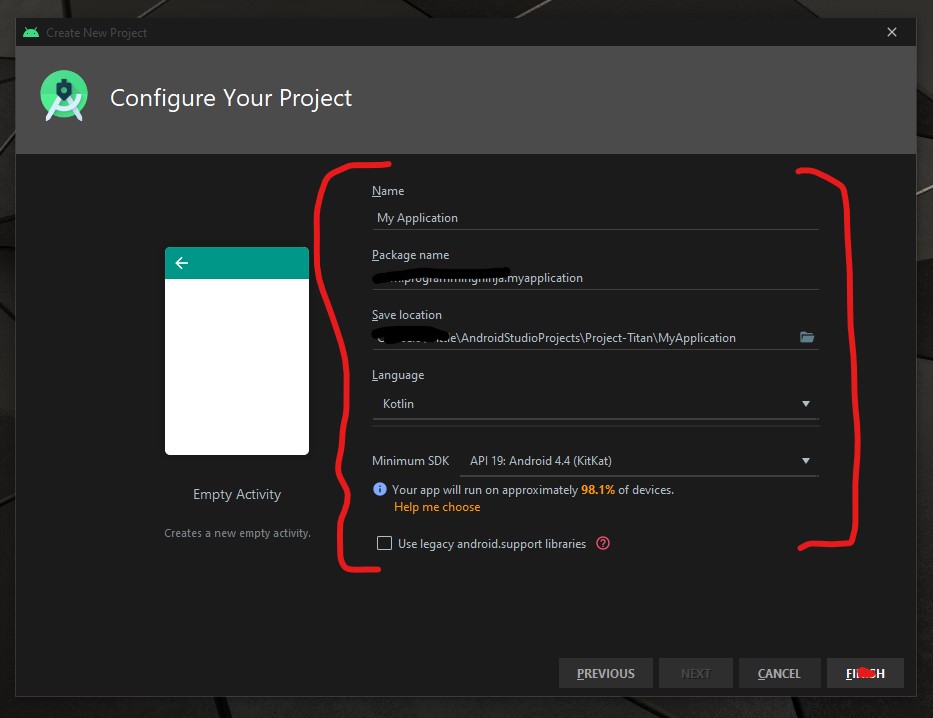
To begin the development open your Android IDE and select “Empty Actvity” then select the “NEXT” button.
Now it is time to configure the project with changing the following fields Name and Language as seen in the image below.
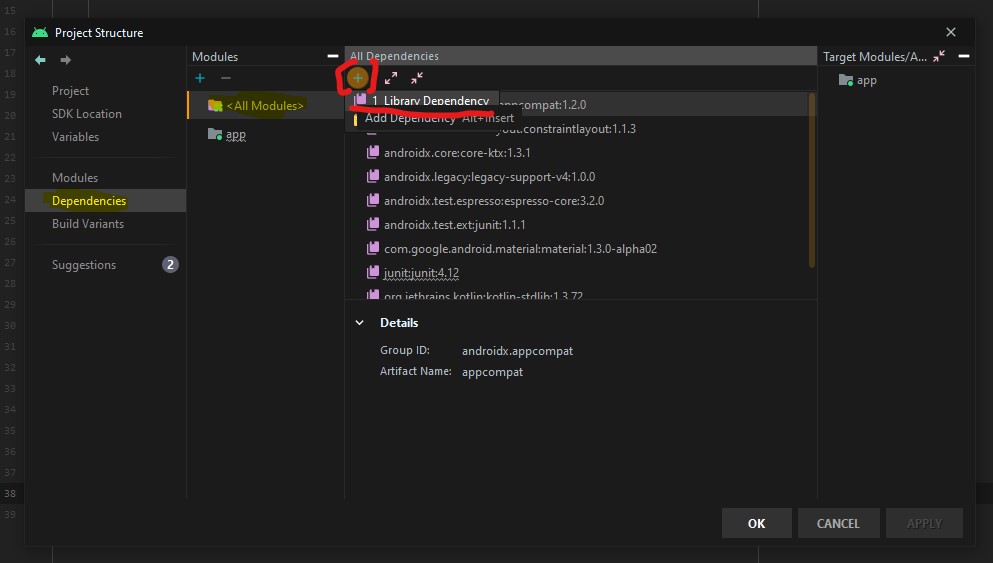
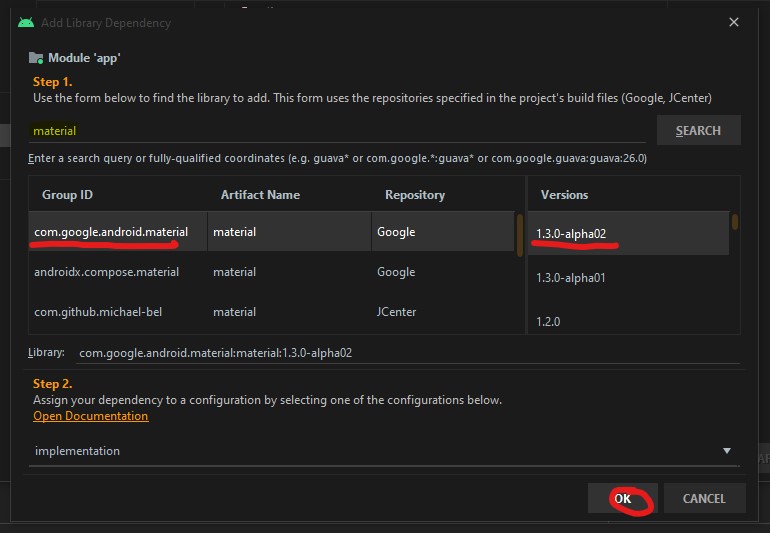
Now we need to add the material dependency into the project which has the NavigationView and then sync the project. You do have two options to accomplish this task.
the first way is adding to the build.gradle (Module: app)
implementation 'com.google.android.material:material:1.3.0-alpha02'
Or the second way is using the “Dependencies” selector. To achieve this select File -> Package Structure.. (Ctrl+Alt+Shift+S) ->
Now that the dependency is add we are going to focus on the main activity layout and this is where the navigation menu is going to be displayed.
<androidx.drawerlayout.widget.DrawerLayout
        xmlns:android="http://schemas.android.com/apk/res/android"
        xmlns:tools="http://schemas.android.com/tools"
        xmlns:app="http://schemas.android.com/apk/res-auto"
        android:layout_width="match_parent"
        android:layout_height="match_parent"
        android:id="@+id/drawer"
        tools:openDrawer="start"
        tools:context=".MainActivity">

    <RelativeLayout
            android:layout_width="wrap_content"
            android:layout_height="wrap_content">

        <androidx.appcompat.widget.Toolbar
                android:layout_width="match_parent"
                android:layout_height="wrap_content"
                android:id="@+id/tb_toolbar"
                app:title="Coeus Drawer Demo"
                app:titleTextColor="@color/cardview_light_background"
                android:background="@color/colorAccent" />

        <FrameLayout
                android:layout_width="match_parent"
                android:layout_height="match_parent"
                android:id="@+id/frame_container" />
    </RelativeLayout>

    <com.google.android.material.navigation.NavigationView
            android:layout_width="wrap_content"
            android:layout_height="match_parent"
            android:id="@+id/nv_menu"
            app:menu="@menu/ico_menu"
            app:headerLayout="@layout/nav_header"
            android:layout_gravity="start" />
</androidx.drawerlayout.widget.DrawerLayout>
Now that we have the DrawerLayout as the parent view and this draw the view for the child items
- Line 20
- Line 29
Within the NavigationView there are two attributes that we need there purpose as follow
- Line 33*: declare items which we need to show in the navigation view, the list of menu
- Line 34*: define the layout which is the header layout in the navigation view, the top part of the navigation view which is mostly used to describe user details or app details (Lets create the layout that is be referenced here, please see code beow)
***Note: when short to creating to new resource “ALT+SHIFT+ENTER”
<?xml version="1.0" encoding="utf-8"?>
<androidx.appcompat.widget.LinearLayoutCompat
    xmlns:android="http://schemas.android.com/apk/res/android"
    android:layout_width="match_parent"
    android:layout_height="wrap_content"
    android:orientation="vertical"
    android:background="@color/colorAccent">

    <androidx.appcompat.widget.AppCompatImageView
            android:layout_width="wrap_content"
            android:layout_height="wrap_content"
            android:id="@+id/img_user_image"
            android:src="@mipmap/ic_launcher_round"/>

    <androidx.appcompat.widget.AppCompatTextView
            android:layout_width="wrap_content"
            android:layout_height="wrap_content"
            android:id="@+id/tv_user_name"
            android:text="User Name"
            android:textSize="30dp"
            android:textColor="@color/cardview_light_background" />

    <androidx.appcompat.widget.AppCompatTextView
            android:layout_width="wrap_content"
            android:layout_height="wrap_content"
            android:id="@+id/tv_user_details"
            android:text="user details"
            android:textSize="20dp"
            android:textColor="@color/cardview_light_background" />
</androidx.appcompat.widget.LinearLayoutCompat>
No we need to modify ActionBar within the style.xml so we don’t run into a complication since we are using our own type of toolbar. We will be modifying the line 2 from DarkActionBar to NoActionBar
<!-- Base application theme. -->
    <style name="AppTheme" parent="Theme.AppCompat.Light.NoActionBar">
        <!-- Customize your theme here. -->
        <item name="colorPrimary">@color/colorPrimary</item>
        <item name="colorPrimaryDark">@color/colorPrimaryDark</item>
        <item name="colorAccent">@color/colorAccent</item>
    </style>
Now that we have completed the layout and now need to focus on the kotlin class (.kt). Select the MainActivity class and everything is going to take place within the OnCreate(), so we’ll begin by setting our new toolbar as the actionbar.
val tb = findViewById<Toolbar>(R.id.tb_toolbar)
setSupportActionBar(tb)
Now it is time to set the actionBar to fire the toggle state, the user wants to ‘open’ and ‘close’ the navigation view.
val nav: NavigationView? = findViewById(R.id.nv_menu)
val drawer: DrawerLayout? = findViewById(R.id.drawer)
val toggle: ActionBarDrawerToggle? = ActionBarDrawerToggle(this, drawer,tb, R.string.open, R.string.close) //create string arguements
Setup a handler to respond to click events on the navigation elements and swap out the fragment. This can be put into the activity directly:
***To understand what a fragment check out the fragment post:
supportFragmentManager.beginTransaction().replace(R.id.frame_container, HomeFragment()).commit()
nav?.setCheckedItem(m_home)
And set the specific action on menuItem clicks. Here, we are showing the toast message for anything that doesn’t have a fragment already create. Ideally, you this is where can start a new activity, or open fragment etc.
nav?.setNavigationItemSelectedListener(object : NavigationView.OnNavigationItemSelectedListener {
     var temp: Fragment? = null

     override fun onNavigationItemSelected(item: MenuItem): Boolean {
          when (item.itemId) {
              m_home -> temp = HomeFragment()
              m_calls -> Toast.makeText(applicationContext, "You have clicked the call", Toast.LENGTH_SHORT).show()
              m_settings -> Toast.makeText(applicationContext, "You have clicked the settings", Toast.LENGTH_SHORT).show()
          }
supportFragmentManager.beginTransaction().replace(R.id.frame_container, temp!!).commit()
drawer.closeDrawer(GravityCompat.START)
                return true
            }
        })
What is the user press back button, the application should check the navigationView and make sure the drawer is closed first and then the app. For this, we will override the onBackPressed() method.
override fun onBackPressed() {
        if (drawer.isDrawerOpen(GravityCompat.START)) {
            drawer.closeDrawer(GravityCompat.START)
        } else {
            super.onBackPressed()
        }
    }
Now check for any errors and if all is good then let’s run the app. If everything compiles correctly then it should be working fine. There is much more in NavigationView like icons in the menu items etc. Try to explore more and share us with on our twitter or slack channel.
- Published in Android, Kotlin, Programming Languages