Ask 100 different developers about what they find most exciting about android development and you will get as many different responses. Personally, I find the customization of the various framework and design libraries. Consider it as such if there is something that doesn’t fit your needs within the development process that as a developer we create custom views without any issues. Within this post, we will be working on a custom Snackbar.
What is a Snackbar? Well simply enough a Snackbars provide lightweight feedback about an operation. They show a brief message at the bottom of the screen on mobile and lower left on larger devices. Snackbars appear above all other elements on screen and only one can be displayed at a time.
Though the Snackbar by default has a few customizable features, consider the fact that the default features may not match the application style. Fortunately, we can easily create a custom Snackbar by implementing just a few classes. If you are unfamiliar with what a Snackbar is please review my previous post regarding the library. Be aware that it may be a little confusing at glance but fear not we will review it the most important part that is to highlight which are:
BottomTransientBottomBarwhich is the parent view- ContentViewCallback
make()a factory method- find the parent view, inflate the custom view, and set additional properties
- customizable method
Custom View
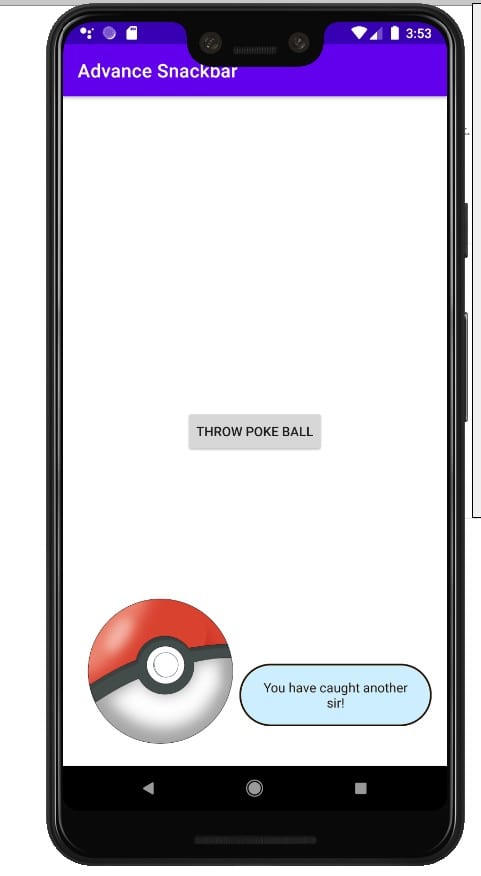
It is assumed that you have already created/opened your current project within your IDE. Now we create a custom view that will be displayed at the bottom of the screen when called. This design will be the simplest form which contains an image and static message.
class CustomSnackbarView @JvmOverloads constructor(context: Context, attrs: AttributeSet? = null, defStyleAttr: Int = 0) : ConstraintLayout (context, attrs, defStyleAttr) {

    private val customImg : AppCompatImageView

    init {
        View.inflate(context, R.layout.view_custom_snackbar, this)
        clipToPadding = false
        this.customImg = findViewById(R.id.img_snack)
    }
}
this is accompanied by the following layout XML
<?xml version="1.0" encoding="utf-8"?>
<merge
    xmlns:android="http://schemas.android.com/apk/res/android"
    xmlns:tools="http://schemas.android.com/tools"
    xmlns:app="http://schemas.android.com/apk/res-auto"
    android:layout_width="match_parent"
    android:layout_height="wrap_content"
    tools:parentTag="androidx.constraintlayout.widget.ConstraintLayout">

    <androidx.appcompat.widget.AppCompatImageView
        android:layout_width="173dp"
        android:layout_height="173dp"
        android:id="@+id/img_snack"
        android:scaleType="centerInside"
        app:layout_constraintBottom_toBottomOf="parent"
        app:layout_constraintLeft_toLeftOf="parent"
        app:layout_constraintStart_toStartOf="parent"
        app:srcCompat="@drawable/pokeball" />

    <androidx.appcompat.widget.AppCompatTextView
        android:layout_width="0dp"
        android:layout_height="wrap_content"
        android:id="@+id/tv_snack"
        android:gravity="center"
        android:padding="16dp"
        android:text="You have caught another sir!"
        android:textColor="#28140c"
        android:background="@drawable/custom_snackbar_bg"
        app:layout_constraintEnd_toEndOf="parent"
        app:layout_constraintRight_toRightOf="parent"
        app:layout_constraintBottom_toBottomOf="@+id/img_snack"
        app:layout_constraintLeft_toRightOf="@+id/img_snack"
        app:layout_constraintStart_toEndOf="@+id/img_snack"
        app:layout_constraintTop_toTopOf="@+id/img_snack"
        app:layout_constraintVertical_bias="0.75" />
</merge>
Implementation of Custom View
Now the objective is to implement ContentViewCallback. The interface objective is to notify when the Snackbar starts appearing and dismissing using animateContentIn() and animateContentOut()
class CustomSnackbarView @JvmOverloads constructor(context: Context, attrs: AttributeSet? = null, defStyleAttr: Int = 0) : ConstraintLayout (context, attrs, defStyleAttr), ContentViewCallback {

    private val customImg : AppCompatImageView

    init {
        View.inflate(context, R.layout.view_custom_snackbar, this)
        clipToPadding = false
        this.customImg = findViewById(R.id.img_snack)
    }

    override fun animateContentIn(delay: Int, duration: Int) {
        val scaleX = ObjectAnimator.ofFloat(customImg, View.SCALE_X, 0f, 1f)
        val scaleY = ObjectAnimator.ofFloat(customImg, View.SCALE_Y, 0f, 1f)
        AnimatorSet().apply {
            interpolator = OvershootInterpolator()
            setDuration(500)
            playTogether(scaleX,scaleY)
        }.start()

    }

    override fun animateContentOut(delay: Int, duration: Int) {
        TODO("Not yet implemented")
    }

}
Take note that there is a simple scale animation as the Snackbar appears. Now setting the clipToPadding to false is important to avoid the image from clipping because of OvershootInterpolator.
Extending BaseTransientBottomBar
We are now at the point to create an equivalent class for the Snackbar.
The custom Snackbar constructor accepts two params: one for the parent view and another for the custom view that supports the implementation of ContentViewCallback.
class CustomSnackbar(parent: ViewGroup, content: CustomSnackbarView) : BaseTransientBottomBar<CustomSnackbar>(parent, content, content) {

}
Now to implement the entry point method make(). As stated earlier in this post, there are three things to accomplish:
- There is no reason to attempt and recreate the wheel so we will borrow the logic from the Snackbar’s source code
internal fun View?.findParent(): ViewGroup? {

    var view = this
    var fallback: ViewGroup? = null

    do {
        if (view is CoordinatorLayout) {
            //the Coordinator layout has been found
            return view
        } else if (view is FrameLayout) {
            if (view.id == android.R.id.content) {
                //coordinator layout not found so we need to use the appropriate hierarchy
                return view
            } else {
                //if no view assign the fallback
                fallback = view
            }
        }

        if (view != null) {
            //will continue to search for the view
            val parent = view.parent
            view = if (parent is View) parent else null
        }
    } while (view != null)

    return fallback
}
- Inflate the custom view
- inflating a custom view is best done by using the XML layout
<?xml version="1.0" encoding="utf-8"?>
<com.programmingninja.advancesnackbar.snackbar.CustomSnackbarView
    xmlns:android="http://schemas.android.com/apk/res/android"
    android:layout_width="match_parent"
    android:layout_height="wrap_content"
    android:padding="8dp" />
- Build and correct errors
class CustomSnackbar(parent: ViewGroup, content: CustomSnackbarView) : BaseTransientBottomBar<CustomSnackbar>(parent, content, content) {

    companion object {
        fun make(view: View) : CustomSnackbar{

            //set parent for this view
            val parent = view.findParent() ?: throw IllegalArgumentException("No suitable parent found from the correct view. Please correct.")

            //custom view inflated
            val customView = LayoutInflater.from(view.context).inflate(R.layout.activity_snackbar, parent, false) as CustomSnackbarView

            //creation and return this new snackbar
            return CustomSnackbar(parent, customView)
        }

    }
}
If we attempt to run the code, you will notice that there is a gray background and padding. Why is this? This is because the BaseBottomTransientBar implementation is wrapped with the SnackbarBasrLayout. The workaround for this issue is simple enough by adding an init() block
init {
        getView().setBackgroundColor(ContextCompat.getColor(view.context, android.R.color.transparent))
        getView().setPadding(0,0,0,0)
}
Wrapping it altogether
Modify the MainActivity with the following
class MainActivity : AppCompatActivity() {
    override fun onCreate(savedInstanceState: Bundle?) {
        super.onCreate(savedInstanceState)
        setContentView(R.layout.activity_main)

        findViewById<View>(R.id.btn_catch_em).setOnClickListener {
            CustomSnackbar.make(it).show()
        }
    }
}
Now we need to modify the main activity layout
<?xml version="1.0" encoding="utf-8"?>
<androidx.constraintlayout.widget.ConstraintLayout
    xmlns:android="http://schemas.android.com/apk/res/android"
    xmlns:app="http://schemas.android.com/apk/res-auto"
    xmlns:tools="http://schemas.android.com/tools"
    android:layout_width="match_parent"
    android:layout_height="match_parent"
    tools:context=".MainActivity">

    <androidx.appcompat.widget.AppCompatButton
        android:layout_width="wrap_content"
        android:layout_height="wrap_content"
        android:id="@+id/btn_catch_em"
        android:layout_margin="8dp"
        android:text="Throw Poke Ball"
        app:layout_constraintEnd_toEndOf="parent"
        app:layout_constraintStart_toStartOf="parent"
        app:layout_constraintTop_toTopOf="parent"
        app:layout_constraintBottom_toBottomOf="parent" />
</androidx.constraintlayout.widget.ConstraintLayout>