Integrating Google’s reCAPTCHA w/Android

Introduction
Google’s reCAPTCHA API protects your website/app from malicious traffic. You might have seen the reCAPTCHA integrated on web pages. You can integrate the same in your Android apps too using SafeNet API. The service is free to use and it will show a captcha to be solved if the engine suspects user interaction to be a bot instead of a human.
Within this post, I will explain and build a simple button click application that will integrate captcha to avoid bots from submitting forms on there own. But understand that this method is not only limited to form usage but a user can integrate any this module into any app
How it works
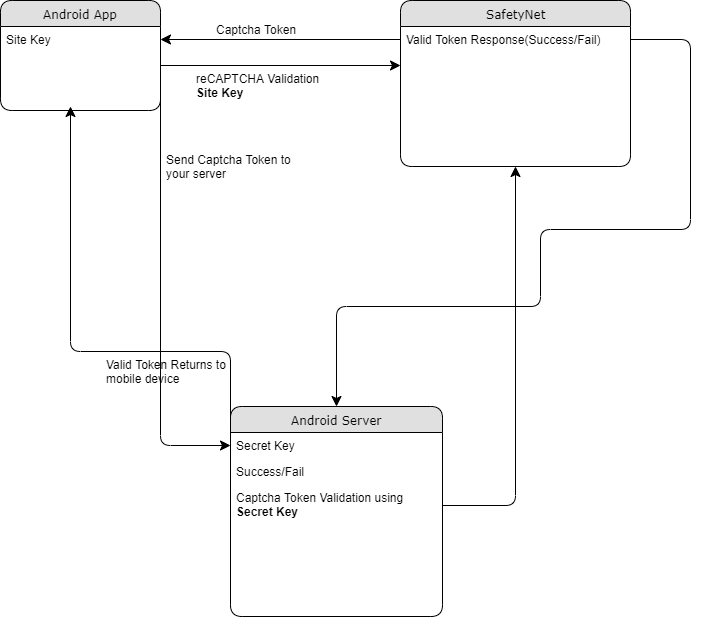
The following point will explain the simple flow of reCAPTCHA in Android with SafetyNet API.
- First, a user needs to obtain the SafetyNet key pair by registering your app. After completing this a Site & Secret Key.
- The Site Key will be integrated into an Android app and it can be public. Secret Key should be kept on your server and it shouldn’t be exposed.
- When reCAPTCHA is invoked, it will show the Captcha challenge to a user it necessary. In this step, it communicates with the captcha server and returns “User Response Token” using Site Key.
Registering your App w/SafetyNet
To begin before diving into the application creation we need to get the keys that will be validated against.
Fist go to the site following site and sign up if you do not already have an account
- https://www.google.com/recaptcha/intro/v3.html
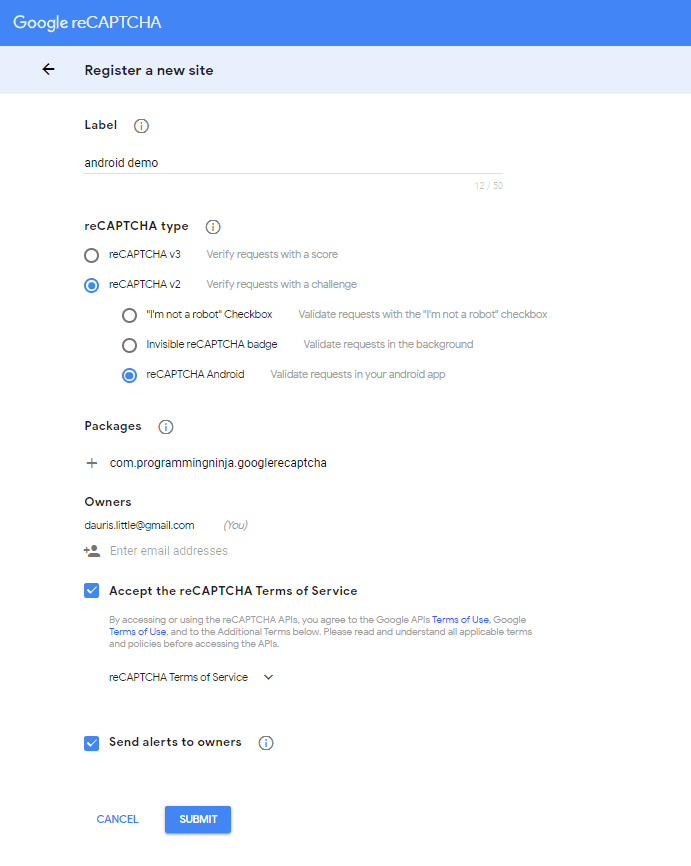
- After accessing your account create
- Register a new account
- Now enter your label, reCAPTCHA type, domains and then accept “Terms of Service”
NOTE: Regarding the label the title be anything that identifies the api key to yourself
NOTE: Regarding the selecting reCAPTCHA if working with android select reCAPTCHA v2 then reCAPTCHA Android
NOTE: Regarding populating the domain should be your Package Name in Package Names Section
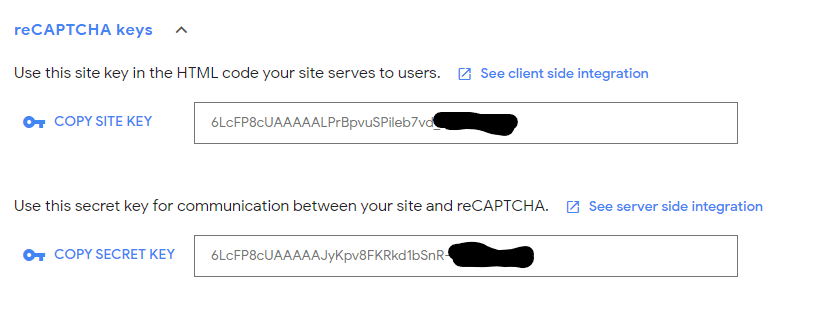
Then, you will get the site key and secret key from SafetyNet API Server and it as well as shows client and server-side integration code snippets. The following figures show the same.
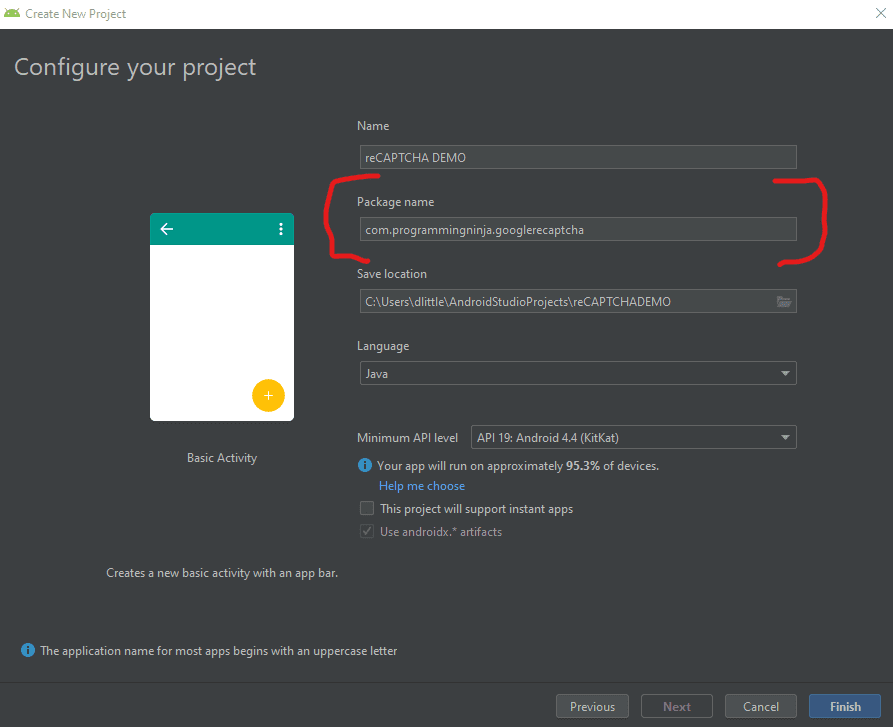
Step 1 – Create New Project w/Android Studio
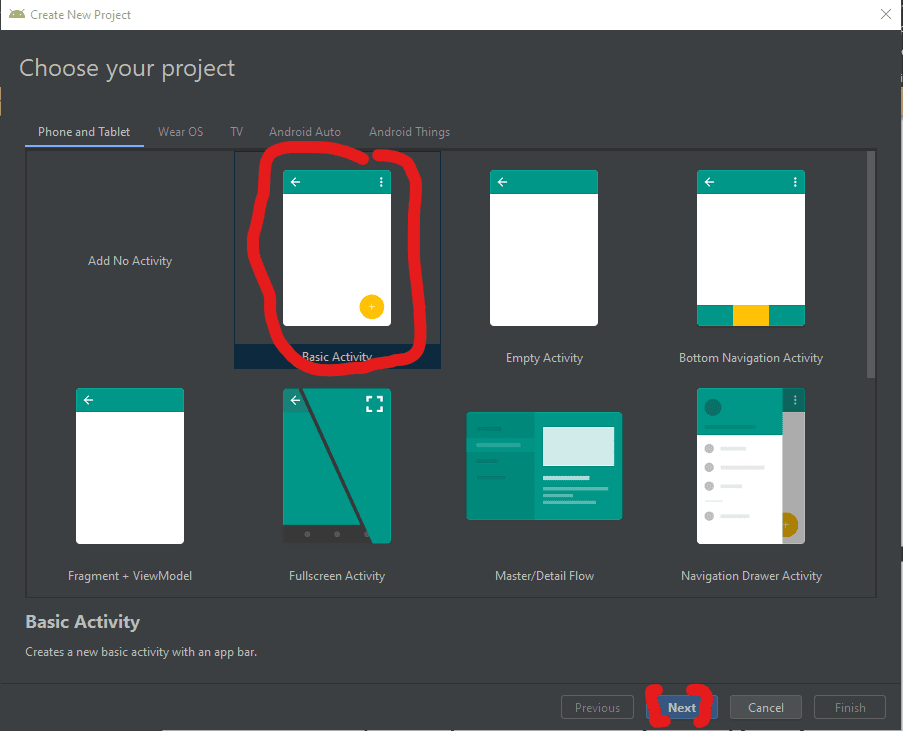
Now lets begin with the fun stuff and to begin you will begin by open Android Studio and then “Create New Project”
- Begin by Start a new Android Studio Project èselect Basic Activity from templates.
NOTE: While creating, use the package name you have registered on reCAPTCHA dashboard.
Step 2 – Setting up the library & AndroidMainfest for the project
Add SafeNet and the Volley dependency to your build.gradle and rebuild the project. Here, I used the following dependency. You can change as per your Android SDK.
NOTE: Volley is used to send HTTP call to our server to validate the captcha token on the server side.
build.gradle
dependencies {
    implementation fileTree(dir: 'libs', include: ['*.jar'])
    implementation 'androidx.appcompat:appcompat:1.1.0'
    implementation 'androidx.constraintlayout:constraintlayout:1.1.3'
    implementation 'com.google.android.material:material:1.0.0'
    testImplementation 'junit:junit:4.12'
    androidTestImplementation 'androidx.test.ext:junit:1.1.1'
    androidTestImplementation 'androidx.test.espresso:espresso-core:3.2.0'

    //dependency for recaptcha (safetynet)
    implementation 'com.google.android.gms:play-services-safetynet:17.0.0'

    //dependency for fast networking for networking
    implementation 'com.android.volley:volley:1.1.0'
}
Now we need to add the app manifest file with the following permission(s). SafetyNet library is used to create the captcha validation in android. Volley library is an HTTP Networkinf library used here for validating captcha response.
AndroidManifest.xml
<uses-permission android:name="android.permission.INTERNET"/>
Step 3 – Implementation of SafetyNet API
If you are still with me then let’s dive into the Java part of the project. We will first ensure that we have all the modules that will be used in the application
Required modules
import android.os.Bundle;
import android.util.Log;
import android.view.View;
import android.widget.Button;
import android.widget.TextView;

import androidx.appcompat.app.AppCompatActivity;
import androidx.annotation.NonNull;

//volley
import com.android.volley.DefaultRetryPolicy;
import com.android.volley.RequestQueue;
import com.android.volley.Request;
import com.android.volley.Response;
import com.android.volley.VolleyError;
import com.android.volley.toolbox.StringRequest;
import com.android.volley.toolbox.Volley;


import com.google.android.gms.common.api.ApiException;
import com.google.android.gms.common.api.CommonStatusCodes;
import com.google.android.gms.safetynet.SafetyNet;
import com.google.android.gms.safetynet.SafetyNetApi;
import com.google.android.gms.tasks.OnFailureListener;
import com.google.android.gms.tasks.OnSuccessListener;

import org.json.JSONObject;

import java.util.HashMap;
import java.util.Map;

import android.view.Menu;
import android.view.MenuItem;
Step 3 – Implementation of SafetyNet API (Continue)
If you are still with me then let’s dive into the Java part of the project. We will first ensure that we have all the modules that will be used in the application
- Replace “Site_Key” and “Site_Secret_Key” with your appropriate “Site Key” and “Secret Key” get from SafetyNet API while registering app.
- The API will check the Server and it has a separate callbacks from success and failure.
- At Success, we will get Captcha Response Token which will be used to validate the user interaction is made by a bot or real human.
- We will discuss how to validate the token with SafetyNet API Server in next step.
NOTE: the call on the created click event
protected void onCreate(Bundle savedInstanceState) {
        super.onCreate(savedInstanceState);
        setContentView(R.layout.activity_main);

        btn = findViewById(R.id.reCaptcha);
        txtV = findViewById(R.id.verifyText);
        btn.setOnClickListener(this);

        requestQueue = Volley.newRequestQueue(getApplicationContext());
    }

    public void onClick(View view){
        SafetyNet.getClient(this).verifyWithRecaptcha(Site_Key)
                .addOnSuccessListener(this, new OnSuccessListener <SafetyNetApi.RecaptchaTokenResponse>(){
                    @Override
                    public void onSuccess(SafetyNetApi.RecaptchaTokenResponse response){
                        if (!response.getTokenResult().isEmpty()){
                            handleCaptchaResult(response.getTokenResult());

                        }
                    }
        })
                .addOnFailureListener(this, new OnFailureListener() {
                    @Override
                    public void onFailure(@NonNull Exception e) {
                        if (e instanceof  ApiException){
                            ApiException apiException = (ApiException)e;
                            Log.d(TAG, "Error Message: " + CommonStatusCodes.getStatusCodeString(apiException.getStatusCode()));
                        } else {
                            Log.d(TAG, "Unknown error type or error" + e.getMessage());
                        }
                    }
                });
    }
Step 4 – Captcha Response Token Validation
- We have to verify the token getting from the server using the secret key.
- It can achieve by using the following.
-
- API Link – https://www.google.com/recaptcha/api/siteverify
- Method – POST
- Params – secret, response (We have to pass the “SECRET_KEY” and “TOKEN” respectively)
NOTE: Volley has
- RequestQueue to maintain the server calls in queue.
- RetryPolicy to retry the server call if it is fail with TimeOut and Retry Count. We can change those values.
- StringRequest is used for getting Response as JSON String.
- Method.POST denotes the call as POST method.
- Params are passed to server using Map, HashMap.
The SafetyNet API provides the response respective to the parameters passed and the success is Boolean Datatype.
void handleCaptchaResult(final String responseToken){
        String url = "https://www.google.com/recaptcha/api/siteverify"; //consider using global variable here
        StringRequest request = new StringRequest(Request.Method.POST, url, new Response.Listener<String>() {
            @Override
            public void onResponse(String response) {
                try {
                    JSONObject jsonObject = new JSONObject(response);
                    if (jsonObject.getBoolean("success")) {
                        txtV.setTextSize(35);
                        txtV.setText("Congratulations! You're not a robot anymore");
                    }
                } catch (Exception ex) {
                    Log.d(TAG, "Error message: " + ex.getMessage());
                }
            }
        },
                new Response.ErrorListener() {
                    @Override
                    public void onErrorResponse(VolleyError error) {
                        Log.d(TAG, "Error message: " + error.getMessage());
                    }
                })
        {
            @Override
            protected Map<String,String> getParams(){
                Map<String,String> params = new HashMap<>();
                params.put("secret", Site_Secret_Key);
                params.put("response", responseToken);
                return params;
            }
        };
        request.setRetryPolicy(new DefaultRetryPolicy(50000,DefaultRetryPolicy.DEFAULT_MAX_RETRIES,DefaultRetryPolicy.DEFAULT_BACKOFF_MULT));
        requestQueue.add(request);
    }
Full Review / Conclusion
In this blog tutorial, I was able to show you how to use Google’s reCAPTCHA in our Android app. Understand using reCAPTCHA in any app, we need to get one Site key and one Secret key and after that, we request for the captcha from the reCAPTCHA server. Once we get the reCAPTCHA and the user has entered the captcha, we send the entered value to the reCPATCA server and get the captcha token. This token is sent to our server and our server along with the secret key send the token to the reCAPTCHA server again. After that, we get some success message and that message is conveyed to our Android app.
NOTE: I have also displayed below the code for the layout for the main activity as well. This is the just a simple layout but the practical could be implemented with very little ease.
import android.os.Bundle;
import android.util.Log;
import android.view.View;
import android.widget.Button;
import android.widget.TextView;

import androidx.appcompat.app.AppCompatActivity;
import androidx.annotation.NonNull;

//volley
import com.android.volley.DefaultRetryPolicy;
import com.android.volley.RequestQueue;
import com.android.volley.Request;
import com.android.volley.Response;
import com.android.volley.VolleyError;
import com.android.volley.toolbox.StringRequest;
import com.android.volley.toolbox.Volley;


import com.google.android.gms.common.api.ApiException;
import com.google.android.gms.common.api.CommonStatusCodes;
import com.google.android.gms.safetynet.SafetyNet;
import com.google.android.gms.safetynet.SafetyNetApi;
import com.google.android.gms.tasks.OnFailureListener;
import com.google.android.gms.tasks.OnSuccessListener;

import org.json.JSONObject;

import java.util.HashMap;
import java.util.Map;

import com.google.android.material.floatingactionbutton.FloatingActionButton;
import com.google.android.material.snackbar.Snackbar;

import androidx.appcompat.widget.Toolbar;


import android.view.Menu;
import android.view.MenuItem;

public class MainActivity extends AppCompatActivity implements View.OnClickListener {

    String TAG = MainActivity.class.getSimpleName();
    Button btn;
    TextView txtV;
 // TODO - replace the SITE KEY with yours
    String Site_Key = "6LcFP8cUAAAAALPrBpvuSPileb7vd"; //consider making global variable(this will not work not a valid key)
 // TODO - replace the Secret KEY with yours
    String Site_Secret_Key = "6LcFP8cUAAAAAJyKpv8FKRkd1bSnR-"; //consider making global variable(this will not work not a valid key)
    RequestQueue requestQueue;

    //application space controls
    @Override
    protected void onCreate(Bundle savedInstanceState) {
        super.onCreate(savedInstanceState);
        setContentView(R.layout.activity_main);

        btn = findViewById(R.id.reCaptcha);
        txtV = findViewById(R.id.verifyText);
        btn.setOnClickListener(this);

        requestQueue = Volley.newRequestQueue(getApplicationContext());
    }

    @Override
    public void onClick(View view){
        SafetyNet.getClient(this).verifyWithRecaptcha(Site_Key)
                .addOnSuccessListener(this, new OnSuccessListener <SafetyNetApi.RecaptchaTokenResponse>(){
                    @Override
                    public void onSuccess(SafetyNetApi.RecaptchaTokenResponse response){
                        if (!response.getTokenResult().isEmpty()){
                            handleCaptchaResult(response.getTokenResult());

                        }
                    }
        })
                .addOnFailureListener(this, new OnFailureListener() {
                    @Override
                    public void onFailure(@NonNull Exception e) {
                        if (e instanceof  ApiException){
                            ApiException apiException = (ApiException)e;
                            Log.d(TAG, "Error Message: " + CommonStatusCodes.getStatusCodeString(apiException.getStatusCode()));
                        } else {
                            Log.d(TAG, "Unknown error type or error" + e.getMessage());
                        }
                    }
                });
    }

    void handleCaptchaResult(final String responseToken){
        String url = "https://www.google.com/recaptcha/api/siteverify"; //consider using global variable here
        StringRequest request = new StringRequest(Request.Method.POST, url, new Response.Listener<String>() {
            @Override
            public void onResponse(String response) {
                try {
                    JSONObject jsonObject = new JSONObject(response);
                    if (jsonObject.getBoolean("success")) {
                        txtV.setTextSize(35);
                        txtV.setText("Congratulations! You're not a robot anymore");
                    }
                } catch (Exception ex) {
                    Log.d(TAG, "Error message: " + ex.getMessage());
                }
            }
        },
                new Response.ErrorListener() {
                    @Override
                    public void onErrorResponse(VolleyError error) {
                        Log.d(TAG, "Error message: " + error.getMessage());
                    }
                })
        {
            @Override
            protected Map<String,String> getParams(){
                Map<String,String> params = new HashMap<>();
                params.put("secret", Site_Secret_Key);
                params.put("response", responseToken);
                return params;
            }
        };
        request.setRetryPolicy(new DefaultRetryPolicy(50000,DefaultRetryPolicy.DEFAULT_MAX_RETRIES,DefaultRetryPolicy.DEFAULT_BACKOFF_MULT));
        requestQueue.add(request);
    }
}
<androidx.constraintlayout.widget.ConstraintLayout
    xmlns:android="http://schemas.android.com/apk/res/android"
    xmlns:app="http://schemas.android.com/apk/res-auto"
    xmlns:tools="http://schemas.android.com/tools"
    android:layout_width="match_parent"
    android:layout_height="match_parent"
    tools:context=".MainActivity">
    <LinearLayout
        android:layout_height="match_parent"
        android:layout_width="match_parent"
        android:orientation="vertical">

        <Button
            android:id="@+id/reCaptcha"
            android:layout_height="wrap_content"
            android:layout_width="wrap_content"
            android:text="Show reCAPTCHA"/>

        <TextView
            android:id="@+id/verifyText"
            android:layout_width="wrap_content"
            android:layout_height="wrap_content"
            android:capitalize="characters"
            android:text="Hello World"
            android:textSize="24sp" />

    </LinearLayout>
</androidx.constraintlayout.widget.ConstraintLayout>
- Published in Android, API, blog, Java, Mobile Development, Programming Languages
Snapchat’s Developer API Creates Lots of Opportunities

Snapchat’s CEO Evan Spiegel has announced the company’s next big step, which is the release of the much anticipated developer APIs. Snapchat will finally allow 3rd party web & mobile application developers to leverage Snapchat’s platform with deep integrations. This has been eagerly awaited by the development community as Snapchat was one of the last holdouts from the major social media networks to release an API. They cited “Privacy & Security” as the main factors behind the delay in taking this step, and given the recent climate, this was probably smart. In this post, I’ll dive into a bit more detail on not only the privacy aspects, but first let’s have a look at the feature-set and discuss some of the possibilities these new APIs bring to the table.
1. Login
There will of course be a login API called Snap Login, which doesn’t surprise anyone, given that a similar feature exists for Facebook, Twitter, Google, and a ton of other platforms. However, the difference here is that Snap will not give the developers any information beyond just the username. Developers will not be able to gather any demographics or profile information on the user, and Snapchat has explicitly said that they will never open up the user’s friends list to the developers for privacy reasons. Smart move.
2. Camera
Next up is the Snap Camera API which will enable users to be able to share content directly to their Snapchat Story from other apps. This has been a highly requested feature for some time now and it is great to see Snap take the feedback received from the app developers community to heart. Sharing experiences on Facebook & Twitter had been a breeze till now, and Snapchat was definitely starting to get left behind, so this was much needed. Imagine a scenario where you are at a birthday party, and have been taking pictures & video clips all evening. The next day, you can simply open up your Photos app, select pictures & videos from that event and create a new Story.
3. Bitmoji
Another API that is being made available will allow users to use their Bitmoji avatar in other apps, such as Messages or Tinder. Personally, I don’t get what all the fuss is about with Bitmojis and ever really understood that whole hype. But I guess it’s something the kids are doing and it was a simple enough integration for Snap to make. People apparently invest a lot of time & effort into their Bitmojis and see it as an extension of themselves. Posting reaction memes and gifs in message threads has become commonplace, so this seems to be a feature stemming from the same vein.
4. Embedding
Lastly, and perhaps the biggest API in my opinion, is one that will allow developers use public Snap (photos & videos) to create themed Stories on the web. This is where the big picture starts to become a bit clearer. Nowadays it is almost a given that an article, whether news or entertainment related, will have a tweet or two embedded within it to quote prominent people involved in the story. What Snapchat is trying to do here is recreate that lightning in a bottle, with pictures & videos. Although Instagram does already have embedding available for Insta Posts, they don’t have such a feature for Stories. Being able to create your *own* story is similar to Moments by Twitter, where you can collect a bunch of (publicly available) tweets and organize them into a Moment which can be viewed in the Twitter app, or as an embedded frame on a web site. With Snap’s new API, people will now be able to do the same, but with publicly available Snaps. This feature has the potential to capture a completely different audience than the one Snap is currently catering too, which is just what the company needs amidst growing concerns of stagnating user growth.
Data Privacy & Security
Snap has made it very clear that at the heart of this big new step will be Data Privacy & Security. All 3rd party apps will go through an approval & review process. Apple was the first company to introduce a review process for 3rd party apps to go live on its platform. Back in the day, Facebook & Android were allowing 3rd party developers to build and deploy apps without any intervention from the platform itself, while Apple was making developers go through painfully long approval processes (they used to sometimes take up to 3 weeks).
Over time however, Apple was vindicated in their decision to put security first, as the App Store quickly gained the reputation of being a secure environment for all people, regardless of technical knowledge, to safely download apps without fear. Meanwhile, Facebook was filled to the brim with spam in the form of game invites, and letting developers scrape & dump vast amounts of private user data. Android had its own share of issues with malware and spyware running rampant in their apps as their platform was as open as they get. Eventually, both Facebook & Android introduced approval processes, which have since become the norm. Snap, learning from its predecessors, has followed suit.
Conclusion
It had become apparent that Snap was losing the battle to Instagram, and that bold moves would be required in order to stay relevant in the next 5 years. While this may not be the blockbuster move that captures all the headlines, it is definitely steps in the right direction. Snap needs to be able to prove to its investors that it can grow beyond the youth demographic that it currently touts as its crowning jewel, and continue to grow. Time will tell if this will be the moment that Snap turns it around. They sure do need a win right about now.
- Published in API, Mobile Development