allowBackup: Android’s Attributes

If you’ve ever been sky diving, you know that it’s essential to prepare for redundancies in your jump. That way, if one shoot fails you have a spare as your backup. This philosophy isn’t left behind within android and this is accomplished using allowBackup, which helps automatically backing up application data.
allowBackup Purpose
According to the documentation, this feature allows Auto Backup for App automatically backs up a user’s data from apps that target and run on Android 6.0 (API level 23) or later. This can be accomplished in your android app so the user(s) can more quickly recover the data. This feature allows the user to delete the application using any method such as manually deleting/uninstalling the app to using the device “factory reset”, regardless of the method the app will retain the user data when they decide to reinstall. This feature is taken a step further across multiple devices which allows the user to get a new device and this information will be available for a new device.
How Much Data?
When implemented the user can store the data limited to 25MB, which persists across the lifetime of an app being installed on your device. Though that does not sound like a lot in reality it is more than enough to save preferences/settings.
Where Is It Stored?
This data is stored by uploading it to the user’s Google Drive, where it is protected but the user’s account credentials. Don’t worry this data is stored in a private folder on the user’s drive and doesn’t count towards the user’s personal Drive quota.
Note: Only the most recent backup is stored in the drive.
What is Being Backed Up
The default function of this feature includes files in most directories that are assigned within your app by the system:
- shared preferences
getFilesDir()orgetDir(String, int)- Files stored in the app internal storage
getDatabasePath(String)- Files within this directory
getExternalFilesDir()- Files on external storage within this directory
So in short you can configure the application to include as well as exclude any files.
Customizing Your Backup
Within the android manifest, ensure that you add android:fullBackupContent within your application block. This points to an XML file that should contain all the rules for the full backup for the Auto Backup. Follow these steps and you can accomplish the task:
- within the res directory create a directory called xml
- now create an XML file called auto_backup_rules.xml
- Use the syntax include/exclude
- if you use both
include/excludetheincludetag supersede - The path reference within the
includeandexcluderefers to the resource location- Example:
<include domain="database" path="test_db.db"
- Example:
- if you use both
- The backup file should be listed in Android Manifest
- Example:
<application android:fullBackupContent="@xml/auto_backup_rules ... >
- Example:
Triggering the Backup
Backups are triggered automatically when any of the following conditions are met:
- backup must be enabled by the user. From Android 9 this setting is within Setting> System > Backup
- 24 hours has elapsed since the last backup
- The device is not in use
- The device is connected to a stable Wi-Fi network
Should Backups Cause Problem
Android backups rely on the Android Debug Bridge (ADB) command to perform backup and restore. ADB, however, has been a soft target for hackers and is still not trusted by respected developers. The idea that someone can inject malicious code into your backup data is unsettling, to say the least. This generally isn’t a problem for end-users as it requires debugging to be enabled on the device, but since a lot of Android users are fond of exploring and rooting their devices, it can become a serious problem.
Once backed up, all application data can be read by the user. adb restore allows the creation of application data from a source specified by the user. Following a restore, applications should not assume that the data, file permissions, and directory permissions were created by the application itself.
Therefore, applications that handle and store sensitive information such as card details, passwords, etc., should have this setting explicitly set to false — by default, it is set to exclude — to prevent such risks, or you can also customize what needs to be backed up.
If there is anything that is missing or being overlooked please do not hesitate to comment so we can all learn.
- Published in Android, Java, Kotlin, Programming Languages
Java Or Kotlin Language: Deciding Which Option to Use for Android Development

If my math is not wrong Java has been around for over 20+ years now and has no intention of going away. It holds a supreme position in the list of most popular programming languages following the C and C++ =, setting the highest usability record with millions of developers and systems.
Random Fact:
James Gosling, Mike Sheridan, and Patrick Naughton initiated the Java language back in 1991. Java has been the primary language for Android app development along with a few of its companions: Scala, Groovy and stepping up is Kotlin.
Kotlin Background
Let first you will need to understand what exactly is Kotlin so it is considered as statically typed programming language that runs on JVM(Java Virtual Machine) and JavaScript. It is developed by JetBrains and open-source community. The ‘Kotlin’ name came from Kotlin Island located near Saint Petersburg. It is supported by leading IDEs and compatible with Java 6 or Java 8. Kotlin is described as a general-purpose language and introduces functional features to support Java interoperability. The Kotlin project was born out of the aspiration for heightened productivity. The goal was to improve the coding experience in a way that was both practical and effective.
A central focus of Kotlin is to enable mixed-language projects. Kotlin also introduces improved syntax, as well as concise expressions and abstractions. Using Kotlin with Java reduces excessive boilerplate code, which is a huge win for Android developers. Kotlin came when Android development needed a more modern language to add to the qualities of java and aid in mobile development. This allows developers to not only easily update old Java apps to Kotlin, but also carry on their old work in Java to Kotlin.
Here’s a brief example Kotlin language
package hello
fun main() {
  println("Hello World")
}
It’s that simple! Kotlin uses developer-friendly coding structures and norms that are easy-to-understand and use. When considering this example from the develops’ perspective, you will be able to understand why Kotlin is loved by developers around the world. It is concise, effective, and faster compared to Java.
Is Java Dead?
Based on the group that I program with it appears that Java is currently in the area with us developers. Java is a reputable programming language with vast open-source tools and libraries to help developers. With that said, no language is without fault and even Java is subject to complications that can make a developer’s job tedious. If anything the objective for Kotlin is to supposedly introduce solutions to the common programming headaches and improve the Java ecosystem as a whole.
Strict Trial And Error
Kotlin has some milage under itself and has become a more stable and congruous development option especially within the Android Studio IDE. Some developers seem to believe that Kotlin will oust Java for Android development in future years. Other reviewers seem to believe Kotlin and Java should be coexisting without one outweighing the other.
This is a quality Java is not known for; however, readability should always take priority over concision. Yes, the succinct nature of Kotlin simplifies a developer’s job and mitigates the risk for error, but Kotlin doesn’t practice concision for concision’s sake. So let’s take the example below and compare the difference in the languages presents.
public class MathLife {
   public static double calculate () throws Exception {
      switch(op) {
         case "add":
            return a + b;
         case "subtract":
            return a - b;
         case "multiply":
            return a * b;
         case "divide":
            return a / b;
         default:
            throw new Exception();
      }
   }
}
Above is a simple calculator function written in Java. For comparison, here is the same calculator in Kotlin:
fun calculate(a: Double, op: String, b: Double): Double {
   when (op) {
      "add" -> return a + b
      "subtract" -> return a - b
      "multiply" -> return a * b
      "divide" -> return a / b
      else -> throw Exception()
   }
}
It may not seem like much, but the Kotlin version of this calculator is written in half the lines of code it took to program the function in Java. Brevity is a crucial factor in productivity. Writing large projects becomes easier when a developer is given more power for every line of code. A key observation here is Kotlin does not overlook comprehension for the sake of brevity. The syntax is concise, readable and still substantial.
The Winner: Java or Kotlin
In all fairness, chances are that you have been taught, learn and embraced Java. Switching to Kotlin at a time can be a bit of shock, so it is important to do this transition slowly to make sure you understand. having said that, Kotlin is the new official language and owing to its modern nature, it will become widely adopted in the future, so learning it and starting development with it right now would be a good idea. Understand java will continue to be a popular language for several years to come and isn’t likely to be entirely replaced. So take your time and make the switch gently.
At the end of the day, it’s all about what you feel comfortable with. As stated previously to be a true blood Androidian, you will need to have a working knowledge of the language Java. But if you already do have that then the Kotlin language of the future, so you might as well spend some time getting accustomed to it.
- Published in Android, Java, Kotlin, Language, Programming Languages
HTML5 Hidden Gems

When people tell me they are interested in web development and ask me where to begin. My response has always been to start with “HTML” it’s easy. Reflecting back on earlier introduction to web development it was really easy especially with html4 and probably hands down the easiest programming language.
HTML is an incredible and powerful markup language that can be used to give web application structure while also providing powerful accessibility benefits.
Today we will focus on 10 HTML element tags that should in your tool bag and ideally, it will aid you and ensure that your site is a more accessible and structurally sound web presence.
- Audio
- Blockquote
- Output
- Picture
- Progress
- Meter
- Template
- Time
- Video
- Word Break OP
Audio
<audio>
   <source src="bulbasaur.mp3" type="audio/mpeg" />
   <source src="bulbasaur.ogg" type="audio/ogg" />
   <source src="bulbasaur.wav" type="audio/wav" />
</audio>
Blockquote
this tag specifies a section that is considered a quote from some other source.
<blockquote>
Lorem ipsum dolor sit amet, consectetuer adipiscing elit. Aenean commodo ligula eget dolor. Aenean massa. Cum sociis natoque penatibus et magnis dis parturient montes, nascetur ridiculus mus.
</blockquote>
Output
This tag is a little fancier because it represents the results of a calculation. You can use the plus sign and equal symbol to indicate that the first and second input values should be “outputted” to the output tag; you can denote this with a for attribute containing the ids of the two elements to combine.
<form oninput="x.value=parseInt(a.value)+parseInt(b.value)">
   <input type="range" id="a" value="50">
   +<input type="number" id="b" value="25">
   =<output name="x" for="a b"></output>
</form>
Picture
This tag allows the user to specify the image sources. Instead of having an image that you scale up and down depending upon the viewport width, multiple images can be designed to fill the browser viewport. the tag is partnered with additional tags <source> and <img> tags. the following attributes are to keep in mind when using the <picture> tag.
- media: accepts any valid media query that you might define within CSS
- type: defines the MIME-type
- sizes: defines a single width value
- srcset: this is a required attribute. defines the URL of the image to display
<picture>
   <source media="(min-width:650px)" srcset="charmander.jpg">
   <source media="(min-width:465px)" srcset="evee.jpg">
   <img src="squirtle .jpg" alt="pokemon" style="width:auto;">
</picture>
The <img> tag is used to provide backward compatibility if a browser doesn’t support the <picture> tag or if none of the <source> tags to match.
Progress
This tag represents the progress of a task. the tag is not a replacement for the <meter> tag, thus components indicating disk space usage or query result relevance should use the <meter> tag.
<progress id="file" value="32" max="100"> 32% </progress>
Meter
this tag defines a scalar measurement within a defined range or a fractional value. Many also refer to this tag as a “gauge”. the tag can be used to display disk usage statistics or to indicate the relevance of search results.
<label for="disk_c">Disk usage C:</label>
<meter id="disk_c" value="2" min="0" max="10">2 out of 10</meter><br>

<label for="disk_d">Disk usage D:</label>
<meter id="disk_d" value="0.6">60%</meter>
Template
This tag contains content that is hidden from the user but will be used to instantiate the HTML code. Using javascript you can render this content with the cloneNode() method.
<template>
   <h2>Pokemon</h2>
   <img src="charmander.jpg" width="214" height="204">
</template>
Time
This tag defines a human-readable date or time. This can be used to encode dates and times in a machine-readable manner so that user agents can add reminders or scheduled events to the user’s calendar. This is also helpful for search engines to produce smarter search results.
<p>Open from <time>10:00</time> to <time>21:00</time> every weekday.</p>

<p>I have a date on <time datetime="2008-02-14 20:00">Valentines day</time>.</p>
Video
This tag specifies a video stream or movie clip. Similar to the audio tag it has formats that are supported: MP4, WebM, and Ogg
<video width="320" height="240" controls>
   <source src="mewtwo.mp4" type="video/mp4">
   <source src="mewtwo.ogg" type="video/ogg">
   Your browser does not support the video tag.
</video>
Word Break Opportunity
If you have a long block of text or a long word you can use this tag to specify where in a body to text it would be ideal to break on.
<p>To learn AJAX, you must be familiar with the XML<wbr>Http<wbr>Request Object.</p>
- Published in blog, HTML5, Programming Languages, Web Application Development
Integrating Google’s reCAPTCHA w/Android

Introduction
Google’s reCAPTCHA API protects your website/app from malicious traffic. You might have seen the reCAPTCHA integrated on web pages. You can integrate the same in your Android apps too using SafeNet API. The service is free to use and it will show a captcha to be solved if the engine suspects user interaction to be a bot instead of a human.
Within this post, I will explain and build a simple button click application that will integrate captcha to avoid bots from submitting forms on there own. But understand that this method is not only limited to form usage but a user can integrate any this module into any app
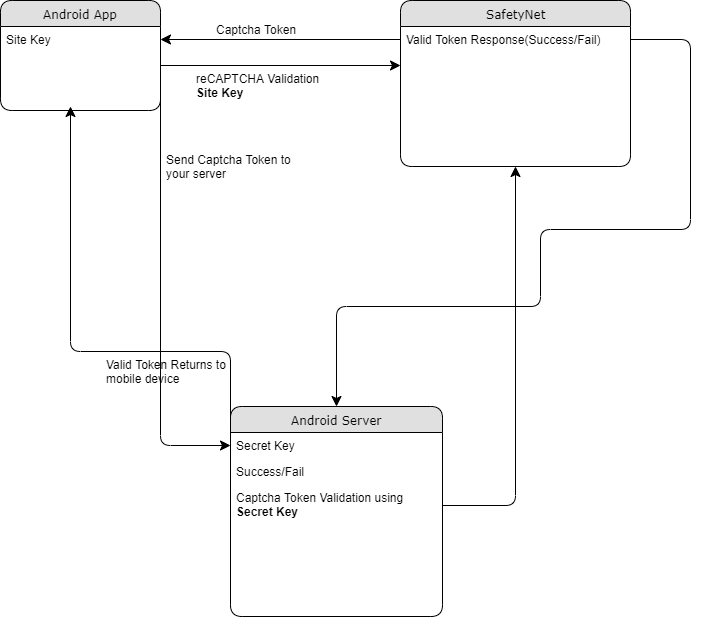
How it works
The following point will explain the simple flow of reCAPTCHA in Android with SafetyNet API.
- First, a user needs to obtain the SafetyNet key pair by registering your app. After completing this a Site & Secret Key.
- The Site Key will be integrated into an Android app and it can be public. Secret Key should be kept on your server and it shouldn’t be exposed.
- When reCAPTCHA is invoked, it will show the Captcha challenge to a user it necessary. In this step, it communicates with the captcha server and returns “User Response Token” using Site Key.
Registering your App w/SafetyNet
To begin before diving into the application creation we need to get the keys that will be validated against.
Fist go to the site following site and sign up if you do not already have an account
- https://www.google.com/recaptcha/intro/v3.html
- After accessing your account create
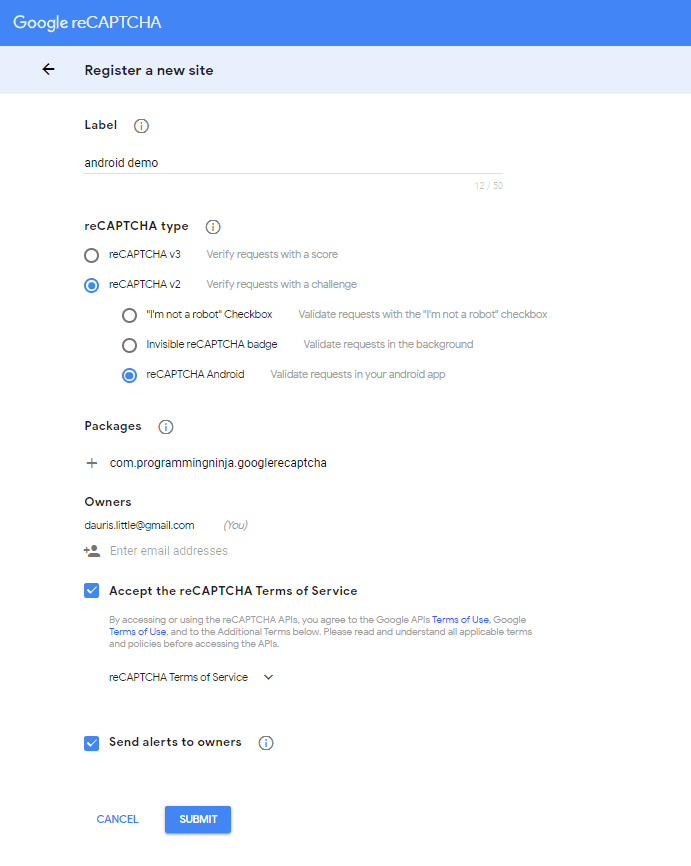
- Register a new account
- Now enter your label, reCAPTCHA type, domains and then accept “Terms of Service”
NOTE: Regarding the label the title be anything that identifies the api key to yourself
NOTE: Regarding the selecting reCAPTCHA if working with android select reCAPTCHA v2 then reCAPTCHA Android
NOTE: Regarding populating the domain should be your Package Name in Package Names Section
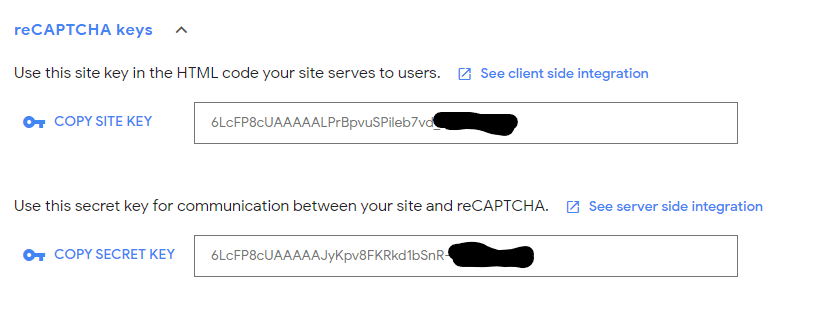
Then, you will get the site key and secret key from SafetyNet API Server and it as well as shows client and server-side integration code snippets. The following figures show the same.
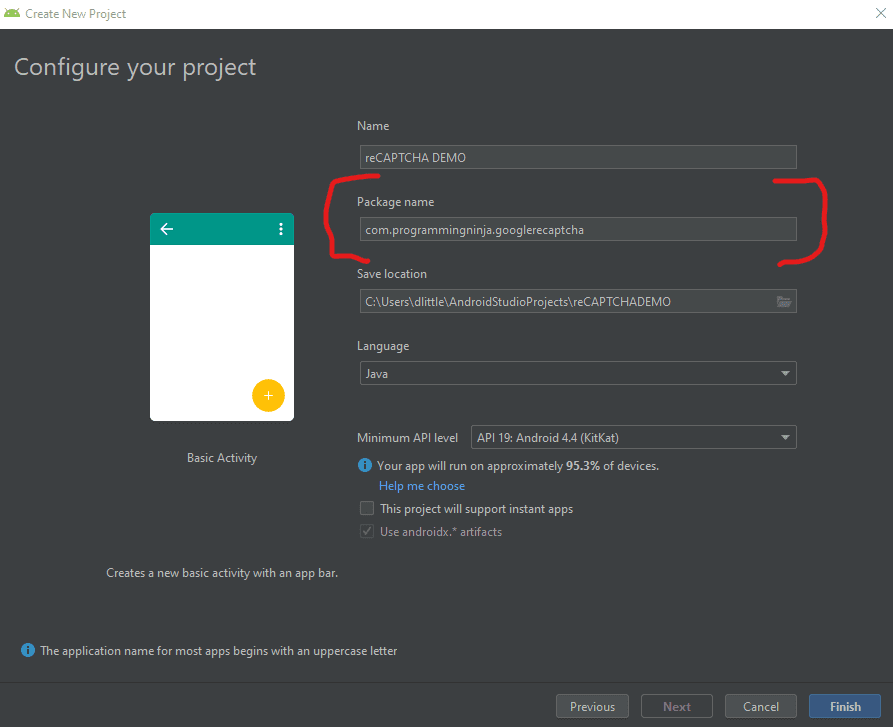
Step 1 – Create New Project w/Android Studio
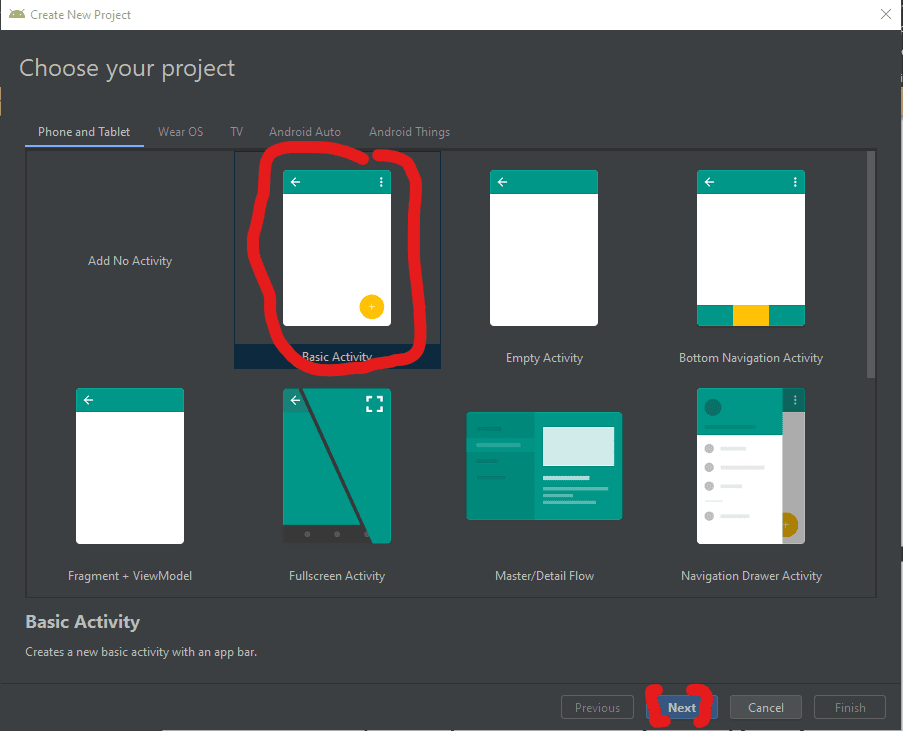
Now lets begin with the fun stuff and to begin you will begin by open Android Studio and then “Create New Project”
- Begin by Start a new Android Studio Project èselect Basic Activity from templates.
NOTE: While creating, use the package name you have registered on reCAPTCHA dashboard.
Step 2 – Setting up the library & AndroidMainfest for the project
Add SafeNet and the Volley dependency to your build.gradle and rebuild the project. Here, I used the following dependency. You can change as per your Android SDK.
NOTE: Volley is used to send HTTP call to our server to validate the captcha token on the server side.
build.gradle
dependencies {
    implementation fileTree(dir: 'libs', include: ['*.jar'])
    implementation 'androidx.appcompat:appcompat:1.1.0'
    implementation 'androidx.constraintlayout:constraintlayout:1.1.3'
    implementation 'com.google.android.material:material:1.0.0'
    testImplementation 'junit:junit:4.12'
    androidTestImplementation 'androidx.test.ext:junit:1.1.1'
    androidTestImplementation 'androidx.test.espresso:espresso-core:3.2.0'

    //dependency for recaptcha (safetynet)
    implementation 'com.google.android.gms:play-services-safetynet:17.0.0'

    //dependency for fast networking for networking
    implementation 'com.android.volley:volley:1.1.0'
}
Now we need to add the app manifest file with the following permission(s). SafetyNet library is used to create the captcha validation in android. Volley library is an HTTP Networkinf library used here for validating captcha response.
AndroidManifest.xml
<uses-permission android:name="android.permission.INTERNET"/>
Step 3 – Implementation of SafetyNet API
If you are still with me then let’s dive into the Java part of the project. We will first ensure that we have all the modules that will be used in the application
Required modules
import android.os.Bundle;
import android.util.Log;
import android.view.View;
import android.widget.Button;
import android.widget.TextView;

import androidx.appcompat.app.AppCompatActivity;
import androidx.annotation.NonNull;

//volley
import com.android.volley.DefaultRetryPolicy;
import com.android.volley.RequestQueue;
import com.android.volley.Request;
import com.android.volley.Response;
import com.android.volley.VolleyError;
import com.android.volley.toolbox.StringRequest;
import com.android.volley.toolbox.Volley;


import com.google.android.gms.common.api.ApiException;
import com.google.android.gms.common.api.CommonStatusCodes;
import com.google.android.gms.safetynet.SafetyNet;
import com.google.android.gms.safetynet.SafetyNetApi;
import com.google.android.gms.tasks.OnFailureListener;
import com.google.android.gms.tasks.OnSuccessListener;

import org.json.JSONObject;

import java.util.HashMap;
import java.util.Map;

import android.view.Menu;
import android.view.MenuItem;
Step 3 – Implementation of SafetyNet API (Continue)
If you are still with me then let’s dive into the Java part of the project. We will first ensure that we have all the modules that will be used in the application
- Replace “Site_Key” and “Site_Secret_Key” with your appropriate “Site Key” and “Secret Key” get from SafetyNet API while registering app.
- The API will check the Server and it has a separate callbacks from success and failure.
- At Success, we will get Captcha Response Token which will be used to validate the user interaction is made by a bot or real human.
- We will discuss how to validate the token with SafetyNet API Server in next step.
NOTE: the call on the created click event
protected void onCreate(Bundle savedInstanceState) {
        super.onCreate(savedInstanceState);
        setContentView(R.layout.activity_main);

        btn = findViewById(R.id.reCaptcha);
        txtV = findViewById(R.id.verifyText);
        btn.setOnClickListener(this);

        requestQueue = Volley.newRequestQueue(getApplicationContext());
    }

    public void onClick(View view){
        SafetyNet.getClient(this).verifyWithRecaptcha(Site_Key)
                .addOnSuccessListener(this, new OnSuccessListener <SafetyNetApi.RecaptchaTokenResponse>(){
                    @Override
                    public void onSuccess(SafetyNetApi.RecaptchaTokenResponse response){
                        if (!response.getTokenResult().isEmpty()){
                            handleCaptchaResult(response.getTokenResult());

                        }
                    }
        })
                .addOnFailureListener(this, new OnFailureListener() {
                    @Override
                    public void onFailure(@NonNull Exception e) {
                        if (e instanceof  ApiException){
                            ApiException apiException = (ApiException)e;
                            Log.d(TAG, "Error Message: " + CommonStatusCodes.getStatusCodeString(apiException.getStatusCode()));
                        } else {
                            Log.d(TAG, "Unknown error type or error" + e.getMessage());
                        }
                    }
                });
    }
Step 4 – Captcha Response Token Validation
- We have to verify the token getting from the server using the secret key.
- It can achieve by using the following.
-
- API Link – https://www.google.com/recaptcha/api/siteverify
- Method – POST
- Params – secret, response (We have to pass the “SECRET_KEY” and “TOKEN” respectively)
NOTE: Volley has
- RequestQueue to maintain the server calls in queue.
- RetryPolicy to retry the server call if it is fail with TimeOut and Retry Count. We can change those values.
- StringRequest is used for getting Response as JSON String.
- Method.POST denotes the call as POST method.
- Params are passed to server using Map, HashMap.
The SafetyNet API provides the response respective to the parameters passed and the success is Boolean Datatype.
void handleCaptchaResult(final String responseToken){
        String url = "https://www.google.com/recaptcha/api/siteverify"; //consider using global variable here
        StringRequest request = new StringRequest(Request.Method.POST, url, new Response.Listener<String>() {
            @Override
            public void onResponse(String response) {
                try {
                    JSONObject jsonObject = new JSONObject(response);
                    if (jsonObject.getBoolean("success")) {
                        txtV.setTextSize(35);
                        txtV.setText("Congratulations! You're not a robot anymore");
                    }
                } catch (Exception ex) {
                    Log.d(TAG, "Error message: " + ex.getMessage());
                }
            }
        },
                new Response.ErrorListener() {
                    @Override
                    public void onErrorResponse(VolleyError error) {
                        Log.d(TAG, "Error message: " + error.getMessage());
                    }
                })
        {
            @Override
            protected Map<String,String> getParams(){
                Map<String,String> params = new HashMap<>();
                params.put("secret", Site_Secret_Key);
                params.put("response", responseToken);
                return params;
            }
        };
        request.setRetryPolicy(new DefaultRetryPolicy(50000,DefaultRetryPolicy.DEFAULT_MAX_RETRIES,DefaultRetryPolicy.DEFAULT_BACKOFF_MULT));
        requestQueue.add(request);
    }
Full Review / Conclusion
In this blog tutorial, I was able to show you how to use Google’s reCAPTCHA in our Android app. Understand using reCAPTCHA in any app, we need to get one Site key and one Secret key and after that, we request for the captcha from the reCAPTCHA server. Once we get the reCAPTCHA and the user has entered the captcha, we send the entered value to the reCPATCA server and get the captcha token. This token is sent to our server and our server along with the secret key send the token to the reCAPTCHA server again. After that, we get some success message and that message is conveyed to our Android app.
NOTE: I have also displayed below the code for the layout for the main activity as well. This is the just a simple layout but the practical could be implemented with very little ease.
import android.os.Bundle;
import android.util.Log;
import android.view.View;
import android.widget.Button;
import android.widget.TextView;

import androidx.appcompat.app.AppCompatActivity;
import androidx.annotation.NonNull;

//volley
import com.android.volley.DefaultRetryPolicy;
import com.android.volley.RequestQueue;
import com.android.volley.Request;
import com.android.volley.Response;
import com.android.volley.VolleyError;
import com.android.volley.toolbox.StringRequest;
import com.android.volley.toolbox.Volley;


import com.google.android.gms.common.api.ApiException;
import com.google.android.gms.common.api.CommonStatusCodes;
import com.google.android.gms.safetynet.SafetyNet;
import com.google.android.gms.safetynet.SafetyNetApi;
import com.google.android.gms.tasks.OnFailureListener;
import com.google.android.gms.tasks.OnSuccessListener;

import org.json.JSONObject;

import java.util.HashMap;
import java.util.Map;

import com.google.android.material.floatingactionbutton.FloatingActionButton;
import com.google.android.material.snackbar.Snackbar;

import androidx.appcompat.widget.Toolbar;


import android.view.Menu;
import android.view.MenuItem;

public class MainActivity extends AppCompatActivity implements View.OnClickListener {

    String TAG = MainActivity.class.getSimpleName();
    Button btn;
    TextView txtV;
 // TODO - replace the SITE KEY with yours
    String Site_Key = "6LcFP8cUAAAAALPrBpvuSPileb7vd"; //consider making global variable(this will not work not a valid key)
 // TODO - replace the Secret KEY with yours
    String Site_Secret_Key = "6LcFP8cUAAAAAJyKpv8FKRkd1bSnR-"; //consider making global variable(this will not work not a valid key)
    RequestQueue requestQueue;

    //application space controls
    @Override
    protected void onCreate(Bundle savedInstanceState) {
        super.onCreate(savedInstanceState);
        setContentView(R.layout.activity_main);

        btn = findViewById(R.id.reCaptcha);
        txtV = findViewById(R.id.verifyText);
        btn.setOnClickListener(this);

        requestQueue = Volley.newRequestQueue(getApplicationContext());
    }

    @Override
    public void onClick(View view){
        SafetyNet.getClient(this).verifyWithRecaptcha(Site_Key)
                .addOnSuccessListener(this, new OnSuccessListener <SafetyNetApi.RecaptchaTokenResponse>(){
                    @Override
                    public void onSuccess(SafetyNetApi.RecaptchaTokenResponse response){
                        if (!response.getTokenResult().isEmpty()){
                            handleCaptchaResult(response.getTokenResult());

                        }
                    }
        })
                .addOnFailureListener(this, new OnFailureListener() {
                    @Override
                    public void onFailure(@NonNull Exception e) {
                        if (e instanceof  ApiException){
                            ApiException apiException = (ApiException)e;
                            Log.d(TAG, "Error Message: " + CommonStatusCodes.getStatusCodeString(apiException.getStatusCode()));
                        } else {
                            Log.d(TAG, "Unknown error type or error" + e.getMessage());
                        }
                    }
                });
    }

    void handleCaptchaResult(final String responseToken){
        String url = "https://www.google.com/recaptcha/api/siteverify"; //consider using global variable here
        StringRequest request = new StringRequest(Request.Method.POST, url, new Response.Listener<String>() {
            @Override
            public void onResponse(String response) {
                try {
                    JSONObject jsonObject = new JSONObject(response);
                    if (jsonObject.getBoolean("success")) {
                        txtV.setTextSize(35);
                        txtV.setText("Congratulations! You're not a robot anymore");
                    }
                } catch (Exception ex) {
                    Log.d(TAG, "Error message: " + ex.getMessage());
                }
            }
        },
                new Response.ErrorListener() {
                    @Override
                    public void onErrorResponse(VolleyError error) {
                        Log.d(TAG, "Error message: " + error.getMessage());
                    }
                })
        {
            @Override
            protected Map<String,String> getParams(){
                Map<String,String> params = new HashMap<>();
                params.put("secret", Site_Secret_Key);
                params.put("response", responseToken);
                return params;
            }
        };
        request.setRetryPolicy(new DefaultRetryPolicy(50000,DefaultRetryPolicy.DEFAULT_MAX_RETRIES,DefaultRetryPolicy.DEFAULT_BACKOFF_MULT));
        requestQueue.add(request);
    }
}
<androidx.constraintlayout.widget.ConstraintLayout
    xmlns:android="http://schemas.android.com/apk/res/android"
    xmlns:app="http://schemas.android.com/apk/res-auto"
    xmlns:tools="http://schemas.android.com/tools"
    android:layout_width="match_parent"
    android:layout_height="match_parent"
    tools:context=".MainActivity">
    <LinearLayout
        android:layout_height="match_parent"
        android:layout_width="match_parent"
        android:orientation="vertical">

        <Button
            android:id="@+id/reCaptcha"
            android:layout_height="wrap_content"
            android:layout_width="wrap_content"
            android:text="Show reCAPTCHA"/>

        <TextView
            android:id="@+id/verifyText"
            android:layout_width="wrap_content"
            android:layout_height="wrap_content"
            android:capitalize="characters"
            android:text="Hello World"
            android:textSize="24sp" />

    </LinearLayout>
</androidx.constraintlayout.widget.ConstraintLayout>
- Published in Android, API, blog, Java, Mobile Development, Programming Languages