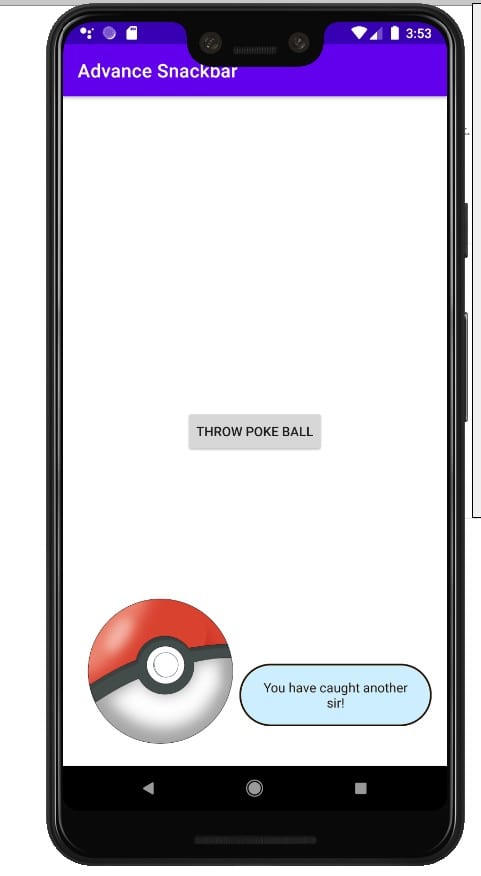
Creating Advance Custom Snackbar w/ Kotlin

Ask 100 different developers about what they find most exciting about android development and you will get as many different responses. Personally, I find the customization of the various framework and design libraries. Consider it as such if there is something that doesn’t fit your needs within the development process that as a developer we create custom views without any issues. Within this post, we will be working on a custom Snackbar.
What is a Snackbar? Well simply enough a Snackbars provide lightweight feedback about an operation. They show a brief message at the bottom of the screen on mobile and lower left on larger devices. Snackbars appear above all other elements on screen and only one can be displayed at a time.
Though the Snackbar by default has a few customizable features, consider the fact that the default features may not match the application style. Fortunately, we can easily create a custom Snackbar by implementing just a few classes. If you are unfamiliar with what a Snackbar is please review my previous post regarding the library. Be aware that it may be a little confusing at glance but fear not we will review it the most important part that is to highlight which are:
BottomTransientBottomBarwhich is the parent view- ContentViewCallback
make()a factory method- find the parent view, inflate the custom view, and set additional properties
- customizable method
Custom View
It is assumed that you have already created/opened your current project within your IDE. Now we create a custom view that will be displayed at the bottom of the screen when called. This design will be the simplest form which contains an image and static message.
class CustomSnackbarView @JvmOverloads constructor(context: Context, attrs: AttributeSet? = null, defStyleAttr: Int = 0) : ConstraintLayout (context, attrs, defStyleAttr) {

    private val customImg : AppCompatImageView

    init {
        View.inflate(context, R.layout.view_custom_snackbar, this)
        clipToPadding = false
        this.customImg = findViewById(R.id.img_snack)
    }
}
this is accompanied by the following layout XML
<?xml version="1.0" encoding="utf-8"?>
<merge
    xmlns:android="http://schemas.android.com/apk/res/android"
    xmlns:tools="http://schemas.android.com/tools"
    xmlns:app="http://schemas.android.com/apk/res-auto"
    android:layout_width="match_parent"
    android:layout_height="wrap_content"
    tools:parentTag="androidx.constraintlayout.widget.ConstraintLayout">

    <androidx.appcompat.widget.AppCompatImageView
        android:layout_width="173dp"
        android:layout_height="173dp"
        android:id="@+id/img_snack"
        android:scaleType="centerInside"
        app:layout_constraintBottom_toBottomOf="parent"
        app:layout_constraintLeft_toLeftOf="parent"
        app:layout_constraintStart_toStartOf="parent"
        app:srcCompat="@drawable/pokeball" />

    <androidx.appcompat.widget.AppCompatTextView
        android:layout_width="0dp"
        android:layout_height="wrap_content"
        android:id="@+id/tv_snack"
        android:gravity="center"
        android:padding="16dp"
        android:text="You have caught another sir!"
        android:textColor="#28140c"
        android:background="@drawable/custom_snackbar_bg"
        app:layout_constraintEnd_toEndOf="parent"
        app:layout_constraintRight_toRightOf="parent"
        app:layout_constraintBottom_toBottomOf="@+id/img_snack"
        app:layout_constraintLeft_toRightOf="@+id/img_snack"
        app:layout_constraintStart_toEndOf="@+id/img_snack"
        app:layout_constraintTop_toTopOf="@+id/img_snack"
        app:layout_constraintVertical_bias="0.75" />
</merge>
Implementation of Custom View
Now the objective is to implement ContentViewCallback. The interface objective is to notify when the Snackbar starts appearing and dismissing using animateContentIn() and animateContentOut()
class CustomSnackbarView @JvmOverloads constructor(context: Context, attrs: AttributeSet? = null, defStyleAttr: Int = 0) : ConstraintLayout (context, attrs, defStyleAttr), ContentViewCallback {

    private val customImg : AppCompatImageView

    init {
        View.inflate(context, R.layout.view_custom_snackbar, this)
        clipToPadding = false
        this.customImg = findViewById(R.id.img_snack)
    }

    override fun animateContentIn(delay: Int, duration: Int) {
        val scaleX = ObjectAnimator.ofFloat(customImg, View.SCALE_X, 0f, 1f)
        val scaleY = ObjectAnimator.ofFloat(customImg, View.SCALE_Y, 0f, 1f)
        AnimatorSet().apply {
            interpolator = OvershootInterpolator()
            setDuration(500)
            playTogether(scaleX,scaleY)
        }.start()

    }

    override fun animateContentOut(delay: Int, duration: Int) {
        TODO("Not yet implemented")
    }

}
Take note that there is a simple scale animation as the Snackbar appears. Now setting the clipToPadding to false is important to avoid the image from clipping because of OvershootInterpolator.
Extending BaseTransientBottomBar
We are now at the point to create an equivalent class for the Snackbar.
The custom Snackbar constructor accepts two params: one for the parent view and another for the custom view that supports the implementation of ContentViewCallback.
class CustomSnackbar(parent: ViewGroup, content: CustomSnackbarView) : BaseTransientBottomBar<CustomSnackbar>(parent, content, content) {

}
Now to implement the entry point method make(). As stated earlier in this post, there are three things to accomplish:
- There is no reason to attempt and recreate the wheel so we will borrow the logic from the Snackbar’s source code
internal fun View?.findParent(): ViewGroup? {

    var view = this
    var fallback: ViewGroup? = null

    do {
        if (view is CoordinatorLayout) {
            //the Coordinator layout has been found
            return view
        } else if (view is FrameLayout) {
            if (view.id == android.R.id.content) {
                //coordinator layout not found so we need to use the appropriate hierarchy
                return view
            } else {
                //if no view assign the fallback
                fallback = view
            }
        }

        if (view != null) {
            //will continue to search for the view
            val parent = view.parent
            view = if (parent is View) parent else null
        }
    } while (view != null)

    return fallback
}
- Inflate the custom view
- inflating a custom view is best done by using the XML layout
<?xml version="1.0" encoding="utf-8"?>
<com.programmingninja.advancesnackbar.snackbar.CustomSnackbarView
    xmlns:android="http://schemas.android.com/apk/res/android"
    android:layout_width="match_parent"
    android:layout_height="wrap_content"
    android:padding="8dp" />
- Build and correct errors
class CustomSnackbar(parent: ViewGroup, content: CustomSnackbarView) : BaseTransientBottomBar<CustomSnackbar>(parent, content, content) {

    companion object {
        fun make(view: View) : CustomSnackbar{

            //set parent for this view
            val parent = view.findParent() ?: throw IllegalArgumentException("No suitable parent found from the correct view. Please correct.")

            //custom view inflated
            val customView = LayoutInflater.from(view.context).inflate(R.layout.activity_snackbar, parent, false) as CustomSnackbarView

            //creation and return this new snackbar
            return CustomSnackbar(parent, customView)
        }

    }
}
If we attempt to run the code, you will notice that there is a gray background and padding. Why is this? This is because the BaseBottomTransientBar implementation is wrapped with the SnackbarBasrLayout. The workaround for this issue is simple enough by adding an init() block
init {
        getView().setBackgroundColor(ContextCompat.getColor(view.context, android.R.color.transparent))
        getView().setPadding(0,0,0,0)
}
Wrapping it altogether
Modify the MainActivity with the following
class MainActivity : AppCompatActivity() {
    override fun onCreate(savedInstanceState: Bundle?) {
        super.onCreate(savedInstanceState)
        setContentView(R.layout.activity_main)

        findViewById<View>(R.id.btn_catch_em).setOnClickListener {
            CustomSnackbar.make(it).show()
        }
    }
}
Now we need to modify the main activity layout
<?xml version="1.0" encoding="utf-8"?>
<androidx.constraintlayout.widget.ConstraintLayout
    xmlns:android="http://schemas.android.com/apk/res/android"
    xmlns:app="http://schemas.android.com/apk/res-auto"
    xmlns:tools="http://schemas.android.com/tools"
    android:layout_width="match_parent"
    android:layout_height="match_parent"
    tools:context=".MainActivity">

    <androidx.appcompat.widget.AppCompatButton
        android:layout_width="wrap_content"
        android:layout_height="wrap_content"
        android:id="@+id/btn_catch_em"
        android:layout_margin="8dp"
        android:text="Throw Poke Ball"
        app:layout_constraintEnd_toEndOf="parent"
        app:layout_constraintStart_toStartOf="parent"
        app:layout_constraintTop_toTopOf="parent"
        app:layout_constraintBottom_toBottomOf="parent" />
</androidx.constraintlayout.widget.ConstraintLayout>
- Published in Android, Kotlin, Programming Languages, Tutorial
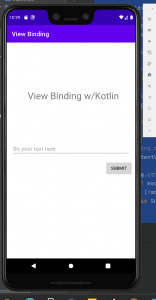
View Binding w/Android
View Binding Purposes?
note: View binding is a feature that allows you to more easily write code that interacts with views. Once view binding is enabled in a module, it generates a binding class for each XML layout file present in that module. An instance of a binding class contains direct references to all views that have an ID in the corresponding layout.
View Binding is part of Android Jetpack. View Binding was introduced at the Android Talk at Google IO/19. Let’s learn more about this. In most cases, view binging replaces findViewById. Ultimately the findViewById, is used to declare the view variable for x times to use it. It makes a lot of boilerplate code inside the view Activity/Fragment. That is why View Binding came to provide a good way to access all views with onlu init one variable.
Key features
- ViewBinding is always null safe and type-safe, which supports both Java and Kotlin.
- ViewBinding is introduced in the Gradle version 3.6 and above (which comes with the Android Studio 4.0, only gradle 3.6).
- ViewBinding also helps to reduce the boilerplate code, hence reducing the code redundancy.
- While using the ViewBinding proper naming conventions are need to be followed because it creates the binding class internally using the name of the same layout file. Naming the layout file in the snake case is preferred. For Example, the ViewBinding creates activity_main.xml(snake case) file as ActivityMainBinding(pascal case), which contains all the property and instances of all the views containing in that layout.
- And also whatever IDs of all elements are created inside the layout XML file, the ViewBinding converts them to camel case. For example: android:id=”button_submit” -> buttonSubmit. Which is much useful in the code readability.
- Using ViewBinding the compilation of the code is a bit faster as compared to the traditional findViewById() method.
- The ActivityMainBinding class is generated in the following path under the project hierarchy this can be viewed.
Before View Binding
class MainActivity: AppCompatActivity() {
   val btnSignIn = findViewById<AppCompatButton>(R.id.btn_signIn)
   val txtUserStatus = findViewById<AppCompatTextView>(R.id.tv_userStatus)

   txtUserStatus?.Text = userProfile?.overview
   btnSignIn?.setOnClickListener {
      Snackbar sb = Snackbar.make(cl, "Successfully login attempt", Snackbar.LENGTH_SHORT);
      sb.show();
   }
}
After View Binding
class MainActivity: AppCompatActivity() {

   val binding = ActivityMainBinding.inflate(layoutInflater)

   binding.tv_UserStatus.text = userProfile?.overview
   binding.btnSignIn.setOnClickListener {
      Snackbar sb = Snackbar.make(cl, "Login Attempt Successful", Snackbar.LENGTH_SHORT);
      sb.show();
   }
}
Why View Binding
If you review the to above code clip you can notice a bit of the differences. For exmple you declare the binding variable from the generated view binding class. Now you can access all the view ids from the binding variable. The main advantages of using View Binding:
- Type Safety
- View binding provide a generated method od the same type as defined in the XML layout.
- Null Safety
- findViewById
Using View Binding
- enable viewBinding and this should take place with build.gradle
buildFeatures {
   viewBinding = true
}
- After enabling viewBinding perform the sync and let’s modify the XML layout
<?xml version="1.0" encoding="utf-8"?>
<androidx.constraintlayout.widget.ConstraintLayout
    xmlns:android="http://schemas.android.com/apk/res/android"
    xmlns:app="http://schemas.android.com/apk/res-auto"
    xmlns:tools="http://schemas.android.com/tools"
    android:layout_width="match_parent"
    android:layout_height="match_parent"
    android:id="@+id/cl_layer"
    tools:context=".MainActivity"
    tools:ignore="">

    <androidx.appcompat.widget.AppCompatTextView
        android:layout_width="match_parent"
        android:layout_height="wrap_content"
        android:id="@+id/tv_header"
        android:text="View Binding w/Kotlin"
        android:textSize="30dp"
        android:textAlignment="center"
        android:layout_marginStart="15dp"
        android:layout_marginTop="150dp"
        app:layout_constraintEnd_toEndOf="parent"
        app:layout_constraintStart_toStartOf="parent"
        app:layout_constraintTop_toTopOf="parent"

        />
    <androidx.appcompat.widget.AppCompatEditText
        android:layout_width="match_parent"
        android:layout_height="wrap_content"
        android:id="@+id/et_message"
        android:layout_marginStart="16dp"
        android:layout_marginEnd="16dp"
        android:layout_marginTop="128dp"
        android:hint="Sir, your text here"
        app:layout_constraintEnd_toEndOf="@id/tv_header"
        app:layout_constraintStart_toStartOf="@id/tv_header"
        app:layout_constraintTop_toBottomOf="@id/tv_header" />

    <androidx.appcompat.widget.AppCompatButton
        android:layout_width="wrap_content"
        android:layout_height="wrap_content"
        android:id="@+id/btn_submit"
        android:layout_marginTop="16dp"
        android:text="Submit"
        app:layout_constraintEnd_toEndOf="@id/et_message"
        app:layout_constraintTop_toBottomOf="@id/et_message" />
</androidx.constraintlayout.widget.ConstraintLayout>
PS: If your view id uses the under_score, it will be generated as a camelCase variable.
- The things that need to be focused on here are, creating the instance of the ViewBinding.
Kotlin
class MainActivity : AppCompatActivity() {

    //create instance ActivityMainBinding
    private lateinit var amb : ActivityMainBinding

    override fun onCreate(savedInstanceState: Bundle?) {
        super.onCreate(savedInstanceState)

        //create the instance of ActivityMainBinding
        val binding = ActivityMainBinding.inflate(layoutInflater)

        //binding.root returns the root layout
        setContentView(binding.root)

        binding.btnSubmit.setOnClickListener {
            val msg = binding.etMessage.text.toString()
            if (!msg.isEmpty()) Snackbar.make(binding.clLayer, binding.etMessage.text.toString(), Snackbar.LENGTH_SHORT).show()
            else Snackbar.make(binding.clLayer, "Message is currently empty", Snackbar.LENGTH_SHORT).show()
        }
    }
}
Java
public class MainActivity extends AppCompatActivity {

    //binding class to the xml
    //allows the system to automatically generate the system
    ActivityMainBinding amb;

    @Override
    protected void onCreate(Bundle savedInstanceState) {
        super.onCreate(savedInstanceState);

        //inflating the xml
        amb = ActivityMainBinding.inflate(getLayoutInflater());

        //retrieve the root layout
        View v = amb.getRoot();

        //ContentView for the layout
        setContentView(v);

        //calling the button and setting the click listener
        //call the button by id and set the click listener
        amb.btnSubmit.setOnClickListener(new View.OnClickListener() {
            @Override
            public void onClick(View v) {

                String msg = amb.etMessage.getText().toString();
                if (!msg.isEmpty()) Snackbar.make(amb.clLayer, amb.etMessage.getText().toString(), Snackbar.LENGTH_SHORT).show();
                else Snackbar.make(amb.clLayer, "Message is empty", Snackbar.LENGTH_SHORT).show();
            }
        });

    }
}
And that’s it. You are done setting up your view using View Binding.
if youre interested in seeing a tutorial on the topic check it out here:
- Published in Android, Java, Kotlin, Programming Languages
Oh, I need A Splash Screen, Right?

If you have had any smart phone before the I am sure you have seen a splash screen before. If you have not then for your information a spalsh screen is a screen that displays when you first open an app on the device. Many developer may refers to this as a launch screen and displays when that app is loading after being opened. When this loading process has completed, it transitions to a different screen where actual actions can be performed.
If you have noticed these splash sceen you most definitely noticed that they tend to only display for a short time and then its gone. Personally I feel that the splash screen is pretty vital part to any application since it is the user’s first impression/experience with the application.
Implementing Splash Screens
There are technically two ways to implement a splash screen.
Using a Timer (Get It Together)
This is the old easy approach. You have to create a dedicated splash screen Activity that shows up for x seconds then opens the appropriate activity. You get more flexibility here as you can add animations, custom views or any other element you can normally fit into an Activity layout. A very basic implementation of this is below
class SplashActivity : AppCompatActivity() {

    //setting the timer for the activity
    private val SPLASH_TIMER:Long = 5000 // this equates to seconds

    override fun onCreate(savedInstanceState: Bundle?) {
        super.onCreate(savedInstanceState)
        setContentView(R.layout.activity_splash)

        //fire after timer expires
        timedSplashScreen()
    }


    private fun timedSplashScreen() {
        Handler().postDelayed({
            //start the main activity
            startActivity(Intent(this, MainActivity::class.java))
        }, SPLASH_TIMER)
    }
}
Advantages:
- You can display awesome animation or some custom design that has been built. For example, the development of games.
- perform alternative activities on the splash screen
Disadvantages
- the launcher activity doesn’t show up immediately
- this is even worst during a cold start
- additionally, during cold start the user is stuck looking at the
windowBackground- afterward, the user still waits until the splash screen time expires before the app content
- Don’t expect the animation to wow your user every time
Using a Smart Timer (Get It Together)
This is very similar to the timer method listed above. The difference here is rather than make the delay be fixed, you vary it based on whether this is the user’s first time launching the app or not. We can accomplish this by using the SharedPreferences.
class SmartSplashActvity : AppCompatActivity() {
    override fun onCreate(savedInstanceState: Bundle?) {
        super.onCreate(savedInstanceState)
        setContentView(R.layout.activity_smart_splash_actvity)

        splashScreenKey()
    }

    private fun splashScreenKey() {
        val sp = getPreferences(MODE_PRIVATE)
        val firstLaunchPrefKey = "pref_first_launch"

        val splashDuration = when (sp.getBoolean(firstLaunchPrefKey, true)) {
            true -> {
                //
                sp.edit().putBoolean(firstLaunchPrefKey, false).apply()
                5000
            }
            false -> {
                //
                10000
            }
        }

        splashScreenDuration(splashDuration)
    }

    private fun splashScreenDuration(splashDuration: Int) {
        Handler().postDelayed({
            startActivity(Intent(this, MainActivity::class.java))
        }, splashDuration.toLong())
    }

}
Advantages:
- All the advantages that timer accomplished
- this method could aid in getting to the content quicker to the user.
Disadvantages
- all the disadvantages that exist for timer method
Splash Screen Best Practice
Now doing what needs to be done the right way. When the app is launched and has been in the memory yet, there is a delay between when the user started your app and when the launcher Activity’s onCreate() is called. During this what we call a “cold start”, the window manager tries to draw a UI placeholder using elements from the theme.xml. The key is creating a custom theme that overrides windowBackground, then replacing that custom theme with your standard theme before calling super.onCreate() in the activity.
class DedicatedSplashScreen : AppCompatActivity() {

    override fun onCreate(savedInstanceState: Bundle?) {
        super.onCreate(savedInstanceState)

        startActivity(Intent(this, MainActivity::class.java))
        finish()
    }

}
- Keep it free from unnecessary distraction
- Don’t use multiple colors or logos
- Use animation sparingly
Splash screens are simple. They’re used to enhance a brand and give users something nice to look at as they wait. .
- Published in Android, Kotlin, Programming Languages, Tutorial
Using View Binding w/Android

View Binding is one of the best features which provides the views to bind with the activity which is ongoing. Replacing the findViewById() method, hence reducing the boilerplate code, generated the instances of the views of the current layout. And most important feature about the View Binding is it’s always null safe. In this article detailed it’s been provided in detail approach for the View Binding.
if interested in knowing more about View Binding check out my previous blog
- Implementation
Of couse open your ide of choice, for myself I am using Android Studio, and create a project with and empty activity. if you are unfamiliar with this process or is missing this activity template please follow this link.
- Enable ViewBinding
After the ide fininish initilizing everything we are going to open the module build.gradle

note: this project layout is supplied by the ide Android Studio
android {

    ...

    buildFeatures {
        viewBinding = true
    }
}
- Modify XML
<?xml version="1.0" encoding="utf-8"?>
<androidx.constraintlayout.widget.ConstraintLayout
    xmlns:android="http://schemas.android.com/apk/res/android"
    xmlns:app="http://schemas.android.com/apk/res-auto"
    xmlns:tools="http://schemas.android.com/tools"
    android:layout_width="match_parent"
    android:layout_height="match_parent"
    android:id="@+id/cl_layer"
    tools:context=".MainActivity"
    tools:ignore="">

    <androidx.appcompat.widget.AppCompatTextView
        android:layout_width="match_parent"
        android:layout_height="wrap_content"
        android:id="@+id/tv_header"
        android:text="View Binding w/Kotlin"
        android:textSize="30dp"
        android:textAlignment="center"
        android:layout_marginStart="15dp"
        android:layout_marginTop="150dp"
        app:layout_constraintEnd_toEndOf="parent"
        app:layout_constraintStart_toStartOf="parent"
        app:layout_constraintTop_toTopOf="parent"

        />
    <androidx.appcompat.widget.AppCompatEditText
        android:layout_width="match_parent"
        android:layout_height="wrap_content"
        android:id="@+id/et_message"
        android:layout_marginStart="16dp"
        android:layout_marginEnd="16dp"
        android:layout_marginTop="128dp"
        android:hint="Sir, your text here"
        app:layout_constraintEnd_toEndOf="@id/tv_header"
        app:layout_constraintStart_toStartOf="@id/tv_header"
        app:layout_constraintTop_toBottomOf="@id/tv_header" />

    <androidx.appcompat.widget.AppCompatButton
        android:layout_width="wrap_content"
        android:layout_height="wrap_content"
        android:id="@+id/btn_submit"
        android:layout_marginTop="16dp"
        android:text="Submit"
        app:layout_constraintEnd_toEndOf="@id/et_message"
        app:layout_constraintTop_toBottomOf="@id/et_message" />
</androidx.constraintlayout.widget.ConstraintLayout>
UI Design
- Modify Activity class
package com.programmingninja.viewbinding

import androidx.appcompat.app.AppCompatActivity
import android.os.Bundle
import com.google.android.material.snackbar.Snackbar
import com.programmingninja.viewbinding.databinding.ActivityMainBinding

class MainActivity : AppCompatActivity() {

    //create instance ActivityMainBinding
    private lateinit var amb : ActivityMainBinding

    override fun onCreate(savedInstanceState: Bundle?) {
        super.onCreate(savedInstanceState)

        //create the instance of ActivityMainBinding
        val binding = ActivityMainBinding.inflate(layoutInflater)

        //binding.root returns the root layout
        setContentView(binding.root)

        binding.btnSubmit.setOnClickListener {
            val msg = binding.etMessage.text.toString()
            if (!msg.isEmpty()) Snackbar.make(binding.clLayer, binding.etMessage.text.toString(), Snackbar.LENGTH_SHORT).show()
            else Snackbar.make(binding.clLayer, "Message is currently empty", Snackbar.LENGTH_SHORT).show()
        }
    }
}
- Run that CODE
This new approach to finding views has an elegant interface, like Data Binding. Google designed it to avoid the performance issues of Data Binding and to provide compile-time safety.
See the completed code here: Fortress of Solitude
Show/Hide On-Screen Keyboard

Android R is also known as Android 11 release brought a few new APIs to the table and one of them is the new WindowInset which expands the control that we as developers have over the window insets. This includes the navigation and status bar as well as an on-screen keyboard.
This new release provides a direct way to check these state changes that now toggle and listen for changes in the visibility of the window insets. These options now allow the developer to control and react to the animation when the visibility state changes (but this is not going to be covered within this article).
Getting Started
When writing this post, Android 11 been running on more than 1% of devices, but thanks to the magic of AndroidX the APIs are also usable on several other devices with earlier versions. This post focus on using AndroidX implementation but you will find the equivalent APIs to use in documentation.
implementation "androidx.core:core-ktx:1.5.0-alpha05
Now we are going to insert the following code into the build.gradle file, under all the dependencies. (Note: Any version of 1.5.0 or later will work and please check for the latest version. Apply accordingly)
Show/Hide Keyboard
To start we need to access the WindowInsetsController. When the view is passed it doesn’t have to be an EditText directly but can be any view in the same hierarchy as the focused editText.
//note: ci is my shorthand for controllerInsets
val ci = ViewCompat.getWindowInsetsController(view)
Now that we have initialized the view let show the keyboard on the screen:
ci?.show(WindowInsetsCompat.Type.ime())
Let’s hide the keyboard now:
ci?.hide(WindowInsetsCompat.Type.ime())
Keyboard Visibility
If you have ever tried to check the keyboard visibility in the past then you have probably messed with the global layout listeners because there was no other way. Well, hold on to your trousers because finally there is a proper way to do it.
//start by accessing the root window insets
val insets = ViewCompat.getRootWindowInsets(view)

//Now check the visibility of the IME window
insets?.isVisible(WindowInsetsCompat.Type.ime())
Catching Keyboard Changes
To catch the changes with the keyboard visibility, then we have to let the device know that the app is now responsible for the content view of the insets.
//add the following now
WindowCompat.setDecorFitsSystemWindows(window, false)
This will force the view to be drawn behind the on-screen keyboard as well as other system UI, however, now that we are listening for the keyboard changes we can move any other conflicting views accordingly.
Conclusion
Controlling the on-screen keyboard is common in Android development, so the APIs are long overdue. Understand that this now provides us (developers) a more reliable and efficient way to control any type of window insets going forward. Also, note that AndroidX allows us to use these APIs with older Android versions as well.
- Published in Android, Java, Kotlin, Programming Languages
Using Snackbar

Android Snackbar is an interesting component introduced with the Material Design. Snackbars are very similar to the Toast messages with a few exceptions but the biggest is that provide action to interact with. Snackbar will be displayed at the bottom of the screen and can be swiped away in order to dismiss them.
Major Difference between Toast and Snackbar messages
- Toast message can be customized as well as displayed anywhere on the screen, however, Snackbar can be only shown at the bottom
- Toast messages cannot display action controllers but Snackbars optionally can display them
- Toast message remains on the screen until their time limit is mean but Snackbars can be swiped off before time expiring
note: similar to toast you have three different values for time limit
Implementing Snackbar
To begin this project is being created in Android Studio but any IDE that has the SDK for development can produce the same result. We begin by opening the ide and selecting “Create New Project”. Select “Empty Activity” and fill out the detail of the application and make sure with “Language” you select Java.
note: if you’re using Kotlin please review this tutorial
After the project is created open build.gradle and add the latest stable Material Design Dependency.
dependencies {
     implementation 'com.google.android.material:material:1.3.0'
}
By using the material dependency, you can also create components like Cardview, Recyclerview, and other things as well… If interested in learning to incorporate other material components review the below links.
Styling the App
<style name="AppTheme"
    parent="Theme.MaterialComponents.Light.NoActionBar">
    <item name="colorPrimary">@color/colorPrimary</item>
    <item name="colorPrimaryDark">@color/colorPrimary</item>
    <item name="colorAccent">@color/colorPrimary</item>
</style>
Method Creation
Open your MainActivity.java and we will begin by creating the following methods:
- Basic Snackbar
- As you can see the syntax is the default setup of the Snackbar. Please take note of the make function which accepts the following parameters. View, expected message to display and then the duration of the message to display.
public void basicSnack(View v){
    Snackbar sb = Snackbar.make(cl, "This is a basic Snackbar Display", Snackbar.LENGTH_SHORT);
    sb.show();
}
- Action Basic Snackbar
- Within this method, we reference a callback interaction using setAction(). This allows you to take a certain action when the user interacts with a Snackbar
public void basicActionSnack(View v) {
    Snackbar sb = Snackbar.make(cl, "Snackbar with Action Feature", Snackbar.LENGTH_SHORT);
    sb.setAction("Undo", new View.OnClickListener() {
        @Override
        public void onClick(View v) {
            Toast.makeText(getApplicationContext(), "Undo action", Toast.LENGTH_SHORT).show();
        }
    });
    sb.show();
}
- Custom Basic Snackbar
- By default, Snackbar text color is set to white with the default background #323232 but these features can be overwritten
public void basicCustomSnack( View v) {
    Snackbar sb = Snackbar.make(cl, "Custom Snackbar", Snackbar.LENGTH_SHORT);
    sb.setAction("Undo", new View.OnClickListener() {
        @Override
        public void onClick(View v) {
            Toast.makeText(getApplicationContext(), "Undoing Action", Toast.LENGTH_SHORT).show();
        }
    });

    sb.setActionTextColor(Color.CYAN);
    View sbv = sb.getView();
    TextView tv = sbv.findViewById(R.id.snackbar_text);
    tv.setTextColor(Color.GREEN);

    sb.show();
}
Let’s check the completed code
<!-- main activity xml-->
<?xml version="1.0" encoding="utf-8"?>
<androidx.coordinatorlayout.widget.CoordinatorLayout
    xmlns:android="http://schemas.android.com/apk/res/android"
    xmlns:app="http://schemas.android.com/apk/res-auto"
    android:layout_width="match_parent"
    android:layout_height="match_parent"
    android:id="@+id/app_Coordinator"
    android:fitsSystemWindows="true"
    android:orientation="vertical">

    <com.google.android.material.appbar.AppBarLayout
        android:layout_width="match_parent"
        android:layout_height="wrap_content"
        android:background="?attr/colorPrimary">

        <androidx.appcompat.widget.Toolbar
            android:layout_width="match_parent"
            android:layout_height="?attr/actionBarSize"
            android:id="@+id/toolbar"
            android:theme="@style/ToolbarStyle"
            app:title="@string/app_name"
            app:popupTheme="@style/ThemeOverlay.AppCompat.Light" />

    </com.google.android.material.appbar.AppBarLayout>
    <include layout="@layout/app_content" />

    <com.google.android.material.floatingactionbutton.FloatingActionButton
        android:layout_width="wrap_content"
        android:layout_height="wrap_content"
        android:layout_gravity="bottom|end"
        android:layout_margin="10dp"
        android:src="@drawable/ic_add_black"
        android:contentDescription="TODO" />
</androidx.coordinatorlayout.widget.CoordinatorLayout>
<!--container xml -->
<?xml version="1.0" encoding="utf-8"?>
<androidx.appcompat.widget.LinearLayoutCompat xmlns:android="http://schemas.android.com/apk/res/android"
    android:layout_width="match_parent"
    android:layout_height="wrap_content"
    xmlns:app="http://schemas.android.com/apk/res-auto"
    app:layout_behavior="@string/appbar_scrolling_view_behavior"
    android:padding="10dp"
    android:orientation="vertical">

    <androidx.appcompat.widget.AppCompatButton
        android:layout_width="match_parent"
        android:layout_height="wrap_content"
        android:text="@string/basic_snack"
        android:onClick="basicSnack" />

    <androidx.appcompat.widget.AppCompatButton
        android:layout_width="match_parent"
        android:layout_height="wrap_content"
        android:text="@string/basic_action_snack"
        android:onClick="basicActionSnack" />

    <androidx.appcompat.widget.AppCompatButton
        android:layout_width="match_parent"
        android:layout_height="wrap_content"
        android:text="@string/basic_custom_snack"
        android:onClick="basicCustomSnack" />

</androidx.appcompat.widget.LinearLayoutCompat>
// main activity
public class MainActivity extends AppCompatActivity {
    private CoordinatorLayout cl;
    private Toolbar tb;

    @Override
    protected void onCreate(Bundle savedInstanceState) {
        super.onCreate(savedInstanceState);
        setContentView(R.layout.activity_main);

        cl = findViewById(R.id.app_Coordinator);
        tb = findViewById(R.id.toolbar);
        setSupportActionBar(tb);
    }

    public void basicSnack(View v){
        Snackbar sb = Snackbar.make(cl, "This is a basic Snackbar Display", Snackbar.LENGTH_SHORT);
        sb.show();
    }

    public void basicActionSnack(View v) {
        Snackbar sb = Snackbar.make(cl, "Snackbar with Action Feature", Snackbar.LENGTH_SHORT);
        sb.setAction("Undo", new View.OnClickListener() {
            @Override
            public void onClick(View v) {
                Toast.makeText(getApplicationContext(), "Undo action", Toast.LENGTH_SHORT).show();
            }
        });

        sb.show();
    }

    public void basicCustomSnack( View v) {
        Snackbar sb = Snackbar.make(cl, "Custom Snackbar", Snackbar.LENGTH_SHORT);
        sb.setAction("Undo", new View.OnClickListener() {
            @Override
            public void onClick(View v) {
                Toast.makeText(getApplicationContext(), "Undoing Action", Toast.LENGTH_SHORT).show();
            }
        });

        sb.setActionTextColor(Color.CYAN);

        View sbv = sb.getView();
        TextView tv = sbv.findViewById(R.id.snackbar_text);
        tv.setTextColor(Color.GREEN);

        sb.show();
    }
}
To conclude
I hope you found this reading helpful and if you need further assistance don’t hesitate to contact me for additional assistance. If you are also interested in seeing other tutorials that are not present please hit my line and with
- Published in Android, Java, Programming Languages, Tutorial