Gesture Controls for Android w/Kotlin

If you have never used or unaware of what is gestures control. Incorporating gesture functionality makes an app more functional and engaging for users. As you will find in this tutorial the objective will be to implement two different types of gestures in the application. Assuming this is not your first rodeo lets dive into the development process.
Project Creation
Well of course you need somewhere to start so firing up your Android Studio it you haven’t already. Select the project you prefer to use but for this tutorial we are going to use the “Empty Activity” template just to keep it simple. (If you require more content on the different templates check out: Blah Blah)
NOTE: minimum SDK for this project is 5.0
Update Activity Layout
After you project has finished loading and building itself, we are going to head over ‘activity_main.xml’. First let’s change the parent layout from constraint to frame layout. Withing the frame we are going to use the Material Cardview and inside the card view we will add the constraint layout. Last the constraint layout will hold the important stuff which are buttons and text view. Let’s see how the code looks altogether.
<?xml version="1.0" encoding="utf-8"?>
<com.google.android.material.circularreveal.CircularRevealFrameLayout xmlns:android="http://schemas.android.com/apk/res/android"
    xmlns:app="http://schemas.android.com/apk/res-auto"
    xmlns:tools="http://schemas.android.com/tools"
    android:layout_width="match_parent"
    android:layout_height="match_parent"
    android:id="@+id/layout_parent"
    android:background="@color/design_default_color_primary"
    tools:context=".MainActivity">

    <com.google.android.material.card.MaterialCardView
        android:layout_width="match_parent"
        android:layout_height="match_parent"
        android:id="@+id/cv_display"
        android:layout_gravity="center"
        android:layout_margin="20dp"
        app:cardCornerRadius="15dp">

        <androidx.constraintlayout.widget.ConstraintLayout
            android:layout_width="match_parent"
            android:layout_height="match_parent">

            <androidx.appcompat.widget.AppCompatTextView
                android:id="@+id/tv_question"
                android:layout_width="wrap_content"
                android:layout_height="wrap_content"
                android:layout_marginTop="20dp"
                android:text="@string/txt_question_value"
                android:textSize="70sp"
                app:layout_constraintEnd_toEndOf="parent"
                app:layout_constraintStart_toStartOf="parent"
                app:layout_constraintTop_toTopOf="parent" />

            <androidx.appcompat.widget.AppCompatTextView
                android:id="@+id/tv_solution"
                android:layout_width="wrap_content"
                android:layout_height="wrap_content"
                android:layout_below="@id/tv_question"
                android:layout_marginTop="10dp"
                android:text="@string/txt_answer_value"
                android:textSize="40sp"
                app:layout_constraintBottom_toTopOf="@id/tv_points"
                app:layout_constraintEnd_toEndOf="parent"
                app:layout_constraintStart_toStartOf="parent"
                app:layout_constraintTop_toBottomOf="@id/tv_question" />

            <com.google.android.material.floatingactionbutton.FloatingActionButton
                android:id="@+id/btn_addition"
                android:layout_width="wrap_content"
                android:layout_height="wrap_content"
                android:layout_below="@id/tv_question"
                android:contentDescription="@string/txt_add_descriptor"
                android:src="@drawable/ic_baseline_add_24"
                app:layout_constraintEnd_toEndOf="parent"
                app:layout_constraintBottom_toBottomOf="@+id/tv_solution"
                app:layout_constraintStart_toEndOf="@+id/tv_solution"
                app:layout_constraintTop_toTopOf="@+id/tv_solution" />

            <com.google.android.material.floatingactionbutton.FloatingActionButton
                android:id="@+id/btn_subtraction"
                android:layout_width="wrap_content"
                android:layout_height="wrap_content"
                android:layout_below="@id/tv_question"
                android:layout_toStartOf="@+id/tv_solution"
                android:contentDescription="@string/txt_minus_descriptor"
                android:src="@drawable/ic_baseline_remove_24"
                app:layout_constraintBottom_toBottomOf="@id/tv_solution"
                app:layout_constraintEnd_toStartOf="@+id/tv_solution"
                app:layout_constraintStart_toStartOf="parent"
                app:layout_constraintTop_toTopOf="@+id/tv_solution" />

            <androidx.appcompat.widget.AppCompatTextView
                android:id="@+id/tv_points"
                android:layout_width="wrap_content"
                android:layout_height="wrap_content"
                android:layout_below="@id/tv_solution"
                android:layout_marginBottom="30dp"
                android:text="@string/txt_string_score"
                android:textSize="30sp"
                app:layout_constraintBottom_toBottomOf="parent"
                app:layout_constraintEnd_toEndOf="@id/btn_addition"
                app:layout_constraintStart_toStartOf="@id/btn_subtraction" />

        </androidx.constraintlayout.widget.ConstraintLayout>
    </com.google.android.material.card.MaterialCardView>
</com.google.android.material.circularreveal.CircularRevealFrameLayout>
inner class GestureControlListener : GestureDetector.SimpleOnGestureListener() {

        override fun onFling(evt1: MotionEvent, evt2: MotionEvent, xVelocity: Float, yVelocity: Float) : Boolean {

            pts -= 75
            generateQuestion(userAnsw)
            view.setBackgroundColor(Random.nextInt())

            Snackbar.make(view, "Skipped", Snackbar.LENGTH_SHORT).show()
            cv.text = "Current Score: $pts"
            return true
        }
}
Writing Kotlin Code
Now we’ll create an inner class for detecting gestures that extends to ‘GestureDetector.SimpleOnGestureListener’. Within the class we will keep it simple and override the two functions that detects fling and double tap gestures.
class MainActivity : AppCompatActivity() {

    /** Global Variables Start **/
    //gesture
    lateinit var gdc: GestureDetectorCompat

    ///Textviews
    lateinit var qv: AppCompatTextView
    lateinit var sv: AppCompatTextView
    lateinit var cv: AppCompatTextView

    //Buttons
    lateinit var ab: FloatingActionButton
    lateinit var sb: FloatingActionButton

    //view
    lateinit var view:FrameLayout

    //integer variables
    var pts = 0
    var userAnsw = 0
    var questionValue1 = 0
    var questionValue2 = 0
    /** Global Variables end **/

    override fun onCreate(savedInstanceState: Bundle?) {
        super.onCreate(savedInstanceState)
        setContentView(R.layout.activity_main)
    }

}
Comprehending what we just declared. First the GestureDetectorCompat object contains functions which we will override to enable us to respond to the different gestures. Then we have the next 6 variables that are associated with the Views within the cardview. Then the variables that will represent the score along with the users answer, and then the question that is displayed to the user.
Setup Views and Listeners
We’ll start by referring to all our views. After we have accomplished that will set up onClickListerners to increase or decrease with the floating action button. Now that the click listeners are set, we need to define a way to generate new questions for the user to answer. We’ll create a function called generateQuestion that accepts a numeric parameter. The objective of the function will assign two random numbers based on the parameter passed in and assigned to the variable created earlier questionValue1 and questionValue2.
class MainActivity : AppCompatActivity() {

    /** Global Variables Start **/
    //gesture
    lateinit var gdc: GestureDetectorCompat

    ///Textviews
    lateinit var qv: AppCompatTextView
    lateinit var sv: AppCompatTextView
    lateinit var cv: AppCompatTextView

    //Buttons
    lateinit var ab: FloatingActionButton
    lateinit var sb: FloatingActionButton

    //view
    lateinit var view:FrameLayout

    //integer variables
    var pts = 0
    var userAnsw = 0
    var questionValue1 = 0
    var questionValue2 = 0
    /** Global Variables end **/

    override fun onCreate(savedInstanceState: Bundle?) {
        super.onCreate(savedInstanceState)
        setContentView(R.layout.activity_main)

        //lets do some work
        view = findViewById<FrameLayout>(R.id.layout_parent)
        qv =  findViewById(R.id.tv_question)
        sv = findViewById(R.id.tv_solution)
        cv = findViewById(R.id.tv_points)
        ab = findViewById(R.id.btn_addition)
        sb = findViewById(R.id.btn_subtraction)

        //assign listeners
        ab.setOnClickListener {
            userAnsw++
            sv.text = "$userAnsw"
        }

        sb.setOnClickListener {
            userAnsw--
            sv.text = "$userAnsw"
        }

        generateQuestion(userAnsw)
    }


    //generate question function for user
    fun generateQuestion(num: Int) {
        var randomNum = 0
        randomNum = if (num == 0) 12
        else num

        questionValue1 = Random.nextInt(randomNum)
        questionValue2 = Random.nextInt(randomNum)

        val problem = "$questionValue1 + $questionValue2"
        qv.text = problem
    }
}
Creating an Inner Class
Now we’ll create an inner class for detecting gestures that extends to ‘GestureDetector.SimpleOnGestureListener’. Within the class we will keep it simple and override the two functions that detects fling and double tap gestures.
class MainActivity : AppCompatActivity() {

    /** Global Variables Start **/
    //gesture
    lateinit var gdc: GestureDetectorCompat

    ///Textviews
    lateinit var qv: AppCompatTextView
    lateinit var sv: AppCompatTextView
    lateinit var cv: AppCompatTextView

    //Buttons
    lateinit var ab: FloatingActionButton
    lateinit var sb: FloatingActionButton

    //view
    lateinit var view:FrameLayout

    //integer variables
    var pts = 0
    var userAnsw = 0
    var questionValue1 = 0
    var questionValue2 = 0
    /** Global Variables end **/

    override fun onCreate(savedInstanceState: Bundle?) {
        super.onCreate(savedInstanceState)
        setContentView(R.layout.activity_main)

        //lets do some work
        view = findViewById<FrameLayout>(R.id.layout_parent)
        qv =  findViewById(R.id.tv_question)
        sv = findViewById(R.id.tv_solution)
        cv = findViewById(R.id.tv_points)
        ab = findViewById(R.id.btn_addition)
        sb = findViewById(R.id.btn_subtraction)

        //assign listeners
        ab.setOnClickListener {
            userAnsw++
            sv.text = "$userAnsw"
        }

        sb.setOnClickListener {
            userAnsw--
            sv.text = "$userAnsw"
        }

        generateQuestion(userAnsw)
    }


    //generate question function for user
    fun generateQuestion(num: Int) {
        var randomNum = 0
        randomNum = if (num == 0) 12
        else num

        questionValue1 = Random.nextInt(randomNum)
        questionValue2 = Random.nextInt(randomNum)

        val problem = "$questionValue1 + $questionValue2"
        qv.text = problem
    }

    /**
    *
    * */
    inner class GestureControlListener : GestureDetector.SimpleOnGestureListener() {


    }
}
The function we just wrote above objective is supposed to detect the fling gesture and when a user uses the fling gesture the application will skip the question and displays a new question. Then we call the function generateQuestion and new questions will be assigned to the AppCompatTextview. A brief message will appear to inform the user that the question was skipped.
class MainActivity : AppCompatActivity() {

    /** Global Variables Start **/
    //gesture
    lateinit var gdc: GestureDetectorCompat

    ///Textviews
    lateinit var qv: AppCompatTextView
    lateinit var sv: AppCompatTextView
    lateinit var cv: AppCompatTextView

    //Buttons
    lateinit var ab: FloatingActionButton
    lateinit var sb: FloatingActionButton

    //view
    lateinit var view:FrameLayout

    //integer variables
    var pts = 0
    var userAnsw = 0
    var questionValue1 = 0
    var questionValue2 = 0
    /** Global Variables end **/

    override fun onCreate(savedInstanceState: Bundle?) {
        super.onCreate(savedInstanceState)
        setContentView(R.layout.activity_main)

        //lets do some work
        view = findViewById<FrameLayout>(R.id.layout_parent)
        qv =  findViewById(R.id.tv_question)
        sv = findViewById(R.id.tv_solution)
        cv = findViewById(R.id.tv_points)
        ab = findViewById(R.id.btn_addition)
        sb = findViewById(R.id.btn_subtraction)

        //assign listeners
        ab.setOnClickListener {
            userAnsw++
            sv.text = "$userAnsw"
        }

        sb.setOnClickListener {
            userAnsw--
            sv.text = "$userAnsw"
        }

        generateQuestion(userAnsw)
    }

    //generate question function for user
    fun generateQuestion(num: Int) {
        var randomNum = 0
        randomNum = if (num == 0) 12
        else num

        questionValue1 = Random.nextInt(randomNum)
        questionValue2 = Random.nextInt(randomNum)

        val problem = "$questionValue1 + $questionValue2"
        qv.text = problem
    }

    /**
    *
    * */
    inner class GestureControlListener : GestureDetector.SimpleOnGestureListener() {

        override fun onFling(evt1: MotionEvent, evt2: MotionEvent, xVelocity: Float, yVelocity: Float) : Boolean {

            pts -= 75
            generateQuestion(userAnsw)
            view.setBackgroundColor(Random.nextInt())

            Snackbar.make(view, "Skipped", Snackbar.LENGTH_SHORT).show()
            cv.text = "Current Score: $pts"
            return true
        }

    }
}
Now we’ll add another function to override in the inner class which is onDoubleTap. As you are probably already aware this function detects a double tap gesture. The double tap gesture will act as a submission for the user answers to the question presented. Upon submission the answer is checked in the conditional and they are found equal the user score is increased and reflected in the view. A new problem is generated but if is found not to be equal then a deduction from the score is applied and brief message is display to the user before generating a new question.
inner class GestureControlListener : GestureDetector.SimpleOnGestureListener() {

        override fun onFling(evt1: MotionEvent, evt2: MotionEvent, xVelocity: Float, yVelocity: Float) : Boolean {

            pts -= 75
            generateQuestion(userAnsw)
            view.setBackgroundColor(Random.nextInt())

            Snackbar.make(view, "Skipped", Snackbar.LENGTH_SHORT).show()
            cv.text = "Current Score: $pts"
            return true
        }


        override fun onDoubleTap(evt: MotionEvent?): Boolean {

            if (userAnsw == questionValue1 + questionValue2) pts = 100*125
            else {
                pts -= 125
                view.setBackgroundColor(Color.RED)
                Snackbar.make(view, "Incorrect", Snackbar.LENGTH_SHORT).show()
            }

            generateQuestion(userAnsw)
            cv.text = "Current Score: $pts"
            return true
        }
}
Finally, we need to override onTouch in the MainActivity. When a touch is detected the function fires, so we’ll use this function to call the gestureDetector onTouchEventFunction.
class MainActivity : AppCompatActivity() {

    /** Global Variables Start **/
    //gesture
    lateinit var gdc: GestureDetectorCompat

    ///Textviews
    lateinit var qv: AppCompatTextView
    lateinit var sv: AppCompatTextView
    lateinit var cv: AppCompatTextView

    //Buttons
    lateinit var ab: FloatingActionButton
    lateinit var sb: FloatingActionButton

    //view
    lateinit var view:FrameLayout

    //integer variables
    var pts = 0
    var userAnsw = 0
    var questionValue1 = 0
    var questionValue2 = 0
    /** Global Variables end **/

    override fun onCreate(savedInstanceState: Bundle?) {
        super.onCreate(savedInstanceState)
        setContentView(R.layout.activity_main)

        //lets do some work
        view = findViewById<FrameLayout>(R.id.layout_parent)
        qv =  findViewById(R.id.tv_question)
        sv = findViewById(R.id.tv_solution)
        cv = findViewById(R.id.tv_points)
        ab = findViewById(R.id.btn_addition)
        sb = findViewById(R.id.btn_subtraction)

        //assign listeners
        ab.setOnClickListener {
            userAnsw++
            sv.text = "$userAnsw"
        }

        sb.setOnClickListener {
            userAnsw--
            sv.text = "$userAnsw"
        }

        generateQuestion(userAnsw)
        gdc = GestureDetectorCompat(this, GestureControlListener())
    }

    override fun onTouchEvent(evt: MotionEvent): Boolean {
        gdc.onTouchEvent(evt)
        return true
    }

    //generate question function for user
    fun generateQuestion(num: Int) {
        var randomNum = 0
        randomNum = if (num == 0) 12
        else num

        questionValue1 = Random.nextInt(randomNum)
        questionValue2 = Random.nextInt(randomNum)

        val problem = "$questionValue1 + $questionValue2"
        qv.text = problem
    }

    /**
    *
    * */
    inner class GestureControlListener : GestureDetector.SimpleOnGestureListener() {

        override fun onFling(evt1: MotionEvent, evt2: MotionEvent, xVelocity: Float, yVelocity: Float) : Boolean {

            pts -= 75
            generateQuestion(userAnsw)
            view.setBackgroundColor(Random.nextInt())

            Snackbar.make(view, "Skipped", Snackbar.LENGTH_SHORT).show()
            cv.text = "Current Score: $pts"
            return true
        }


        override fun onDoubleTap(evt: MotionEvent?): Boolean {

            if (userAnsw == questionValue1 + questionValue2) pts = 100*125
            else {
                pts -= 125
                view.setBackgroundColor(Color.RED)
                Snackbar.make(view, "Incorrect", Snackbar.LENGTH_SHORT).show()
            }

            generateQuestion(userAnsw)
            cv.text = "Current Score: $pts"
            return true
        }
    }
}
Install, Test, Conclude
Use the virtual or install on your device. When you increase or decrease the answer to the sum of the presented question. To submit your answer then double tap and if the answer is correct, you score will increase and a new problem will be presented to you. However, if you fling across the screen then problem is skipped, and a message is displayed to your user. With that I believe we have accomplished the task set out before us. If you are confused about anything, please don’t hesitate to contact me or check out the github repository on the project. You now have the “JUICE”!
Note: This class override a variety of functions
- Published in Android, blog, Kotlin, Mobile Development, Programming Languages, Tutorial
Android Rating: In-App Review API

Well Congratulations because you have coded, debugged and now published you app. The app itself is being used around the world by everyone but unfortunately that is not the end of the road for the application. Now that app is published the new objective is now collecting feedback and producing new updates which is accomplished by taking users feedback. An app rating and reviews are crucial factor to keep your app alive and have the downloads keep going. In the past the user would be prompted with a dialog with fancy buttons and upon ‘click’ the user is redirected to the Play Store. If the end user is anything like me, I find it annoying and complicated for the whole transition. Fear not Google understood and provided and API, which provide a rating widget in the app itself and the end user never has to leave the app itself.
Keep In Mind
- This API only functions with Android 5(API level 20+)
- The API is subject to quotas. Also the API decides how often the review widget should be shown to user.
- Note: More about quotas
- The flow process is controlled by the API. As the developer/designer you should not waste your time trying to alter the design.
- Note: More about Design Guidelines
- Furthermore the flow doesn’t notify us if the end user has completed the review or not
Integrating the API
Simple task here and can be accomplished with very little or minimal code. So enough talk and more implementing:
Since this API is apart of the Play Core API, so we need to add it to the library within the buid.gradle. In the code below you will notice that I am including the material library because I want to show a fallback if there is any error in-app review API.
//build.gradle
dependencies {

    implementation 'androidx.appcompat:appcompat:1.3.0'
    implementation 'com.google.android.material:material:1.5.0' //optional material library
    implementation 'com.google.android.play:core:1.10.3' //play core library
    implementation 'androidx.constraintlayout:constraintlayout:2.0.4'
    testImplementation 'junit:junit:4.13.2'
    androidTestImplementation 'androidx.test.ext:junit:1.1.3'
    androidTestImplementation 'androidx.test.espresso:espresso-core:3.4.0'
}
Now that has been accomplished, we need to create an instance of ReviewManager. This class provides necessary methods to start the review flow.
- New instance created, now a call the requestedReviewFlow() task returns ReviewInfo upon successful completion
- ReviewInfo object , needs to call launchReviewFlow() method which begins the review flow
- If requestReviewFlow fails, then we launch the usual Rate App dialog which then redirects the user to the Play Store.
- showRateApp() method starts the in-app review flow. The showRateAppFallbackDialog() method then acts as a fallback method if requestedReviewFlow throws an error.
package com.programmingninja.inappreview;

import androidx.appcompat.app.AppCompatActivity;
import android.os.Bundle;
import com.google.android.material.dialog.MaterialAlertDialogBuilder;
import com.google.android.play.core.review.ReviewInfo;
import com.google.android.play.core.review.ReviewManager;
import com.google.android.play.core.review.ReviewManagerFactory;
import com.google.android.play.core.tasks.Task;


public class MainActivity extends AppCompatActivity {

    private ReviewManager rm;

    @Override
    protected void onCreate(Bundle savedInstanceState) {
        super.onCreate(savedInstanceState);
        setContentView(R.layout.activity_main);

        doInit();
    }

    private void doInit() {
        rm = ReviewManagerFactory.create(this);
        findViewById(R.id.btn_rating).setOnClickListener(view -> showRateApp());
    }

    public void showRateApp() {
        Task<ReviewInfo> request = rm.requestReviewFlow();
        request.addOnCompleteListener(task -> {
           if (task.isSuccessful()) {
               //reviewinfo object
               ReviewInfo ri = task.getResult();

               Task<Void> flow = rm.launchReviewFlow(this, ri);
               flow.addOnCompleteListener(task1 -> {

               });
           } else {
               //
               showRateAppFallbackDialog();
           }
        });
    }

    private void showRateAppFallbackDialog() {
        new MaterialAlertDialogBuilder(this)
                .setTitle(R.string.app_title)
                .setMessage(R.string.app_user_message)
                .setPositiveButton(R.string.app_btn_positive, (dialog, which) -> {

                })
                .setNegativeButton(R.string.app_btn_negative, (dialog, which) -> {

                })
                .setNeutralButton(R.string.app_btn_neutral, (dialog, which) -> {

                }).show();
    }
}
Install, Test, Conclude
To test the this action, you should have the app approved and published within the PlayStore. Don’t worry the app doesn’t need to be available to the public.
- Published in Android, blog, Java, Programming Languages, Tutorial
QR Reader in Android w/ Kotlin

You may have noticed that QR codes are popping up all around and many of us have become accustomed to using these codes to quickly access information. As a developer know that qr codes are quick, easy, convenient, and alluring for users to scan. Within this read you will learn to implement a QR code scanner in Android Studio with very few steps.
Project Creation
Well of course you need somewhere to start so firing up your Android Studio it you haven’t already. Select the project you prefer to use but for this tutorial we are going to use the “Empty Activity” template just to keep it simple. (If you require more content on the different templates check out: Blah Blah)
NOTE: minimum SDK is 7.0
Adding Gradle Dependency and Manifest
Before we can access the class from ZXing we need to import the dependency to the module build.gradle file. (I always suggest using the latest stable version with that I suggest using the project structure when import dependencies) We also need to add permission to the AndroidMainfest.xml to access to the camera.
NOTE: If you are not familiar with using the Project Structure, please see blog regarding this feature in android studio.
// build.gradle
dependencies {

    implementation 'androidx.core:core-ktx:1.7.0'
    implementation 'androidx.appcompat:appcompat:1.3.0'
    implementation 'com.google.android.material:material:1.4.0'
    implementation 'androidx.constraintlayout:constraintlayout:2.0.4'
    implementation 'com.journeyapps:zxing-android-embedded:4.3.0' //added
    testImplementation 'junit:junit:4.13.2'
    androidTestImplementation 'androidx.test.ext:junit:1.1.3'
    androidTestImplementation 'androidx.test.espresso:espresso-core:3.4.0'
}
// AndroidMainifest.xml
<manifest xmlns:android="http://schemas.android.com/apk/res/android"
    package="com.programmingninja.qrreader">

    <uses-permission android:name="android.permission.CAMERA" />

    <application
        android:allowBackup="true"
        android:icon="@mipmap/ic_launcher"
        android:label="@string/app_name"
        android:roundIcon="@mipmap/ic_launcher_round"
        android:supportsRtl="true"
        android:theme="@style/Theme.QRReader">
        <activity
            android:name=".MainActivity"
            android:exported="true">
            <intent-filter>
                <action android:name="android.intent.action.MAIN" />
                <category android:name="android.intent.category.LAUNCHER" />
            </intent-filter>
        </activity>
    </application>
</manifest>
Updating Layout
Now that we have completed the lightweight stuff lets begin by updating the activity_main.xml. We are going to keep the ConstraintLayout and add within it AppCompatTextView and AppCompatImageButton.
<?xml version="1.0" encoding="utf-8"?>
<androidx.constraintlayout.widget.ConstraintLayout xmlns:android="http://schemas.android.com/apk/res/android"
    xmlns:app="http://schemas.android.com/apk/res-auto"
    xmlns:tools="http://schemas.android.com/tools"
    android:layout_width="match_parent"
    android:layout_height="match_parent"
    tools:context=".MainActivity">

    <androidx.appcompat.widget.AppCompatTextView
        android:layout_width="wrap_content"
        android:layout_height="wrap_content"
        android:id="@+id/tv_message"
        android:text="Tap Button Below to Begin Scanning!"
        app:layout_constraintBottom_toBottomOf="parent"
        app:layout_constraintLeft_toLeftOf="parent"
        app:layout_constraintRight_toRightOf="parent"
        app:layout_constraintTop_toTopOf="parent" />

    <androidx.appcompat.widget.AppCompatImageButton
        android:layout_width="wrap_content"
        android:layout_height="wrap_content"
        android:id="@+id/img_btn_qr"
        app:layout_constraintBottom_toBottomOf="parent"
        app:layout_constraintEnd_toEndOf="parent"
        app:layout_constraintStart_toStartOf="parent"
        app:layout_constraintTop_toBottomOf="@+id/tv_message"
        android:src="@drawable/ic_baseline_qr_code_scanner_24"/>
</androidx.constraintlayout.widget.ConstraintLayout>
Finally Some Kotlin Writing
Within this class we need to use the ZXing IntentIntegrator to override the onActivityResult function. IntentIntegrator allows us to start the scanner with a few lines of code. The result will then appear in our Activity’s and if the user has not provided permission, yet they are present a message to provide access. After access is provided and user scans a code a new AlertDialog is present to perform action from the QR code itself. I will provide the code and blew the snippet you will be informed of everything is greater detail
package com.programmingninja.qrreader

import android.app.SearchManager
import android.content.DialogInterface
import android.content.Intent
import androidx.appcompat.app.AppCompatActivity
import android.os.Bundle
import androidx.appcompat.app.AlertDialog
import androidx.appcompat.widget.AppCompatButton
import androidx.appcompat.widget.AppCompatImageButton
import androidx.appcompat.widget.AppCompatTextView
import com.google.zxing.integration.android.IntentIntegrator

@Suppress("DEPRECATION")
class MainActivity : AppCompatActivity() {
    override fun onCreate(savedInstanceState: Bundle?) {
        super.onCreate(savedInstanceState)
        setContentView(R.layout.activity_main)

        val msgTxt:AppCompatTextView = findViewById(R.id.tv_message)
        val imgBtn:AppCompatImageButton = findViewById(R.id.img_btn_qr)

        imgBtn.setOnClickListener {
            val intentIntegrator = IntentIntegrator(this)

            intentIntegrator.setDesiredBarcodeFormats(listOf(IntentIntegrator.QR_CODE))
            intentIntegrator.initiateScan()
        }
    }

    override fun onActivityResult(requestCode: Int, resultCode: Int, data: Intent?) {
        super.onActivityResult(requestCode, resultCode, data)

        val res = IntentIntegrator.parseActivityResult(resultCode,data)

        if (res != null) {
            AlertDialog.Builder(this).setMessage("Would you like to go to ${res.contents}?")
                .setPositiveButton("Accept", DialogInterface.OnClickListener{
                    dialogInterface, i -> val intent = Intent(Intent.ACTION_WEB_SEARCH)
                    intent.putExtra(SearchManager.QUERY, res.contents)
                    startActivity(intent)
                })
                .setNegativeButton("Deny", DialogInterface.OnClickListener{ dialogInterface, i ->  })
                .create()
                .show()
        }
    }
}
Let’s first review the onCreate function, we are referencing the views in the layout, then we assign an OnClickListener to our AppCompatImageButton which then use an instance of IntentIntegrator which begin the scan. We are settubg tge setDesiredBarcodeFormats function on the variable intentIntegrator. This function allows us to narrow down our barcode format to only focus. The ZXing IntentIntegrator class has support for several barcode formats, however for this tutorial we are going to focus on QR codes. Start the scan using the variable iIntegrator initiateScan function.
Now we create a function called onActivityResult and for this function to work we have to call the super.OnActivityResult function. In this function we create a variable called ‘res’ which holds the data collected from iIntegrator parseActivityResult function. Inside the function is a conditional statement to check if the scan is empty
Within the statement, we build an AlertDialog with a positive and negative button and each button have an action assigned to them. If the positive button is selected then an Intent will be used to start an internet search with QR code’s data but if the negative button is selected then user remains within the app.
Install, Test and Verify
If everything is implemented correctly, we can test the app, run it in the android studio and install it on a device. Now that the app installed, the app will open automatically and display the text and image button. when the user it will request permission to access the camera in your Setting. The camera reads the code and presents it in the AlertDialog a message that is stored in the qr code.

android-tutorial (this link opens in a new window) by daurislittle (this link opens in a new window)
Android Tutorial beginner and advance
- Published in Android, blog, Kotlin, Programming Languages, Tutorial
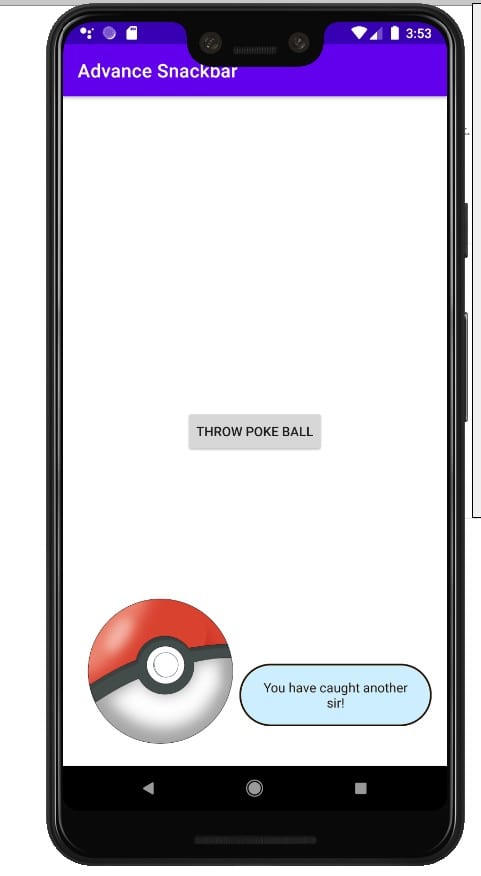
Creating Advance Custom Snackbar w/ Kotlin

Ask 100 different developers about what they find most exciting about android development and you will get as many different responses. Personally, I find the customization of the various framework and design libraries. Consider it as such if there is something that doesn’t fit your needs within the development process that as a developer we create custom views without any issues. Within this post, we will be working on a custom Snackbar.
What is a Snackbar? Well simply enough a Snackbars provide lightweight feedback about an operation. They show a brief message at the bottom of the screen on mobile and lower left on larger devices. Snackbars appear above all other elements on screen and only one can be displayed at a time.
Though the Snackbar by default has a few customizable features, consider the fact that the default features may not match the application style. Fortunately, we can easily create a custom Snackbar by implementing just a few classes. If you are unfamiliar with what a Snackbar is please review my previous post regarding the library. Be aware that it may be a little confusing at glance but fear not we will review it the most important part that is to highlight which are:
BottomTransientBottomBarwhich is the parent view- ContentViewCallback
make()a factory method- find the parent view, inflate the custom view, and set additional properties
- customizable method
Custom View
It is assumed that you have already created/opened your current project within your IDE. Now we create a custom view that will be displayed at the bottom of the screen when called. This design will be the simplest form which contains an image and static message.
class CustomSnackbarView @JvmOverloads constructor(context: Context, attrs: AttributeSet? = null, defStyleAttr: Int = 0) : ConstraintLayout (context, attrs, defStyleAttr) {

    private val customImg : AppCompatImageView

    init {
        View.inflate(context, R.layout.view_custom_snackbar, this)
        clipToPadding = false
        this.customImg = findViewById(R.id.img_snack)
    }
}
this is accompanied by the following layout XML
<?xml version="1.0" encoding="utf-8"?>
<merge
    xmlns:android="http://schemas.android.com/apk/res/android"
    xmlns:tools="http://schemas.android.com/tools"
    xmlns:app="http://schemas.android.com/apk/res-auto"
    android:layout_width="match_parent"
    android:layout_height="wrap_content"
    tools:parentTag="androidx.constraintlayout.widget.ConstraintLayout">

    <androidx.appcompat.widget.AppCompatImageView
        android:layout_width="173dp"
        android:layout_height="173dp"
        android:id="@+id/img_snack"
        android:scaleType="centerInside"
        app:layout_constraintBottom_toBottomOf="parent"
        app:layout_constraintLeft_toLeftOf="parent"
        app:layout_constraintStart_toStartOf="parent"
        app:srcCompat="@drawable/pokeball" />

    <androidx.appcompat.widget.AppCompatTextView
        android:layout_width="0dp"
        android:layout_height="wrap_content"
        android:id="@+id/tv_snack"
        android:gravity="center"
        android:padding="16dp"
        android:text="You have caught another sir!"
        android:textColor="#28140c"
        android:background="@drawable/custom_snackbar_bg"
        app:layout_constraintEnd_toEndOf="parent"
        app:layout_constraintRight_toRightOf="parent"
        app:layout_constraintBottom_toBottomOf="@+id/img_snack"
        app:layout_constraintLeft_toRightOf="@+id/img_snack"
        app:layout_constraintStart_toEndOf="@+id/img_snack"
        app:layout_constraintTop_toTopOf="@+id/img_snack"
        app:layout_constraintVertical_bias="0.75" />
</merge>
Implementation of Custom View
Now the objective is to implement ContentViewCallback. The interface objective is to notify when the Snackbar starts appearing and dismissing using animateContentIn() and animateContentOut()
class CustomSnackbarView @JvmOverloads constructor(context: Context, attrs: AttributeSet? = null, defStyleAttr: Int = 0) : ConstraintLayout (context, attrs, defStyleAttr), ContentViewCallback {

    private val customImg : AppCompatImageView

    init {
        View.inflate(context, R.layout.view_custom_snackbar, this)
        clipToPadding = false
        this.customImg = findViewById(R.id.img_snack)
    }

    override fun animateContentIn(delay: Int, duration: Int) {
        val scaleX = ObjectAnimator.ofFloat(customImg, View.SCALE_X, 0f, 1f)
        val scaleY = ObjectAnimator.ofFloat(customImg, View.SCALE_Y, 0f, 1f)
        AnimatorSet().apply {
            interpolator = OvershootInterpolator()
            setDuration(500)
            playTogether(scaleX,scaleY)
        }.start()

    }

    override fun animateContentOut(delay: Int, duration: Int) {
        TODO("Not yet implemented")
    }

}
Take note that there is a simple scale animation as the Snackbar appears. Now setting the clipToPadding to false is important to avoid the image from clipping because of OvershootInterpolator.
Extending BaseTransientBottomBar
We are now at the point to create an equivalent class for the Snackbar.
The custom Snackbar constructor accepts two params: one for the parent view and another for the custom view that supports the implementation of ContentViewCallback.
class CustomSnackbar(parent: ViewGroup, content: CustomSnackbarView) : BaseTransientBottomBar<CustomSnackbar>(parent, content, content) {

}
Now to implement the entry point method make(). As stated earlier in this post, there are three things to accomplish:
- There is no reason to attempt and recreate the wheel so we will borrow the logic from the Snackbar’s source code
internal fun View?.findParent(): ViewGroup? {

    var view = this
    var fallback: ViewGroup? = null

    do {
        if (view is CoordinatorLayout) {
            //the Coordinator layout has been found
            return view
        } else if (view is FrameLayout) {
            if (view.id == android.R.id.content) {
                //coordinator layout not found so we need to use the appropriate hierarchy
                return view
            } else {
                //if no view assign the fallback
                fallback = view
            }
        }

        if (view != null) {
            //will continue to search for the view
            val parent = view.parent
            view = if (parent is View) parent else null
        }
    } while (view != null)

    return fallback
}
- Inflate the custom view
- inflating a custom view is best done by using the XML layout
<?xml version="1.0" encoding="utf-8"?>
<com.programmingninja.advancesnackbar.snackbar.CustomSnackbarView
    xmlns:android="http://schemas.android.com/apk/res/android"
    android:layout_width="match_parent"
    android:layout_height="wrap_content"
    android:padding="8dp" />
- Build and correct errors
class CustomSnackbar(parent: ViewGroup, content: CustomSnackbarView) : BaseTransientBottomBar<CustomSnackbar>(parent, content, content) {

    companion object {
        fun make(view: View) : CustomSnackbar{

            //set parent for this view
            val parent = view.findParent() ?: throw IllegalArgumentException("No suitable parent found from the correct view. Please correct.")

            //custom view inflated
            val customView = LayoutInflater.from(view.context).inflate(R.layout.activity_snackbar, parent, false) as CustomSnackbarView

            //creation and return this new snackbar
            return CustomSnackbar(parent, customView)
        }

    }
}
If we attempt to run the code, you will notice that there is a gray background and padding. Why is this? This is because the BaseBottomTransientBar implementation is wrapped with the SnackbarBasrLayout. The workaround for this issue is simple enough by adding an init() block
init {
        getView().setBackgroundColor(ContextCompat.getColor(view.context, android.R.color.transparent))
        getView().setPadding(0,0,0,0)
}
Wrapping it altogether
Modify the MainActivity with the following
class MainActivity : AppCompatActivity() {
    override fun onCreate(savedInstanceState: Bundle?) {
        super.onCreate(savedInstanceState)
        setContentView(R.layout.activity_main)

        findViewById<View>(R.id.btn_catch_em).setOnClickListener {
            CustomSnackbar.make(it).show()
        }
    }
}
Now we need to modify the main activity layout
<?xml version="1.0" encoding="utf-8"?>
<androidx.constraintlayout.widget.ConstraintLayout
    xmlns:android="http://schemas.android.com/apk/res/android"
    xmlns:app="http://schemas.android.com/apk/res-auto"
    xmlns:tools="http://schemas.android.com/tools"
    android:layout_width="match_parent"
    android:layout_height="match_parent"
    tools:context=".MainActivity">

    <androidx.appcompat.widget.AppCompatButton
        android:layout_width="wrap_content"
        android:layout_height="wrap_content"
        android:id="@+id/btn_catch_em"
        android:layout_margin="8dp"
        android:text="Throw Poke Ball"
        app:layout_constraintEnd_toEndOf="parent"
        app:layout_constraintStart_toStartOf="parent"
        app:layout_constraintTop_toTopOf="parent"
        app:layout_constraintBottom_toBottomOf="parent" />
</androidx.constraintlayout.widget.ConstraintLayout>
- Published in Android, Kotlin, Programming Languages, Tutorial
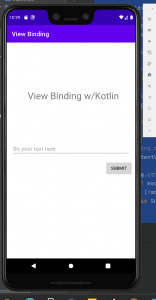
View Binding w/Android
View Binding Purposes?
note: View binding is a feature that allows you to more easily write code that interacts with views. Once view binding is enabled in a module, it generates a binding class for each XML layout file present in that module. An instance of a binding class contains direct references to all views that have an ID in the corresponding layout.
View Binding is part of Android Jetpack. View Binding was introduced at the Android Talk at Google IO/19. Let’s learn more about this. In most cases, view binging replaces findViewById. Ultimately the findViewById, is used to declare the view variable for x times to use it. It makes a lot of boilerplate code inside the view Activity/Fragment. That is why View Binding came to provide a good way to access all views with onlu init one variable.
Key features
- ViewBinding is always null safe and type-safe, which supports both Java and Kotlin.
- ViewBinding is introduced in the Gradle version 3.6 and above (which comes with the Android Studio 4.0, only gradle 3.6).
- ViewBinding also helps to reduce the boilerplate code, hence reducing the code redundancy.
- While using the ViewBinding proper naming conventions are need to be followed because it creates the binding class internally using the name of the same layout file. Naming the layout file in the snake case is preferred. For Example, the ViewBinding creates activity_main.xml(snake case) file as ActivityMainBinding(pascal case), which contains all the property and instances of all the views containing in that layout.
- And also whatever IDs of all elements are created inside the layout XML file, the ViewBinding converts them to camel case. For example: android:id=”button_submit” -> buttonSubmit. Which is much useful in the code readability.
- Using ViewBinding the compilation of the code is a bit faster as compared to the traditional findViewById() method.
- The ActivityMainBinding class is generated in the following path under the project hierarchy this can be viewed.
Before View Binding
class MainActivity: AppCompatActivity() {
   val btnSignIn = findViewById<AppCompatButton>(R.id.btn_signIn)
   val txtUserStatus = findViewById<AppCompatTextView>(R.id.tv_userStatus)

   txtUserStatus?.Text = userProfile?.overview
   btnSignIn?.setOnClickListener {
      Snackbar sb = Snackbar.make(cl, "Successfully login attempt", Snackbar.LENGTH_SHORT);
      sb.show();
   }
}
After View Binding
class MainActivity: AppCompatActivity() {

   val binding = ActivityMainBinding.inflate(layoutInflater)

   binding.tv_UserStatus.text = userProfile?.overview
   binding.btnSignIn.setOnClickListener {
      Snackbar sb = Snackbar.make(cl, "Login Attempt Successful", Snackbar.LENGTH_SHORT);
      sb.show();
   }
}
Why View Binding
If you review the to above code clip you can notice a bit of the differences. For exmple you declare the binding variable from the generated view binding class. Now you can access all the view ids from the binding variable. The main advantages of using View Binding:
- Type Safety
- View binding provide a generated method od the same type as defined in the XML layout.
- Null Safety
- findViewById
Using View Binding
- enable viewBinding and this should take place with build.gradle
buildFeatures {
   viewBinding = true
}
- After enabling viewBinding perform the sync and let’s modify the XML layout
<?xml version="1.0" encoding="utf-8"?>
<androidx.constraintlayout.widget.ConstraintLayout
    xmlns:android="http://schemas.android.com/apk/res/android"
    xmlns:app="http://schemas.android.com/apk/res-auto"
    xmlns:tools="http://schemas.android.com/tools"
    android:layout_width="match_parent"
    android:layout_height="match_parent"
    android:id="@+id/cl_layer"
    tools:context=".MainActivity"
    tools:ignore="">

    <androidx.appcompat.widget.AppCompatTextView
        android:layout_width="match_parent"
        android:layout_height="wrap_content"
        android:id="@+id/tv_header"
        android:text="View Binding w/Kotlin"
        android:textSize="30dp"
        android:textAlignment="center"
        android:layout_marginStart="15dp"
        android:layout_marginTop="150dp"
        app:layout_constraintEnd_toEndOf="parent"
        app:layout_constraintStart_toStartOf="parent"
        app:layout_constraintTop_toTopOf="parent"

        />
    <androidx.appcompat.widget.AppCompatEditText
        android:layout_width="match_parent"
        android:layout_height="wrap_content"
        android:id="@+id/et_message"
        android:layout_marginStart="16dp"
        android:layout_marginEnd="16dp"
        android:layout_marginTop="128dp"
        android:hint="Sir, your text here"
        app:layout_constraintEnd_toEndOf="@id/tv_header"
        app:layout_constraintStart_toStartOf="@id/tv_header"
        app:layout_constraintTop_toBottomOf="@id/tv_header" />

    <androidx.appcompat.widget.AppCompatButton
        android:layout_width="wrap_content"
        android:layout_height="wrap_content"
        android:id="@+id/btn_submit"
        android:layout_marginTop="16dp"
        android:text="Submit"
        app:layout_constraintEnd_toEndOf="@id/et_message"
        app:layout_constraintTop_toBottomOf="@id/et_message" />
</androidx.constraintlayout.widget.ConstraintLayout>
PS: If your view id uses the under_score, it will be generated as a camelCase variable.
- The things that need to be focused on here are, creating the instance of the ViewBinding.
Kotlin
class MainActivity : AppCompatActivity() {

    //create instance ActivityMainBinding
    private lateinit var amb : ActivityMainBinding

    override fun onCreate(savedInstanceState: Bundle?) {
        super.onCreate(savedInstanceState)

        //create the instance of ActivityMainBinding
        val binding = ActivityMainBinding.inflate(layoutInflater)

        //binding.root returns the root layout
        setContentView(binding.root)

        binding.btnSubmit.setOnClickListener {
            val msg = binding.etMessage.text.toString()
            if (!msg.isEmpty()) Snackbar.make(binding.clLayer, binding.etMessage.text.toString(), Snackbar.LENGTH_SHORT).show()
            else Snackbar.make(binding.clLayer, "Message is currently empty", Snackbar.LENGTH_SHORT).show()
        }
    }
}
Java
public class MainActivity extends AppCompatActivity {

    //binding class to the xml
    //allows the system to automatically generate the system
    ActivityMainBinding amb;

    @Override
    protected void onCreate(Bundle savedInstanceState) {
        super.onCreate(savedInstanceState);

        //inflating the xml
        amb = ActivityMainBinding.inflate(getLayoutInflater());

        //retrieve the root layout
        View v = amb.getRoot();

        //ContentView for the layout
        setContentView(v);

        //calling the button and setting the click listener
        //call the button by id and set the click listener
        amb.btnSubmit.setOnClickListener(new View.OnClickListener() {
            @Override
            public void onClick(View v) {

                String msg = amb.etMessage.getText().toString();
                if (!msg.isEmpty()) Snackbar.make(amb.clLayer, amb.etMessage.getText().toString(), Snackbar.LENGTH_SHORT).show();
                else Snackbar.make(amb.clLayer, "Message is empty", Snackbar.LENGTH_SHORT).show();
            }
        });

    }
}
And that’s it. You are done setting up your view using View Binding.
if youre interested in seeing a tutorial on the topic check it out here:
- Published in Android, Java, Kotlin, Programming Languages
Oh, I need A Splash Screen, Right?

If you have had any smart phone before the I am sure you have seen a splash screen before. If you have not then for your information a spalsh screen is a screen that displays when you first open an app on the device. Many developer may refers to this as a launch screen and displays when that app is loading after being opened. When this loading process has completed, it transitions to a different screen where actual actions can be performed.
If you have noticed these splash sceen you most definitely noticed that they tend to only display for a short time and then its gone. Personally I feel that the splash screen is pretty vital part to any application since it is the user’s first impression/experience with the application.
Implementing Splash Screens
There are technically two ways to implement a splash screen.
Using a Timer (Get It Together)
This is the old easy approach. You have to create a dedicated splash screen Activity that shows up for x seconds then opens the appropriate activity. You get more flexibility here as you can add animations, custom views or any other element you can normally fit into an Activity layout. A very basic implementation of this is below
class SplashActivity : AppCompatActivity() {

    //setting the timer for the activity
    private val SPLASH_TIMER:Long = 5000 // this equates to seconds

    override fun onCreate(savedInstanceState: Bundle?) {
        super.onCreate(savedInstanceState)
        setContentView(R.layout.activity_splash)

        //fire after timer expires
        timedSplashScreen()
    }


    private fun timedSplashScreen() {
        Handler().postDelayed({
            //start the main activity
            startActivity(Intent(this, MainActivity::class.java))
        }, SPLASH_TIMER)
    }
}
Advantages:
- You can display awesome animation or some custom design that has been built. For example, the development of games.
- perform alternative activities on the splash screen
Disadvantages
- the launcher activity doesn’t show up immediately
- this is even worst during a cold start
- additionally, during cold start the user is stuck looking at the
windowBackground- afterward, the user still waits until the splash screen time expires before the app content
- Don’t expect the animation to wow your user every time
Using a Smart Timer (Get It Together)
This is very similar to the timer method listed above. The difference here is rather than make the delay be fixed, you vary it based on whether this is the user’s first time launching the app or not. We can accomplish this by using the SharedPreferences.
class SmartSplashActvity : AppCompatActivity() {
    override fun onCreate(savedInstanceState: Bundle?) {
        super.onCreate(savedInstanceState)
        setContentView(R.layout.activity_smart_splash_actvity)

        splashScreenKey()
    }

    private fun splashScreenKey() {
        val sp = getPreferences(MODE_PRIVATE)
        val firstLaunchPrefKey = "pref_first_launch"

        val splashDuration = when (sp.getBoolean(firstLaunchPrefKey, true)) {
            true -> {
                //
                sp.edit().putBoolean(firstLaunchPrefKey, false).apply()
                5000
            }
            false -> {
                //
                10000
            }
        }

        splashScreenDuration(splashDuration)
    }

    private fun splashScreenDuration(splashDuration: Int) {
        Handler().postDelayed({
            startActivity(Intent(this, MainActivity::class.java))
        }, splashDuration.toLong())
    }

}
Advantages:
- All the advantages that timer accomplished
- this method could aid in getting to the content quicker to the user.
Disadvantages
- all the disadvantages that exist for timer method
Splash Screen Best Practice
Now doing what needs to be done the right way. When the app is launched and has been in the memory yet, there is a delay between when the user started your app and when the launcher Activity’s onCreate() is called. During this what we call a “cold start”, the window manager tries to draw a UI placeholder using elements from the theme.xml. The key is creating a custom theme that overrides windowBackground, then replacing that custom theme with your standard theme before calling super.onCreate() in the activity.
class DedicatedSplashScreen : AppCompatActivity() {

    override fun onCreate(savedInstanceState: Bundle?) {
        super.onCreate(savedInstanceState)

        startActivity(Intent(this, MainActivity::class.java))
        finish()
    }

}
- Keep it free from unnecessary distraction
- Don’t use multiple colors or logos
- Use animation sparingly
Splash screens are simple. They’re used to enhance a brand and give users something nice to look at as they wait. .
- Published in Android, Kotlin, Programming Languages, Tutorial
allowBackup: Android’s Attributes
If you’ve ever been sky diving, you know that it’s essential to prepare for redundancies in your jump. That way, if one shoot fails you have a spare as your backup. This philosophy isn’t left behind within android and this is accomplished using allowBackup, which helps automatically backing up application data.
allowBackup Purpose
According to the documentation, this feature allows Auto Backup for App automatically backs up a user’s data from apps that target and run on Android 6.0 (API level 23) or later. This can be accomplished in your android app so the user(s) can more quickly recover the data. This feature allows the user to delete the application using any method such as manually deleting/uninstalling the app to using the device “factory reset”, regardless of the method the app will retain the user data when they decide to reinstall. This feature is taken a step further across multiple devices which allows the user to get a new device and this information will be available for a new device.
How Much Data?
When implemented the user can store the data limited to 25MB, which persists across the lifetime of an app being installed on your device. Though that does not sound like a lot in reality it is more than enough to save preferences/settings.
Where Is It Stored?
This data is stored by uploading it to the user’s Google Drive, where it is protected but the user’s account credentials. Don’t worry this data is stored in a private folder on the user’s drive and doesn’t count towards the user’s personal Drive quota.
Note: Only the most recent backup is stored in the drive.
What is Being Backed Up
The default function of this feature includes files in most directories that are assigned within your app by the system:
- shared preferences
getFilesDir()orgetDir(String, int)- Files stored in the app internal storage
getDatabasePath(String)- Files within this directory
getExternalFilesDir()- Files on external storage within this directory
So in short you can configure the application to include as well as exclude any files.
Customizing Your Backup
Within the android manifest, ensure that you add android:fullBackupContent within your application block. This points to an XML file that should contain all the rules for the full backup for the Auto Backup. Follow these steps and you can accomplish the task:
- within the res directory create a directory called xml
- now create an XML file called auto_backup_rules.xml
- Use the syntax include/exclude
- if you use both
include/excludetheincludetag supersede - The path reference within the
includeandexcluderefers to the resource location- Example:
<include domain="database" path="test_db.db"
- Example:
- if you use both
- The backup file should be listed in Android Manifest
- Example:
<application android:fullBackupContent="@xml/auto_backup_rules ... >
- Example:
Triggering the Backup
Backups are triggered automatically when any of the following conditions are met:
- backup must be enabled by the user. From Android 9 this setting is within Setting> System > Backup
- 24 hours has elapsed since the last backup
- The device is not in use
- The device is connected to a stable Wi-Fi network
Should Backups Cause Problem
Android backups rely on the Android Debug Bridge (ADB) command to perform backup and restore. ADB, however, has been a soft target for hackers and is still not trusted by respected developers. The idea that someone can inject malicious code into your backup data is unsettling, to say the least. This generally isn’t a problem for end-users as it requires debugging to be enabled on the device, but since a lot of Android users are fond of exploring and rooting their devices, it can become a serious problem.
Once backed up, all application data can be read by the user. adb restore allows the creation of application data from a source specified by the user. Following a restore, applications should not assume that the data, file permissions, and directory permissions were created by the application itself.
Therefore, applications that handle and store sensitive information such as card details, passwords, etc., should have this setting explicitly set to false — by default, it is set to exclude — to prevent such risks, or you can also customize what needs to be backed up.
If there is anything that is missing or being overlooked please do not hesitate to comment so we can all learn.
- Published in Android, Java, Kotlin, Programming Languages
Using View Binding w/Android

View Binding is one of the best features which provides the views to bind with the activity which is ongoing. Replacing the findViewById() method, hence reducing the boilerplate code, generated the instances of the views of the current layout. And most important feature about the View Binding is it’s always null safe. In this article detailed it’s been provided in detail approach for the View Binding.
if interested in knowing more about View Binding check out my previous blog
- Implementation
Of couse open your ide of choice, for myself I am using Android Studio, and create a project with and empty activity. if you are unfamiliar with this process or is missing this activity template please follow this link.
- Enable ViewBinding
After the ide fininish initilizing everything we are going to open the module build.gradle

note: this project layout is supplied by the ide Android Studio
android {

    ...

    buildFeatures {
        viewBinding = true
    }
}
- Modify XML
<?xml version="1.0" encoding="utf-8"?>
<androidx.constraintlayout.widget.ConstraintLayout
    xmlns:android="http://schemas.android.com/apk/res/android"
    xmlns:app="http://schemas.android.com/apk/res-auto"
    xmlns:tools="http://schemas.android.com/tools"
    android:layout_width="match_parent"
    android:layout_height="match_parent"
    android:id="@+id/cl_layer"
    tools:context=".MainActivity"
    tools:ignore="">

    <androidx.appcompat.widget.AppCompatTextView
        android:layout_width="match_parent"
        android:layout_height="wrap_content"
        android:id="@+id/tv_header"
        android:text="View Binding w/Kotlin"
        android:textSize="30dp"
        android:textAlignment="center"
        android:layout_marginStart="15dp"
        android:layout_marginTop="150dp"
        app:layout_constraintEnd_toEndOf="parent"
        app:layout_constraintStart_toStartOf="parent"
        app:layout_constraintTop_toTopOf="parent"

        />
    <androidx.appcompat.widget.AppCompatEditText
        android:layout_width="match_parent"
        android:layout_height="wrap_content"
        android:id="@+id/et_message"
        android:layout_marginStart="16dp"
        android:layout_marginEnd="16dp"
        android:layout_marginTop="128dp"
        android:hint="Sir, your text here"
        app:layout_constraintEnd_toEndOf="@id/tv_header"
        app:layout_constraintStart_toStartOf="@id/tv_header"
        app:layout_constraintTop_toBottomOf="@id/tv_header" />

    <androidx.appcompat.widget.AppCompatButton
        android:layout_width="wrap_content"
        android:layout_height="wrap_content"
        android:id="@+id/btn_submit"
        android:layout_marginTop="16dp"
        android:text="Submit"
        app:layout_constraintEnd_toEndOf="@id/et_message"
        app:layout_constraintTop_toBottomOf="@id/et_message" />
</androidx.constraintlayout.widget.ConstraintLayout>
UI Design
- Modify Activity class
package com.programmingninja.viewbinding

import androidx.appcompat.app.AppCompatActivity
import android.os.Bundle
import com.google.android.material.snackbar.Snackbar
import com.programmingninja.viewbinding.databinding.ActivityMainBinding

class MainActivity : AppCompatActivity() {

    //create instance ActivityMainBinding
    private lateinit var amb : ActivityMainBinding

    override fun onCreate(savedInstanceState: Bundle?) {
        super.onCreate(savedInstanceState)

        //create the instance of ActivityMainBinding
        val binding = ActivityMainBinding.inflate(layoutInflater)

        //binding.root returns the root layout
        setContentView(binding.root)

        binding.btnSubmit.setOnClickListener {
            val msg = binding.etMessage.text.toString()
            if (!msg.isEmpty()) Snackbar.make(binding.clLayer, binding.etMessage.text.toString(), Snackbar.LENGTH_SHORT).show()
            else Snackbar.make(binding.clLayer, "Message is currently empty", Snackbar.LENGTH_SHORT).show()
        }
    }
}
- Run that CODE
This new approach to finding views has an elegant interface, like Data Binding. Google designed it to avoid the performance issues of Data Binding and to provide compile-time safety.
See the completed code here: Fortress of Solitude
Did someone say Navigation to the rescue: Android Jetpack

If you been around the block a few times with Android development you probably already know that there is an issue with Navigation. If you don’t trust me you will soon find out but don’t worry I am going to let you in on a little hint to overcome many of the challenges that arise doing the development process. Note unless the app you are developing isn’t complex avoid this altogether but let get serious if you are developing for the public it is sure to become more convoluted as you go. Complexity can range from any of the following: Fragment transactions, deep linking to different parts within the app, passing values/arguments securely and safely, and much more. This is where our friend JetPack’s nav component steps in because its purpose brings solutions to the above complexity. From this article, you can expect how to solve those issues.
Terms and Definition to keep
- NavHost
- a container that has any or all the information it may need to handle the navigation actions
- NavController
- This component performs the navigation between destinations,
- NavigationalUI
- This component simply connects the navigation with some material component (for example the BottomNavigationView and DrawerLayout)
Fragment Transactions
With the nav component, there’s no need to manually handle fragment transactions (praise him), and it takes care of everything internally. To successfully go from FragmentA to FragmentB and now all you need to do is call the corresponding navigation action at runtime.
navController.navigate(R.id.actionId)
//or something like this
navController.navigate(R.id.destinationId)
The Back & Up Navigation
With the nav component and using the single activity model, the Activity’s role becomes more of an entry point to the app that delegates the handling of its content rather than being its owner. A NavHost, it is hooked up to the navigation graph which represents the single source of truth, and this where all the destinations, actions, arguments and deep links are defined
When using fragments as destinations, you can use the NavHostFragment class as a NavHost. Let’s take a look at how the activity layout may look like it
<FrameLayout>
    <fragment
         android:id="@+id/mainNavHostFragment"
         android:name="androidx.navigation.fragment.NavHostFragment"
         android:layout_width="match_parent"
         android:layout_height="match_parent"
         app:defaultNavHost="true"
         app:navGraph="@navigation/main_navigation_grah"/>
</FrameLayout
Since the navigation graph is the single source of truth for all navigation within the app, the navigation component does the right thing when the user navigates back or up. Not only does it handles this, but it correctly takes care of things such as the back stack, transactions, pop behavior, and transaction animations.
Passing Data Securely & Safely
If you have ever pass data between Fragments can be tedious as well as error-prone and this is not including the things that can go wrong or at least get confusing while refactoring the code. Ideally, we like to pass and retrieve arguments in an easy manner without having to worry about their keys, and read them safely.
The navigation component brings a solution to this using the Gradle plugin [androidx.navigation.safeargs]. It basically generates some boilerplate code to make any developer’s life easier. As you will see with the example below when a user navigates from FragmentA to FragmentB while passing a mandatory argument and an optional argument. What classes are generated:
-
FragmentADirections.ActionFragmentAToFragmentB
- Inner class with a constructor that takes in the mandatory arguments and setters for the optional arguments
-
FragmentADirections
- Has a method [actionFragmentAToFragmentB] that takes in the mandatory arguments and returns an instance of
FragmentADirections.ActionFragmentAToFragmentB
- Has a method [actionFragmentAToFragmentB] that takes in the mandatory arguments and returns an instance of
-
FragmentBArgs
- Has getters for the different arguments
So to begin, within the navigation graph, the destinations are defined along with the action (this transition is from FragmentA to FragmentB) and the arguments
<fragment
	android:id="@+id/fragmentA"
	android:name="com.test.FragmentA"
	android:label="Fragment A">
	<action
		android:id="@+id/action_FragmentA_to_FragmentB"
		app:destination="@+id/fragmentB"/>

</fragment>

<fragment
	android:id="@+id/fragmentB"
	android:name="com.test.FragmentB"
	android:label="Fragment B">

	<!--Mandatory Argument-->
	<argument
		android:name="id"
		app:argType="integer" <!--Argument Type-->
		/>

	<!--Optional Argument-->
	<argument
		android:name="data"
		android:defaultValue=""
		app:argType="string" <!--Argument Type-->
		/>
</fragment>
In addition, within FragmentA, performs the navigation while passing the arguments.
//creating  a NavDirection instance for the mandatory argument
val directions = FragmentADirections.actionFragmentAToFragementB(10)

// if there is n optional argument you can pass it
directions.setData("")

//Navigate to the new FragmentB
navController.navigate(directions)
Now reading
val id: Int = FragmentBArgs.fromBundle(arguments).id
val data: String = FragmentBArgs.fromBundle(arguments).data
Deep Links
Deep linking inside any application can get complicated as the app get more complex. Issues such as how to structure these deep links, how to pass the required information, and how to build the right back stack arise. In the nav component, deep linking is a first-class citizen, and both types are supported: Explicit () and Implicit ().
-
Explicit
- Used for notifications, app widgets, actions, and slices. Consider these used for pending intent based.
//prepare the arguments to pass to any notification expectation
val arg = Bundle().apply {
    putString("StringKey", "a string value")
    putInt("IntKey", 0)
}

//preparing intent, while selecting the graph & destination
val pendingIndent = NavDeepLinkBuilder(context)
    .setGraph(R.navigation.main_navigation_graph)
    .setDestination(R.id.destinationFragment)
    .setArguments(arg)
    .createPendingIntent()

//prepaing notification
val notification = NotificationCompat.Builder(context, NavigationApplication.NOTIFICATION_CHANNEL_ID)
    .setSmallIcon(R.drawable.notification_icon)
    .setContentTitle("Explicit Deep Link")
    .setContentText("Click on the following notification")
    .setContentIntent(pendingIndent)
    .setAutoCancel(true)
    .build()

//Display notification
NotificationManagerCompat.from(context).notify(10, notification)
-
Implicit
- Used for handling web URLs and custom scheme URIs.
<fragment
    android:id="@+id/destinationFragment"
    android:name="com.example.destinationFragment"
    android:label="@string/title_destination_fragment">
    <action ... />
    <deepLink
        android:id="@+id/custom_scheme_uri_deeplink"
        app:uri="android-app://path/subpath/{data}" />
    <deepLink
        android:id="@+id/web_url_deeplink"
        app:uri="www.husaynhakeem.com/path/subpath" />
</fragment>
Now we need to review the manifest and tweak it a bit. Within the activity tag of the Activity that contains the above destination fragment, the line below needs to be added.
<activity android:name="com.example.Activity">
    <nav-graph android:value="@navigation/main_navigation_graph" />
</activity>
Testing Navigation
The navigation component comes with a dependency just for testing android.arch.navigation:navigation-testing:$nav_version. But unfortunately, there seems to be very little (to say the least) documentation around it online, I wasn’t personally able to find any projects (not even the google sample apps) that use it, and a GoogleIO talk from earlier this year briefly brings up the topic but doesn’t go into any of its details. But the promise is that testing will be developed further in future releases, allowing developers to test their app’s destinations in isolation without worrying about potential issues such as fragment transactions.
All in All
There’s no doubt that the navigation component brings a lot to the table, it has several other great features I didn’t mention in this article such as nesting graphs, methods curated for Kotlin usage -based on extension functions-, and an easy to use navigation graph editor. But despite this, the navigation component seems to leave some open questions unanswered, especially one that’s bugging me: Passing data back to a previous destination (similar to startActivityForResult and onActivityResult).
The navigation component is currently still in Alpha, it’ll be interesting to see how it evolves, and I also look forward to playing with its testing component when there are more resources around it. But for the time being, I think it would be fun to test its limits in a real-world application.
- Published in Android, Java, Kotlin, Programming Languages
Show/Hide On-Screen Keyboard

Android R is also known as Android 11 release brought a few new APIs to the table and one of them is the new WindowInset which expands the control that we as developers have over the window insets. This includes the navigation and status bar as well as an on-screen keyboard.
This new release provides a direct way to check these state changes that now toggle and listen for changes in the visibility of the window insets. These options now allow the developer to control and react to the animation when the visibility state changes (but this is not going to be covered within this article).
Getting Started
When writing this post, Android 11 been running on more than 1% of devices, but thanks to the magic of AndroidX the APIs are also usable on several other devices with earlier versions. This post focus on using AndroidX implementation but you will find the equivalent APIs to use in documentation.
implementation "androidx.core:core-ktx:1.5.0-alpha05
Now we are going to insert the following code into the build.gradle file, under all the dependencies. (Note: Any version of 1.5.0 or later will work and please check for the latest version. Apply accordingly)
Show/Hide Keyboard
To start we need to access the WindowInsetsController. When the view is passed it doesn’t have to be an EditText directly but can be any view in the same hierarchy as the focused editText.
//note: ci is my shorthand for controllerInsets
val ci = ViewCompat.getWindowInsetsController(view)
Now that we have initialized the view let show the keyboard on the screen:
ci?.show(WindowInsetsCompat.Type.ime())
Let’s hide the keyboard now:
ci?.hide(WindowInsetsCompat.Type.ime())
Keyboard Visibility
If you have ever tried to check the keyboard visibility in the past then you have probably messed with the global layout listeners because there was no other way. Well, hold on to your trousers because finally there is a proper way to do it.
//start by accessing the root window insets
val insets = ViewCompat.getRootWindowInsets(view)

//Now check the visibility of the IME window
insets?.isVisible(WindowInsetsCompat.Type.ime())
Catching Keyboard Changes
To catch the changes with the keyboard visibility, then we have to let the device know that the app is now responsible for the content view of the insets.
//add the following now
WindowCompat.setDecorFitsSystemWindows(window, false)
This will force the view to be drawn behind the on-screen keyboard as well as other system UI, however, now that we are listening for the keyboard changes we can move any other conflicting views accordingly.
Conclusion
Controlling the on-screen keyboard is common in Android development, so the APIs are long overdue. Understand that this now provides us (developers) a more reliable and efficient way to control any type of window insets going forward. Also, note that AndroidX allows us to use these APIs with older Android versions as well.
- Published in Android, Java, Kotlin, Programming Languages
- 1
- 2