

Good afternoon Programming Community, I am glad to welcome you to another Kotlin edition. we will look upon the replacement of switch with the when keyword. Firstly, we will look on to some examples of switch and after that, we will look at how the when keyword makes our task or code easier and more understandable. So, let’s get started.
Standard Conditional
if (number == 1) {
   println("value: 1")
} else if (nummber == 2) {
   println("value: 2")
} else if (number == 3) {
   println("value: 3")
} else if (number == 4) {
   println("value 4")
} else {
   println("value greater 5")
}
A traditional switch is basically just a statement that can substitute a series of simple if/else that make basic checks as displayed above. However it cannot replace all sort of if/else sequences but just those which compare a value with some constant. So, you can only use a switch to perform an action when one specific variable has a certain precise value.
To remove this difficulty, switch-case was introduced, where we pass the variable to be compared with-in the switch statement (in our example, that variable is number) and compare it with various case statements present corresponding to it and do the operation.
‘switch’
switch (number) {
   case 1:
      println("value: 1")
      break;
   case 2:
      println("value: 2")
      break;
   case 3:
      println("value: 3")
      break;
   case 4:
      println("value: 4")
      break;
   default:
      println("value greater 5")
      break;
}
So, in the above code in order to print the numbers in word, you have to use various conditional statements and this results in a large number of lines of code. Think of a situation when you have to print the words representation of numbers up to 100 or 1000. If you are using conditional statements then you have to use 1000 conditional statements.
In the above code, number is passed in switch statement and cases are used to compare that number. For example, if the number is 1 then case 1 will be executed, if number is 2 then case 2 will be executed and so on. But if the number is not equal to any of the case present then the default block will be executed.
‘when’
when {
   number == 1 -> {
       println("value: 1")
   }
   nummber == 2 -> {
       println("value: 2")
   }
   number == 3 -> {
       println("value: 3")
   }
   number == 4 -> {
       println("value 4")
   }
   else -> {
       println("value greater 5")
   }
}
So, if you are moving from Java to Kotlin, then you will find some changes in the syntax part also. In Java we use switch but in Kotlin, that switch gets converted to when. when is also used for conditional representation but it does the things in a very smarter and easier way. Whenever you are having a number of possibilities then you can use when in your code.
In the above code, like in switch, the number is passed in when and then we compare that number with various options available. In our case, if the number == 1, then “one” will be printed and so on. If more than one match is found then the match that occurs first will be considered only. If no match to the number is found then the else part will be executed.
When in doubt use ‘when’
- no complex case/break groups, only the condition followed by ->
- it can group two or more equivalent choices, separating them with a comma
Wrapping Things Up
we learned how to use when in place of switch in Kotlin. We saw that, if we are having a number of possibilities for a particular variable then we can make use of when to handle all the possibilities. Also, we can use when for multiple or more than one choices.

Identifiers C#
Identifiers are the name given to entities such as variables, methods, classes, etc. They are tokens in a program which uniquely identify an element. For example,
int value
From code above value is the variable which is why we call it the identifier. As you will find out later int is consider a “reserved” keyword so should not be used as an identifier unless the prefix @ is present.
Naming Conventions Rule Of Thumb
- Keywords should not be identifiers
- No whitespaces
- Case sensitivity : so
firstnameFirstnamefirstNameFirstNamethese are 4 different identifiers - Must begin with a letter, underscore or
@
Keywords C#
Keywords are predefined sets of reserved words that have special meaning in a program. The meaning of keywords can not be changed, neither can they be directly used as identifiers in a program. For example,
long phoneNumber
From the code above long is considered the keyword whilephoneNumber is the variable or the identifier. In C# long has a special meaning. Keywords such as long, int, bool, string etc are not allowed to be used as identifiers. However when there is a will then we have a way so even though keywords are “reserved” words, tha can be used as indentifiers if you add @ as the prefix long @int
Note: Though you can use the prefix
@I suggest as good practice and coding etiquette that you do not do that. It is what we call bad “juju”
Hello programming world, today it looks like you are interested in trying to implement a navigational drawer within you application. Within this tutorial we are going to be focusing on drawer implementation with Kotlin but if you are interested in learning how in Java or Swift. NavigationDrawer or also known NavigationView which is a panel that shows you the menu but is hidden until the user swiping from the left or right or user touches the hamburger icon( )
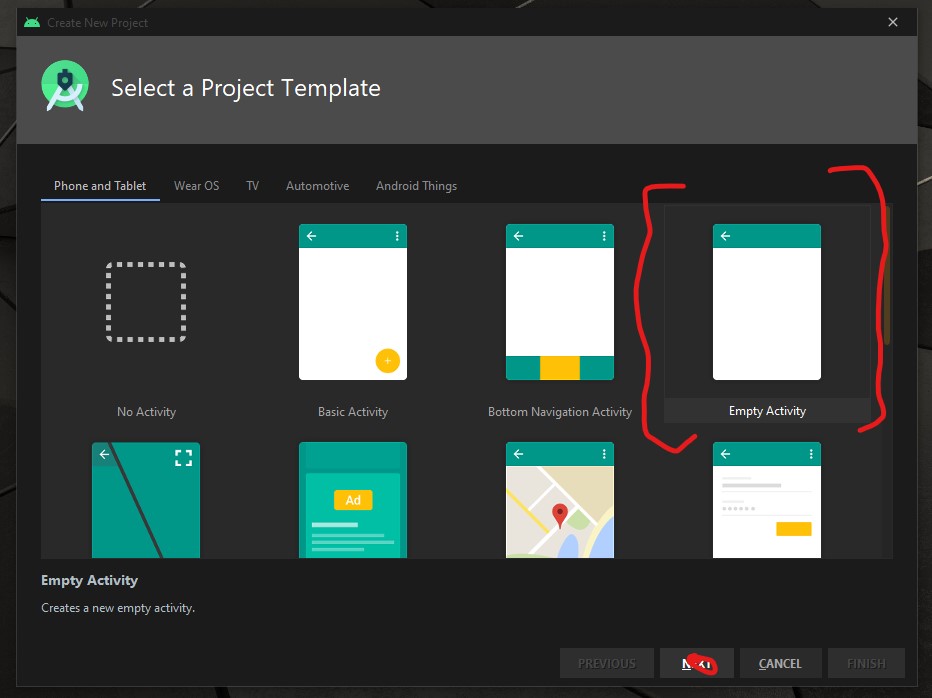
To begin the development open your Android IDE and select “Empty Actvity” then select the “NEXT” button.
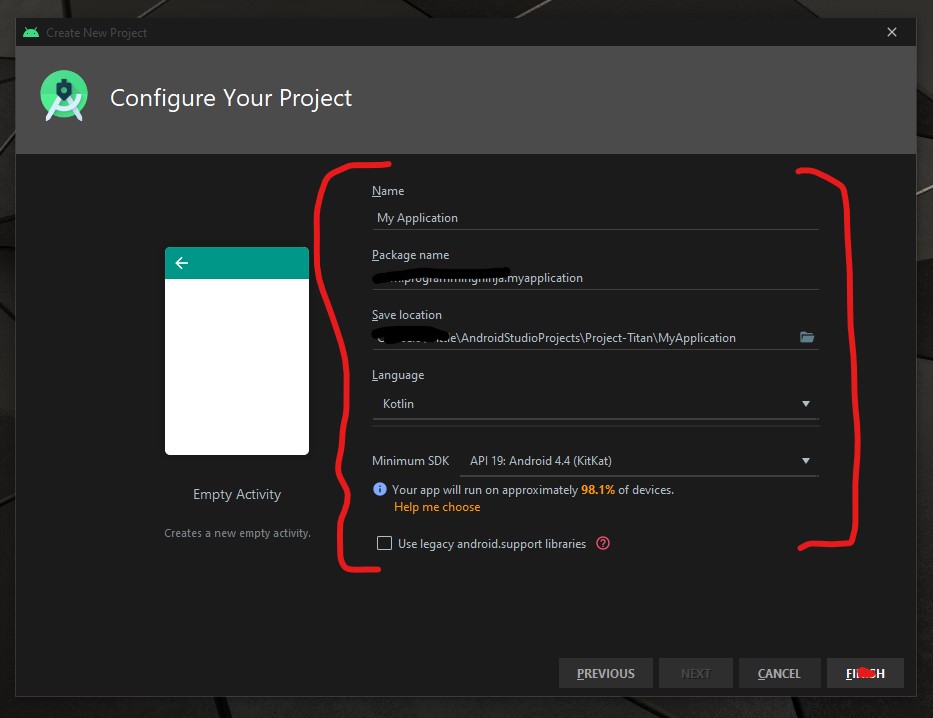
Now it is time to configure the project with changing the following fields Name and Language as seen in the image below.
Now we need to add the material dependency into the project which has the NavigationView and then sync the project. You do have two options to accomplish this task.
the first way is adding to the build.gradle (Module: app)
implementation 'com.google.android.material:material:1.3.0-alpha02'
Or the second way is using the “Dependencies” selector. To achieve this select File -> Package Structure.. (Ctrl+Alt+Shift+S) ->
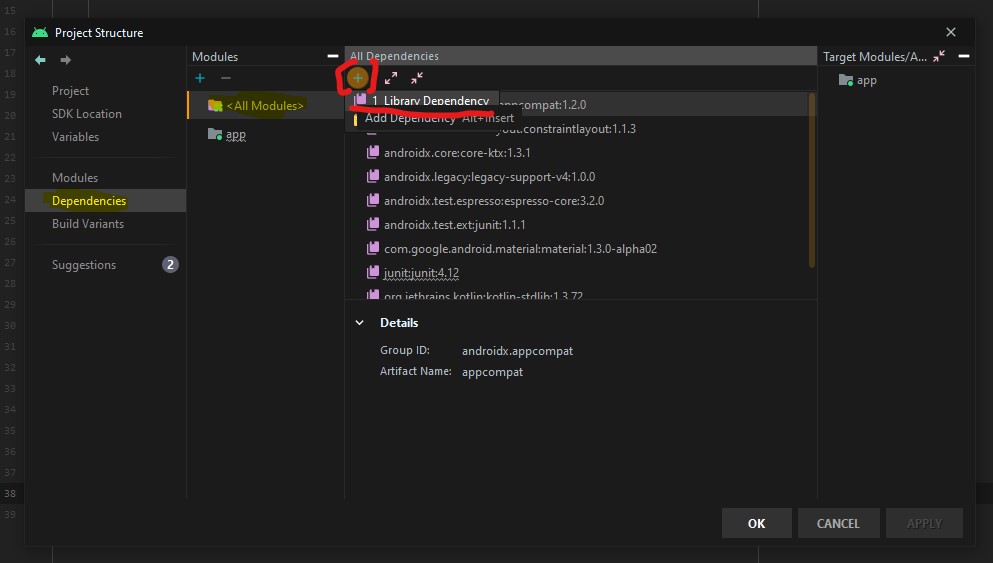
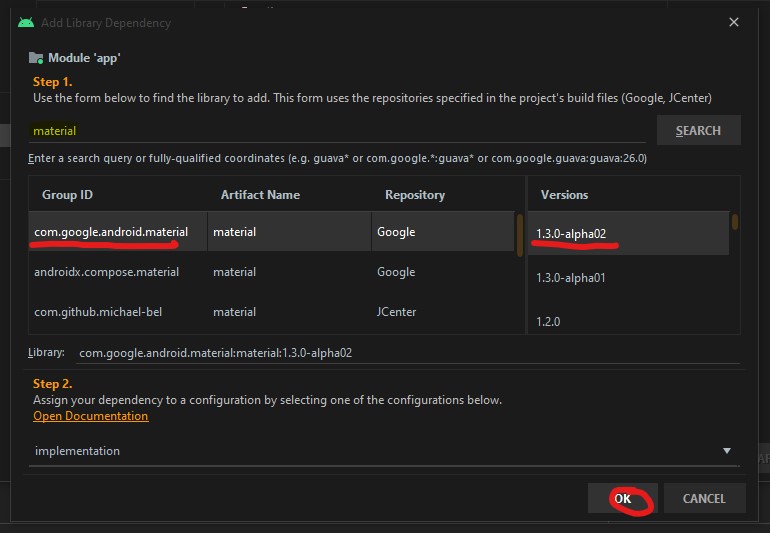
Now that the dependency is add we are going to focus on the main activity layout and this is where the navigation menu is going to be displayed.
<androidx.drawerlayout.widget.DrawerLayout
        xmlns:android="http://schemas.android.com/apk/res/android"
        xmlns:tools="http://schemas.android.com/tools"
        xmlns:app="http://schemas.android.com/apk/res-auto"
        android:layout_width="match_parent"
        android:layout_height="match_parent"
        android:id="@+id/drawer"
        tools:openDrawer="start"
        tools:context=".MainActivity">

    <RelativeLayout
            android:layout_width="wrap_content"
            android:layout_height="wrap_content">

        <androidx.appcompat.widget.Toolbar
                android:layout_width="match_parent"
                android:layout_height="wrap_content"
                android:id="@+id/tb_toolbar"
                app:title="Coeus Drawer Demo"
                app:titleTextColor="@color/cardview_light_background"
                android:background="@color/colorAccent" />

        <FrameLayout
                android:layout_width="match_parent"
                android:layout_height="match_parent"
                android:id="@+id/frame_container" />
    </RelativeLayout>

    <com.google.android.material.navigation.NavigationView
            android:layout_width="wrap_content"
            android:layout_height="match_parent"
            android:id="@+id/nv_menu"
            app:menu="@menu/ico_menu"
            app:headerLayout="@layout/nav_header"
            android:layout_gravity="start" />
</androidx.drawerlayout.widget.DrawerLayout>
Now that we have the DrawerLayout as the parent view and this draw the view for the child items
- Line 20
- Line 29
Within the NavigationView there are two attributes that we need there purpose as follow
- Line 33*: declare items which we need to show in the navigation view, the list of menu
- Line 34*: define the layout which is the header layout in the navigation view, the top part of the navigation view which is mostly used to describe user details or app details (Lets create the layout that is be referenced here, please see code beow)
***Note: when short to creating to new resource “ALT+SHIFT+ENTER”
<?xml version="1.0" encoding="utf-8"?>
<androidx.appcompat.widget.LinearLayoutCompat
    xmlns:android="http://schemas.android.com/apk/res/android"
    android:layout_width="match_parent"
    android:layout_height="wrap_content"
    android:orientation="vertical"
    android:background="@color/colorAccent">

    <androidx.appcompat.widget.AppCompatImageView
            android:layout_width="wrap_content"
            android:layout_height="wrap_content"
            android:id="@+id/img_user_image"
            android:src="@mipmap/ic_launcher_round"/>

    <androidx.appcompat.widget.AppCompatTextView
            android:layout_width="wrap_content"
            android:layout_height="wrap_content"
            android:id="@+id/tv_user_name"
            android:text="User Name"
            android:textSize="30dp"
            android:textColor="@color/cardview_light_background" />

    <androidx.appcompat.widget.AppCompatTextView
            android:layout_width="wrap_content"
            android:layout_height="wrap_content"
            android:id="@+id/tv_user_details"
            android:text="user details"
            android:textSize="20dp"
            android:textColor="@color/cardview_light_background" />
</androidx.appcompat.widget.LinearLayoutCompat>
No we need to modify ActionBar within the style.xml so we don’t run into a complication since we are using our own type of toolbar. We will be modifying the line 2 from DarkActionBar to NoActionBar
<!-- Base application theme. -->
    <style name="AppTheme" parent="Theme.AppCompat.Light.NoActionBar">
        <!-- Customize your theme here. -->
        <item name="colorPrimary">@color/colorPrimary</item>
        <item name="colorPrimaryDark">@color/colorPrimaryDark</item>
        <item name="colorAccent">@color/colorAccent</item>
    </style>
Now that we have completed the layout and now need to focus on the kotlin class (.kt). Select the MainActivity class and everything is going to take place within the OnCreate(), so we’ll begin by setting our new toolbar as the actionbar.
val tb = findViewById<Toolbar>(R.id.tb_toolbar)
setSupportActionBar(tb)
Now it is time to set the actionBar to fire the toggle state, the user wants to ‘open’ and ‘close’ the navigation view.
val nav: NavigationView? = findViewById(R.id.nv_menu)
val drawer: DrawerLayout? = findViewById(R.id.drawer)
val toggle: ActionBarDrawerToggle? = ActionBarDrawerToggle(this, drawer,tb, R.string.open, R.string.close) //create string arguements
Setup a handler to respond to click events on the navigation elements and swap out the fragment. This can be put into the activity directly:
***To understand what a fragment check out the fragment post:
supportFragmentManager.beginTransaction().replace(R.id.frame_container, HomeFragment()).commit()
nav?.setCheckedItem(m_home)
And set the specific action on menuItem clicks. Here, we are showing the toast message for anything that doesn’t have a fragment already create. Ideally, you this is where can start a new activity, or open fragment etc.
nav?.setNavigationItemSelectedListener(object : NavigationView.OnNavigationItemSelectedListener {
     var temp: Fragment? = null

     override fun onNavigationItemSelected(item: MenuItem): Boolean {
          when (item.itemId) {
              m_home -> temp = HomeFragment()
              m_calls -> Toast.makeText(applicationContext, "You have clicked the call", Toast.LENGTH_SHORT).show()
              m_settings -> Toast.makeText(applicationContext, "You have clicked the settings", Toast.LENGTH_SHORT).show()
          }
supportFragmentManager.beginTransaction().replace(R.id.frame_container, temp!!).commit()
drawer.closeDrawer(GravityCompat.START)
                return true
            }
        })
What is the user press back button, the application should check the navigationView and make sure the drawer is closed first and then the app. For this, we will override the onBackPressed() method.
override fun onBackPressed() {
        if (drawer.isDrawerOpen(GravityCompat.START)) {
            drawer.closeDrawer(GravityCompat.START)
        } else {
            super.onBackPressed()
        }
    }
Now check for any errors and if all is good then let’s run the app. If everything compiles correctly then it should be working fine. There is much more in NavigationView like icons in the menu items etc. Try to explore more and share us with on our twitter or slack channel.
In this tutorial, we will learn how to write a simple “Hello World!” program in C#. This will get you familiar with the basic syntax and requirements of a C# program.
The “Hello World!” program is often the first program we see when we dive into a new language. It simply prints Hello World! on the output screen
he purpose of this program is to get us familiar with the basic syntax and requirements of a programming language.
“Hello World”
using System;
namespace HelloWorld
{
    class Hello {
        static void Main(string[] args)
        {
            //Hello comment block
            Console.WriteLine("Hello World!");
        }
    }
}
Note: This is the default setup when creating a new application within the request solution.
Now you may run the application, press F5 and the output should be: “Hello World!”
Understanding the “Hello World” program and how it works
- //Hello comment block
- // – represents the start of a comment section in C#. No worries comment sections/blocks are not executed by the C# compiler. (Consider when reading or using comments for better communicating with developers. To learn more about comments)
- namespace HelloWorld {…}
- is used to define the application namespace. So the example above namespace is called “HelloWorld”
- the perfect way to see namespace is like a container that will consist of methods, classes, and even other namespaces. (To learn more about namespace)
- class Hello {…}
- reflecting on the above example the class is created with the name – Hello in C#. C# is an object-oriented language and is mandatory for program execution.
- static void Main(string[], args){…}
- ‘Main()‘ this a method within the class of “Hello”. During the execution of a C# application, it will start with the ‘Main()‘
- Console.WriteLine(“Hello World”);
- to keep it short just remember in console application this will print the text to the user screen.
Tackling Hello World differently
// Hello World! program
namespace HelloWorld
{
    class Hello {
        static void Main(string[] args)
        {
            System.Console.WriteLine("Hello World!");
        }
    }
}
The above code is another way to execute the ‘Hello World’ program. Please take note with the two codes, the orignal code we began with and the code from above, the first difference is the missing “using System;”. Second difference to notice is the adding of the “System” before Console.WriteLine
Don’t worry more on this is another post.
Take away
- ‘Main()’ method must be inside the class definition
- Every C# program has to have a class definition
- Most importantly the execution begins within the ‘Main()’ method
So let’s keep it simple as a newbie this is an excellent introduction to C#. If anything within this post is hard to comprehend, don’t worry in the beginning I was the same way as well. As you progress with your read and research everything will begin to fall in place.
Swift provides us with multiple ways to loop through items in a collection, they are:
for pokemon in pokemons {
   print(pokemon)
}

pokemons.forEach { (pokemon) in
   print("Pokemon", pokemon)
}

for (index, element) in pokemons.enumerated() {
   print("Number:", index, "Pokemon:", element)
}
Using for in
many programming languages the for in loo is called for-each. Standard loop statement in other languages uses this format:
for (i = 0; i < n; i++) {
   ///some fancy collecion to loop thur
}
Please note: Swift 3 no longer supports c-style for-loops
Now when using swift this approach is a little different, the rationale of this for-in syntax is it can be used to loop over ranges, iterators, strings, sequences, and collections with the same syntax.
let pokemons = ["Pikachu", "Charmander", "Squirtle", "Bulbasaur"]

for i in 0...< pokemons.count {
   print("Pokemon \(i+1):" pokemons[i])
}

//output:
Pokemon 1: Pikachu
Pokemon 2: Charmander
Pokemon 3: Squirtle
Pokemon 4: Bulbasaur
Within Swift the use of object types like arrays, dictionaries, and sets are known as collection. Any collection can be iterated with a for-in loop. For example with dictionary:
let pokedex = ["Electric":"Pikachu","Water":"Squirtle","Fire":"Charmander","Grass":"Bulbasaur"]

for (type, pokemon) in pokedex {
   print("The \(type)'s Pokemon is \(pokemon))
}

//output
The Electric's Pokemon is Pikachu
The Water's Pokemon is Squirtle
The Fire's Pokemon is Charmander
The Grass's Pokemon is Bulbasaur
In addition, Swift also provided two range operators lowerBound...upperBound as a shortcut for expressing a range of values.
Take note: lowebound is greater than upperBound the code will crash
for i in 0...5 {
   print(i)
}
//output
0
1
2
3
4
5

for i in 0..<5 {
   print(i)
}

//output
0
1
2
3
4
If interested in reversing the range while looping, we can easily achieve that using reversed
for i in (0...5).reversed() {
   print(i)
}

//output
5
4
3
2
1
0
Stride
As I referenced before, C-Style for loops are no longer supported within Swift 3, so you’re probably asking how to acquire the ‘increment of the counter’ (i++). We accomplished this by using stride, and this helps us to move from one value to another using any incremental value, we can also specify whether the upperBound is inclusive or exclusive.
for i in stride(from 0, to: 10, by: 2) {
   print(i)
}

//output
0
2
4
6
8
Using for each
pokemons.forEach {
   print("Pokemon", pokemon)
}

//output
Pokemon Mewtwo
Pokemon Snorlax
Pokemon Eevee
Swift provides a dedicated method forEach for specific, unlike the above forIn this method can’t break the loop partway (at some point). It has to loop over each item in the sequence. It has to loop over each item in the sequence. This helps people reading your code to figure out your intent: that you want to act on all items, and won’t stop in the middle.
Please note:
breakstops execution in a loop immediately and continues directly after the loop.
continueonly exits the current iteration of the loop — it will jump back to the top of the loop and resumes up from there for next iteration
var oddNumbers = [Int]()

for numbers in (0...100) {
   guard oddNumbers.count < 15 else {
      break
   }

   guard numbers % 3 == 0 else {
      continue
   }

   oddNumbers.append(numbers)

   print(oddNumbers)
}
the same cannot be achieved in forEach with break and continue, so we need something like:
let oddNumbers = (0...100).filter {numbers -> Bool in
   return numbers % 3 == 0
}.prefix(10)

print(oddNumbers)
Using for enumerated
This Swift loop iterates to each of the items by also telling the index of it. In case if we need to iterate the elements and need their index also, then forEnumerated is the perfect loop for us.
Nested for loops:
var pokedex = ["001", "002", "003"]
var pokemons = ["Bulbasaur", "Ivysaur", "Venusaur"]

for i in 0..< pokedex.count {
   var string = "\(pokedex[i]) is "

   for _ in 1...3 {
      string += "\(pokemons[i])"
   }

   print(string)
}

//output
001 is Bulbasaur
002 is Ivysaur
003 is Venusaur
While:
// a while loop performs a set of statements until a condition becomes false
while condition {
   //statements
}

var index = 0
while index < pokemons.count {
   print(pokemon[index])
   index += 1
}

//output
Bulbasaur
Ivysaur
Venusaur
Repeat:
//repeat while loop is similar to do while loops in other languages

repeat {
   statements
} while condition

var index = 0
repeat {
   print (pokemons[index])
   index += 1
} while index < pokemons.count

//output
Bulbasaur
Ivysaur
Venusaur
It is similar to the above while loop but the major difference is that this loop evaluates the condition after running the statements. Either way, both while and repeat are best used in the loops where the numbers of steps are unknown.

Any programming language a variable is referred to a location in memory(storage area) to stored data. The type of variable defines the range of value that the variable can hold. So indicate a storage space, each variable should be given a unique identifier.
Basically, val and var both are used to declare a variable. var is like a general variable and can be assigned multiple times and is known as the mutable variable in Kotlin. Whereas val is a constant variable and can not be assigned multiple times and can be Initialized only single time and is known as the immutable variable in Kotlin.
Declaring a variable in Kotlin
Var
is short for variable – The object stored in the variable could change (vary) in time.
private val adapter: HomeAdapter? = null
After the Initialized It will not throw me an error because var is a mutable and it can be assigned multiple times.
Val
is short for value – The object stored in val, could not vary in time. Once assigned the val becomes read only, like a constant in Java Programming language.
private var adapter: HomeAdapter? = null
After the Initialized It will throw me an error like “Val can not be reassigned”
So to conclude we have learnt about Val vs Var in Kotlin that var could be changed at any level. Whereas val once assigned, could not be changed, but its properties could be changed.
A fragment is an Android component that holds part of the behavior and/or UI of an activity. As the name would suggest, fragments are not independent entities, but are tied to a single activity. In many ways, they have functionality similar to activities.
In the same way that you don’t actually need an army of little helpers to do your bidding, you don’t have to use fragments. However, if you use them well, they can provide:
- Modularity – Diving complex activity code across fragments for better maintenance
- Adaptability – representing sections of a UI within the different fragments while utilizing different layouts that relys on the screen orientation and size
- Reusability – placing behavior or UI parts within the fragments that multiple activities can share
Fragment Lifecycle of Android
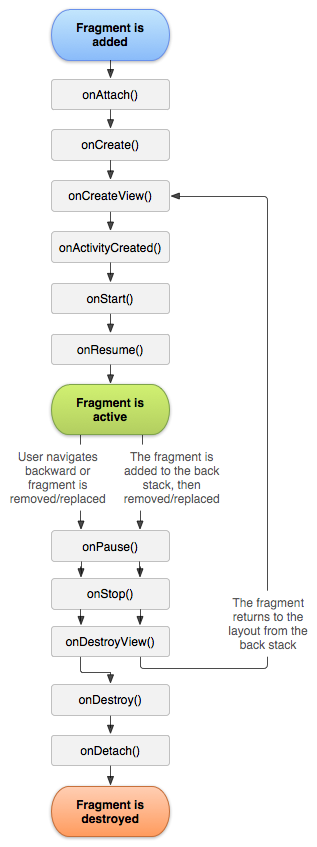
As you already know like activity, a fragment has a lifecycle with events that occur when the status changes within the framents. For example, when an event fires becasue a fragment becomes visible and active, or is not used or removed. Just as in a regular activity you are able to add code and behavior to the callbacks for the events.
Below you will see the fragment lifescycle diagram:
Understanding the lifecycle
- onAttach : the fragment attaches to its host activity
- onCreate : When a new fragment initializes, which always happens after it attaches to the hosts.
- onCreateView : creates its portion of the view hierarchy, which then added to the activity’s hierarchy of view
- onActivityCreated : fragment’s activity has finished on its own onCreate
- onStart : fragment becomes visible and starts after its activity starts
- onResume : fragment is visible and interactable that resumes only after its activity resumes and often resumes immediately after the activity does.
- onPause : user may not interact
- onStop : this is fired when the fragment is no longer visible; the fragment will get change with another fragment or it gets removed from actvity or fragment’s is stopped
- onDestroyView : this is fired when the view and other resources created within the onCreateView() are removed from the activity’s view hierarchy and destroyed.
- onDestroy : fired when the fragment does the final clean up.
- onDetach : fires when the fragment is detached from the activity host
If you want to learn more details regarding please read “Droid Fragments Life”.This is all about how the fragment come up within the activity and goes out. Cool!!
Maybe you are new to the .Net lifestyle or maybe you are a veteran, either way, you ended up here to get a better understanding of what reflection is all about. To begin reflection is the process of describing various metadata of types, methods, and fields in code, that is literal Microsoft definition but no worries I will explain it. So before we dive into anything else you should already have an understanding of namespaces are and why we use them.
With reflection in C#, you can dynamically create an instance of a type and bing that type to an existing object. Moreover, you can get the type from an existing object and access its properties. When you use attributes in your code, reflection gives you access as it provides objects of the type that describe modules, assemblies, and types.
So in this article, I’ll discuss C# Reflection with various examples. Here we’ll learn the way of getting type information using different ways and use of properties and methods of C# Reflection type class.
Here’s a simple example of reflection using the static method GetType – inherited by all types from the Object base class – to obtain the type of a variable,
//using GetType to obtain type information
int a = 42;
System.Type type = a.GetType();
System.Console.WriteLine(type);
//the output will display as the following
//System.Int32
Defining Reflection in C#
To understand reflection, there are a few basics you should understand about modules, types, and members:
- Assemblies contain modules
- Modules contain types
- Types contain members
You need to use Reflection when you want to inspect the contents of an assembly. For example, you can get all members of the object by typing “.” before an object when viewing your Visual Studio editor IntelliSense.
A program reflects on itself when it extracts metadata from its assemblies, then uses it to modify its behavior or inform the user. When you write a C# program that uses reflection, you can use either the TypeOf operator or the GetType() method to get the object’s type.
Examples of Reflection in C#
Implementing reflection in C# requires a two-step process. You first get the “type” object, then use the type to browse members such as “methods” and “properties”. This is how you would create instances of DateTime class from the system assembly:
//create instance of class DateTime
DateTime dt = (DateTime) Activator.CreateInstance(typeof(DateTime);
Namespace Test
{
   public class YuGiOh
   {
      public YuGiOh() {...}
      public string name
      public static double Attack {get{...} set{...}}
      public static double Defense {get{...} set{...}}
      public static string Attribute() {...}
      public static string MonsterEffect() {...}
      public static int Stars () {get{...} set{...}}
      public static string CardType() {...}
   }
}

//dynamically load assembly file
Assembly yugioh = Assembly.LoadFile(@"c:'Test.dll")

//get type of class YuGiOh from just loaded assembly
Type card = yugioh.GetType("Test.YuGiOh");

//create instance of class YuGiOh
object cardInstance = Activator.CreateInstance(card);
And access its members (the following examples illustrate getting values for the public double Number property):
//get info about property: public double Attack
PropertyInfo cardPropertyInfo = card.GetProperty("Attack");

//get the value of property: public double Attack
double value = (double)cardPropertyInfo.GetValue(cardInstance, null);

//set value of property: public double Attack
cardPropertyInfo.SetValue(cardInstance, 10.0, null);
Then, you
Understanding How Reflection Works
The main class for reflection is the System.Type class, which is an abstract class representing a type in the Common Type System. When you use this class, you can find the types used in a module and namespace and also determine if a given type is a reference or value type. You can parse the corresponding metadata tables to look through these items:
- Fields
- properties
- Methods
- Events
Understanding How Reflection in C# Works
There are several uses including:
- Use Module to get all global and non-global methods defined in the module.
- Use MethodInfo to look at information such as parameters, name, return type, access modifiers, and implementation details.
- Use EventInfo to find out the event-handler data type, the name, declaring type and custom attributes.
- Use ConstructorInfo to get data on the parameters, access modifiers, and implementation details of a constructor.
- Use Assembly to load modules listed in the assembly manifest.
- Use PropertyInfo to get the declaring type, reflected type, data type, name and writable status of a property or to get and set property values.
- Use CustomAttributeData to find out information on custom attributes or to review attributes without having to create more instances.
Other uses for Reflection include constructing symbol tables, to determine which fields to persist and through serialization.
If my math is not wrong Java has been around for over 20+ years now and has no intention of going away. It holds a supreme position in the list of most popular programming languages following the C and C++ =, setting the highest usability record with millions of developers and systems.
Random Fact:
James Gosling, Mike Sheridan, and Patrick Naughton initiated the Java language back in 1991. Java has been the primary language for Android app development along with a few of its companions: Scala, Groovy and stepping up is Kotlin.
Kotlin Background
Let first you will need to understand what exactly is Kotlin so it is considered as statically typed programming language that runs on JVM(Java Virtual Machine) and JavaScript. It is developed by JetBrains and open-source community. The ‘Kotlin’ name came from Kotlin Island located near Saint Petersburg. It is supported by leading IDEs and compatible with Java 6 or Java 8. Kotlin is described as a general-purpose language and introduces functional features to support Java interoperability. The Kotlin project was born out of the aspiration for heightened productivity. The goal was to improve the coding experience in a way that was both practical and effective.
A central focus of Kotlin is to enable mixed-language projects. Kotlin also introduces improved syntax, as well as concise expressions and abstractions. Using Kotlin with Java reduces excessive boilerplate code, which is a huge win for Android developers. Kotlin came when Android development needed a more modern language to add to the qualities of java and aid in mobile development. This allows developers to not only easily update old Java apps to Kotlin, but also carry on their old work in Java to Kotlin.
Here’s a brief example Kotlin language
package hello
fun main() {
  println("Hello World")
}
It’s that simple! Kotlin uses developer-friendly coding structures and norms that are easy-to-understand and use. When considering this example from the develops’ perspective, you will be able to understand why Kotlin is loved by developers around the world. It is concise, effective, and faster compared to Java.
Is Java Dead?
Based on the group that I program with it appears that Java is currently in the area with us developers. Java is a reputable programming language with vast open-source tools and libraries to help developers. With that said, no language is without fault and even Java is subject to complications that can make a developer’s job tedious. If anything the objective for Kotlin is to supposedly introduce solutions to the common programming headaches and improve the Java ecosystem as a whole.
Strict Trial And Error
Kotlin has some milage under itself and has become a more stable and congruous development option especially within the Android Studio IDE. Some developers seem to believe that Kotlin will oust Java for Android development in future years. Other reviewers seem to believe Kotlin and Java should be coexisting without one outweighing the other.
This is a quality Java is not known for; however, readability should always take priority over concision. Yes, the succinct nature of Kotlin simplifies a developer’s job and mitigates the risk for error, but Kotlin doesn’t practice concision for concision’s sake. So let’s take the example below and compare the difference in the languages presents.
public class MathLife {
   public static double calculate () throws Exception {
      switch(op) {
         case "add":
            return a + b;
         case "subtract":
            return a - b;
         case "multiply":
            return a * b;
         case "divide":
            return a / b;
         default:
            throw new Exception();
      }
   }
}
Above is a simple calculator function written in Java. For comparison, here is the same calculator in Kotlin:
fun calculate(a: Double, op: String, b: Double): Double {
   when (op) {
      "add" -> return a + b
      "subtract" -> return a - b
      "multiply" -> return a * b
      "divide" -> return a / b
      else -> throw Exception()
   }
}
It may not seem like much, but the Kotlin version of this calculator is written in half the lines of code it took to program the function in Java. Brevity is a crucial factor in productivity. Writing large projects becomes easier when a developer is given more power for every line of code. A key observation here is Kotlin does not overlook comprehension for the sake of brevity. The syntax is concise, readable and still substantial.
The Winner: Java or Kotlin
In all fairness, chances are that you have been taught, learn and embraced Java. Switching to Kotlin at a time can be a bit of shock, so it is important to do this transition slowly to make sure you understand. having said that, Kotlin is the new official language and owing to its modern nature, it will become widely adopted in the future, so learning it and starting development with it right now would be a good idea. Understand java will continue to be a popular language for several years to come and isn’t likely to be entirely replaced. So take your time and make the switch gently.
At the end of the day, it’s all about what you feel comfortable with. As stated previously to be a true blood Androidian, you will need to have a working knowledge of the language Java. But if you already do have that then the Kotlin language of the future, so you might as well spend some time getting accustomed to it.