

When people tell me they are interested in web development and ask me where to begin. My response has always been to start with “HTML” it’s easy. Reflecting back on earlier introduction to web development it was really easy especially with html4 and probably hands down the easiest programming language.
HTML is an incredible and powerful markup language that can be used to give web application structure while also providing powerful accessibility benefits.
Today we will focus on 10 HTML element tags that should in your tool bag and ideally, it will aid you and ensure that your site is a more accessible and structurally sound web presence.
- Audio
- Blockquote
- Output
- Picture
- Progress
- Meter
- Template
- Time
- Video
- Word Break OP
Audio
<audio>
   <source src="bulbasaur.mp3" type="audio/mpeg" />
   <source src="bulbasaur.ogg" type="audio/ogg" />
   <source src="bulbasaur.wav" type="audio/wav" />
</audio>
Blockquote
this tag specifies a section that is considered a quote from some other source.
<blockquote>
Lorem ipsum dolor sit amet, consectetuer adipiscing elit. Aenean commodo ligula eget dolor. Aenean massa. Cum sociis natoque penatibus et magnis dis parturient montes, nascetur ridiculus mus.
</blockquote>
Output
This tag is a little fancier because it represents the results of a calculation. You can use the plus sign and equal symbol to indicate that the first and second input values should be “outputted” to the output tag; you can denote this with a for attribute containing the ids of the two elements to combine.
<form oninput="x.value=parseInt(a.value)+parseInt(b.value)">
   <input type="range" id="a" value="50">
   +<input type="number" id="b" value="25">
   =<output name="x" for="a b"></output>
</form>
Picture
This tag allows the user to specify the image sources. Instead of having an image that you scale up and down depending upon the viewport width, multiple images can be designed to fill the browser viewport. the tag is partnered with additional tags <source> and <img> tags. the following attributes are to keep in mind when using the <picture> tag.
- media: accepts any valid media query that you might define within CSS
- type: defines the MIME-type
- sizes: defines a single width value
- srcset: this is a required attribute. defines the URL of the image to display
<picture>
   <source media="(min-width:650px)" srcset="charmander.jpg">
   <source media="(min-width:465px)" srcset="evee.jpg">
   <img src="squirtle .jpg" alt="pokemon" style="width:auto;">
</picture>
The <img> tag is used to provide backward compatibility if a browser doesn’t support the <picture> tag or if none of the <source> tags to match.
Progress
This tag represents the progress of a task. the tag is not a replacement for the <meter> tag, thus components indicating disk space usage or query result relevance should use the <meter> tag.
<progress id="file" value="32" max="100"> 32% </progress>
Meter
this tag defines a scalar measurement within a defined range or a fractional value. Many also refer to this tag as a “gauge”. the tag can be used to display disk usage statistics or to indicate the relevance of search results.
<label for="disk_c">Disk usage C:</label>
<meter id="disk_c" value="2" min="0" max="10">2 out of 10</meter><br>

<label for="disk_d">Disk usage D:</label>
<meter id="disk_d" value="0.6">60%</meter>
Template
This tag contains content that is hidden from the user but will be used to instantiate the HTML code. Using javascript you can render this content with the cloneNode() method.
<template>
   <h2>Pokemon</h2>
   <img src="charmander.jpg" width="214" height="204">
</template>
Time
This tag defines a human-readable date or time. This can be used to encode dates and times in a machine-readable manner so that user agents can add reminders or scheduled events to the user’s calendar. This is also helpful for search engines to produce smarter search results.
<p>Open from <time>10:00</time> to <time>21:00</time> every weekday.</p>

<p>I have a date on <time datetime="2008-02-14 20:00">Valentines day</time>.</p>
Video
This tag specifies a video stream or movie clip. Similar to the audio tag it has formats that are supported: MP4, WebM, and Ogg
<video width="320" height="240" controls>
   <source src="mewtwo.mp4" type="video/mp4">
   <source src="mewtwo.ogg" type="video/ogg">
   Your browser does not support the video tag.
</video>
Word Break Opportunity
If you have a long block of text or a long word you can use this tag to specify where in a body to text it would be ideal to break on.
<p>To learn AJAX, you must be familiar with the XML<wbr>Http<wbr>Request Object.</p>
Introduction
Google’s reCAPTCHA API protects your website/app from malicious traffic. You might have seen the reCAPTCHA integrated on web pages. You can integrate the same in your Android apps too using SafeNet API. The service is free to use and it will show a captcha to be solved if the engine suspects user interaction to be a bot instead of a human.
Within this post, I will explain and build a simple button click application that will integrate captcha to avoid bots from submitting forms on there own. But understand that this method is not only limited to form usage but a user can integrate any this module into any app
How it works
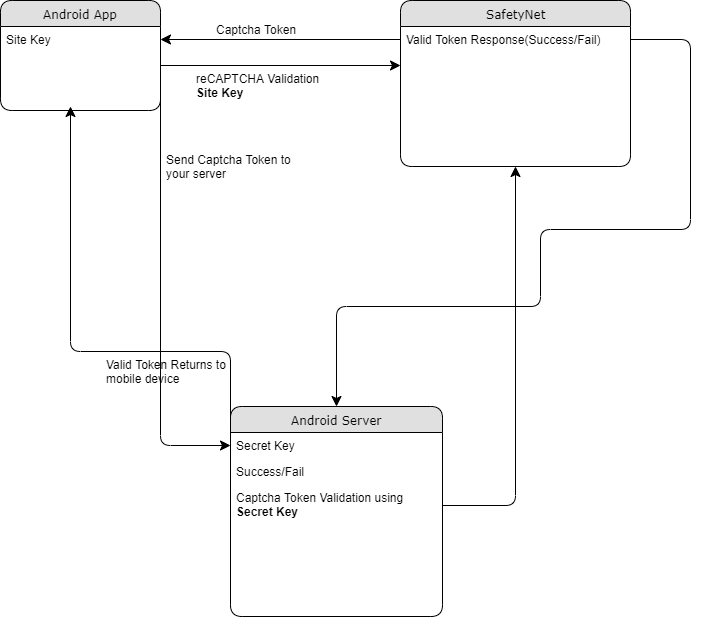
The following point will explain the simple flow of reCAPTCHA in Android with SafetyNet API.
- First, a user needs to obtain the SafetyNet key pair by registering your app. After completing this a Site & Secret Key.
- The Site Key will be integrated into an Android app and it can be public. Secret Key should be kept on your server and it shouldn’t be exposed.
- When reCAPTCHA is invoked, it will show the Captcha challenge to a user it necessary. In this step, it communicates with the captcha server and returns “User Response Token” using Site Key.
Registering your App w/SafetyNet
To begin before diving into the application creation we need to get the keys that will be validated against.
Fist go to the site following site and sign up if you do not already have an account
- https://www.google.com/recaptcha/intro/v3.html
- After accessing your account create
- Register a new account
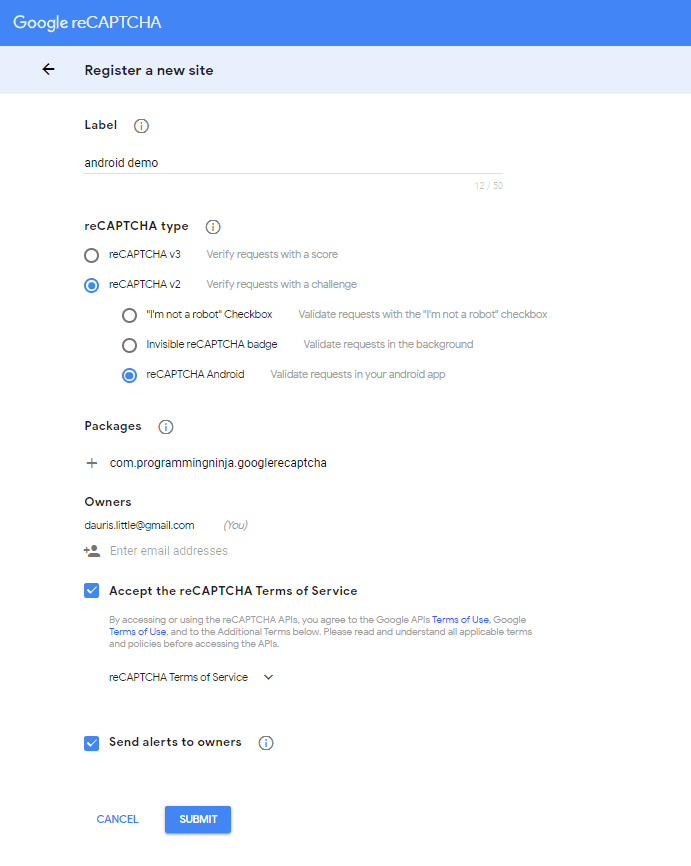
- Now enter your label, reCAPTCHA type, domains and then accept “Terms of Service”
NOTE: Regarding the label the title be anything that identifies the api key to yourself
NOTE: Regarding the selecting reCAPTCHA if working with android select reCAPTCHA v2 then reCAPTCHA Android
NOTE: Regarding populating the domain should be your Package Name in Package Names Section
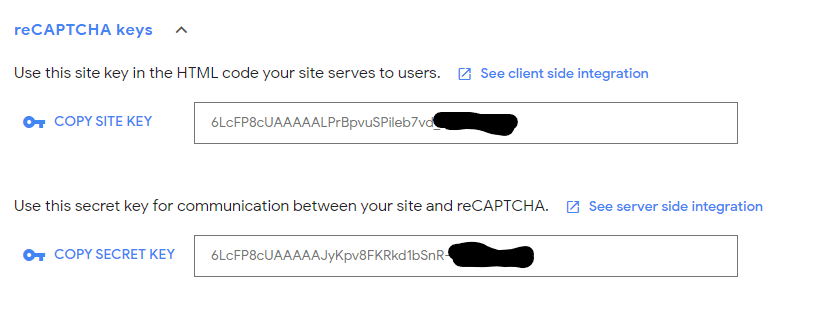
Then, you will get the site key and secret key from SafetyNet API Server and it as well as shows client and server-side integration code snippets. The following figures show the same.
Step 1 – Create New Project w/Android Studio
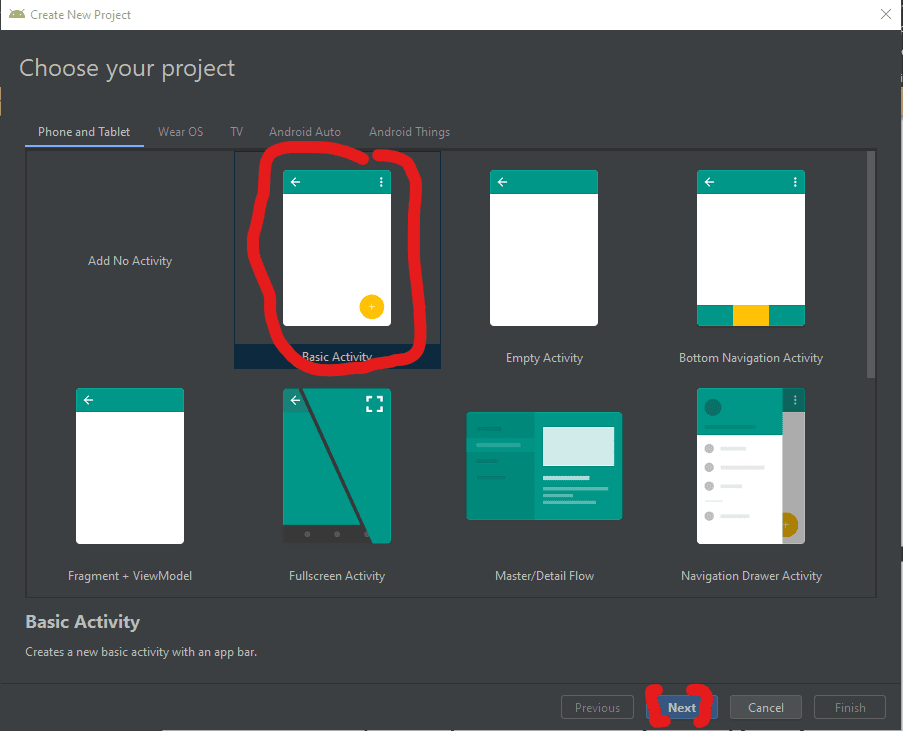
Now lets begin with the fun stuff and to begin you will begin by open Android Studio and then “Create New Project”
- Begin by Start a new Android Studio Project èselect Basic Activity from templates.
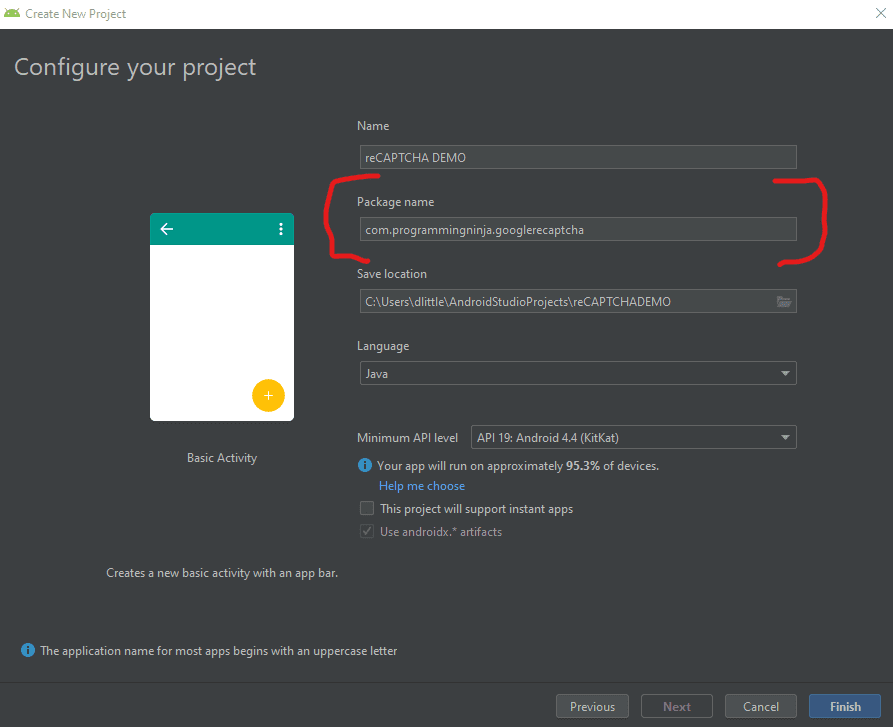
NOTE: While creating, use the package name you have registered on reCAPTCHA dashboard.
Step 2 – Setting up the library & AndroidMainfest for the project
Add SafeNet and the Volley dependency to your build.gradle and rebuild the project. Here, I used the following dependency. You can change as per your Android SDK.
NOTE: Volley is used to send HTTP call to our server to validate the captcha token on the server side.
build.gradle
dependencies {
    implementation fileTree(dir: 'libs', include: ['*.jar'])
    implementation 'androidx.appcompat:appcompat:1.1.0'
    implementation 'androidx.constraintlayout:constraintlayout:1.1.3'
    implementation 'com.google.android.material:material:1.0.0'
    testImplementation 'junit:junit:4.12'
    androidTestImplementation 'androidx.test.ext:junit:1.1.1'
    androidTestImplementation 'androidx.test.espresso:espresso-core:3.2.0'

    //dependency for recaptcha (safetynet)
    implementation 'com.google.android.gms:play-services-safetynet:17.0.0'

    //dependency for fast networking for networking
    implementation 'com.android.volley:volley:1.1.0'
}
Now we need to add the app manifest file with the following permission(s). SafetyNet library is used to create the captcha validation in android. Volley library is an HTTP Networkinf library used here for validating captcha response.
AndroidManifest.xml
<uses-permission android:name="android.permission.INTERNET"/>
Step 3 – Implementation of SafetyNet API
If you are still with me then let’s dive into the Java part of the project. We will first ensure that we have all the modules that will be used in the application
Required modules
import android.os.Bundle;
import android.util.Log;
import android.view.View;
import android.widget.Button;
import android.widget.TextView;

import androidx.appcompat.app.AppCompatActivity;
import androidx.annotation.NonNull;

//volley
import com.android.volley.DefaultRetryPolicy;
import com.android.volley.RequestQueue;
import com.android.volley.Request;
import com.android.volley.Response;
import com.android.volley.VolleyError;
import com.android.volley.toolbox.StringRequest;
import com.android.volley.toolbox.Volley;


import com.google.android.gms.common.api.ApiException;
import com.google.android.gms.common.api.CommonStatusCodes;
import com.google.android.gms.safetynet.SafetyNet;
import com.google.android.gms.safetynet.SafetyNetApi;
import com.google.android.gms.tasks.OnFailureListener;
import com.google.android.gms.tasks.OnSuccessListener;

import org.json.JSONObject;

import java.util.HashMap;
import java.util.Map;

import android.view.Menu;
import android.view.MenuItem;
Step 3 – Implementation of SafetyNet API (Continue)
If you are still with me then let’s dive into the Java part of the project. We will first ensure that we have all the modules that will be used in the application
- Replace “Site_Key” and “Site_Secret_Key” with your appropriate “Site Key” and “Secret Key” get from SafetyNet API while registering app.
- The API will check the Server and it has a separate callbacks from success and failure.
- At Success, we will get Captcha Response Token which will be used to validate the user interaction is made by a bot or real human.
- We will discuss how to validate the token with SafetyNet API Server in next step.
NOTE: the call on the created click event
protected void onCreate(Bundle savedInstanceState) {
        super.onCreate(savedInstanceState);
        setContentView(R.layout.activity_main);

        btn = findViewById(R.id.reCaptcha);
        txtV = findViewById(R.id.verifyText);
        btn.setOnClickListener(this);

        requestQueue = Volley.newRequestQueue(getApplicationContext());
    }

    public void onClick(View view){
        SafetyNet.getClient(this).verifyWithRecaptcha(Site_Key)
                .addOnSuccessListener(this, new OnSuccessListener <SafetyNetApi.RecaptchaTokenResponse>(){
                    @Override
                    public void onSuccess(SafetyNetApi.RecaptchaTokenResponse response){
                        if (!response.getTokenResult().isEmpty()){
                            handleCaptchaResult(response.getTokenResult());

                        }
                    }
        })
                .addOnFailureListener(this, new OnFailureListener() {
                    @Override
                    public void onFailure(@NonNull Exception e) {
                        if (e instanceof  ApiException){
                            ApiException apiException = (ApiException)e;
                            Log.d(TAG, "Error Message: " + CommonStatusCodes.getStatusCodeString(apiException.getStatusCode()));
                        } else {
                            Log.d(TAG, "Unknown error type or error" + e.getMessage());
                        }
                    }
                });
    }
Step 4 – Captcha Response Token Validation
- We have to verify the token getting from the server using the secret key.
- It can achieve by using the following.
-
- API Link – https://www.google.com/recaptcha/api/siteverify
- Method – POST
- Params – secret, response (We have to pass the “SECRET_KEY” and “TOKEN” respectively)
NOTE: Volley has
- RequestQueue to maintain the server calls in queue.
- RetryPolicy to retry the server call if it is fail with TimeOut and Retry Count. We can change those values.
- StringRequest is used for getting Response as JSON String.
- Method.POST denotes the call as POST method.
- Params are passed to server using Map, HashMap.
The SafetyNet API provides the response respective to the parameters passed and the success is Boolean Datatype.
void handleCaptchaResult(final String responseToken){
        String url = "https://www.google.com/recaptcha/api/siteverify"; //consider using global variable here
        StringRequest request = new StringRequest(Request.Method.POST, url, new Response.Listener<String>() {
            @Override
            public void onResponse(String response) {
                try {
                    JSONObject jsonObject = new JSONObject(response);
                    if (jsonObject.getBoolean("success")) {
                        txtV.setTextSize(35);
                        txtV.setText("Congratulations! You're not a robot anymore");
                    }
                } catch (Exception ex) {
                    Log.d(TAG, "Error message: " + ex.getMessage());
                }
            }
        },
                new Response.ErrorListener() {
                    @Override
                    public void onErrorResponse(VolleyError error) {
                        Log.d(TAG, "Error message: " + error.getMessage());
                    }
                })
        {
            @Override
            protected Map<String,String> getParams(){
                Map<String,String> params = new HashMap<>();
                params.put("secret", Site_Secret_Key);
                params.put("response", responseToken);
                return params;
            }
        };
        request.setRetryPolicy(new DefaultRetryPolicy(50000,DefaultRetryPolicy.DEFAULT_MAX_RETRIES,DefaultRetryPolicy.DEFAULT_BACKOFF_MULT));
        requestQueue.add(request);
    }
Full Review / Conclusion
In this blog tutorial, I was able to show you how to use Google’s reCAPTCHA in our Android app. Understand using reCAPTCHA in any app, we need to get one Site key and one Secret key and after that, we request for the captcha from the reCAPTCHA server. Once we get the reCAPTCHA and the user has entered the captcha, we send the entered value to the reCPATCA server and get the captcha token. This token is sent to our server and our server along with the secret key send the token to the reCAPTCHA server again. After that, we get some success message and that message is conveyed to our Android app.
NOTE: I have also displayed below the code for the layout for the main activity as well. This is the just a simple layout but the practical could be implemented with very little ease.
import android.os.Bundle;
import android.util.Log;
import android.view.View;
import android.widget.Button;
import android.widget.TextView;

import androidx.appcompat.app.AppCompatActivity;
import androidx.annotation.NonNull;

//volley
import com.android.volley.DefaultRetryPolicy;
import com.android.volley.RequestQueue;
import com.android.volley.Request;
import com.android.volley.Response;
import com.android.volley.VolleyError;
import com.android.volley.toolbox.StringRequest;
import com.android.volley.toolbox.Volley;


import com.google.android.gms.common.api.ApiException;
import com.google.android.gms.common.api.CommonStatusCodes;
import com.google.android.gms.safetynet.SafetyNet;
import com.google.android.gms.safetynet.SafetyNetApi;
import com.google.android.gms.tasks.OnFailureListener;
import com.google.android.gms.tasks.OnSuccessListener;

import org.json.JSONObject;

import java.util.HashMap;
import java.util.Map;

import com.google.android.material.floatingactionbutton.FloatingActionButton;
import com.google.android.material.snackbar.Snackbar;

import androidx.appcompat.widget.Toolbar;


import android.view.Menu;
import android.view.MenuItem;

public class MainActivity extends AppCompatActivity implements View.OnClickListener {

    String TAG = MainActivity.class.getSimpleName();
    Button btn;
    TextView txtV;
 // TODO - replace the SITE KEY with yours
    String Site_Key = "6LcFP8cUAAAAALPrBpvuSPileb7vd"; //consider making global variable(this will not work not a valid key)
 // TODO - replace the Secret KEY with yours
    String Site_Secret_Key = "6LcFP8cUAAAAAJyKpv8FKRkd1bSnR-"; //consider making global variable(this will not work not a valid key)
    RequestQueue requestQueue;

    //application space controls
    @Override
    protected void onCreate(Bundle savedInstanceState) {
        super.onCreate(savedInstanceState);
        setContentView(R.layout.activity_main);

        btn = findViewById(R.id.reCaptcha);
        txtV = findViewById(R.id.verifyText);
        btn.setOnClickListener(this);

        requestQueue = Volley.newRequestQueue(getApplicationContext());
    }

    @Override
    public void onClick(View view){
        SafetyNet.getClient(this).verifyWithRecaptcha(Site_Key)
                .addOnSuccessListener(this, new OnSuccessListener <SafetyNetApi.RecaptchaTokenResponse>(){
                    @Override
                    public void onSuccess(SafetyNetApi.RecaptchaTokenResponse response){
                        if (!response.getTokenResult().isEmpty()){
                            handleCaptchaResult(response.getTokenResult());

                        }
                    }
        })
                .addOnFailureListener(this, new OnFailureListener() {
                    @Override
                    public void onFailure(@NonNull Exception e) {
                        if (e instanceof  ApiException){
                            ApiException apiException = (ApiException)e;
                            Log.d(TAG, "Error Message: " + CommonStatusCodes.getStatusCodeString(apiException.getStatusCode()));
                        } else {
                            Log.d(TAG, "Unknown error type or error" + e.getMessage());
                        }
                    }
                });
    }

    void handleCaptchaResult(final String responseToken){
        String url = "https://www.google.com/recaptcha/api/siteverify"; //consider using global variable here
        StringRequest request = new StringRequest(Request.Method.POST, url, new Response.Listener<String>() {
            @Override
            public void onResponse(String response) {
                try {
                    JSONObject jsonObject = new JSONObject(response);
                    if (jsonObject.getBoolean("success")) {
                        txtV.setTextSize(35);
                        txtV.setText("Congratulations! You're not a robot anymore");
                    }
                } catch (Exception ex) {
                    Log.d(TAG, "Error message: " + ex.getMessage());
                }
            }
        },
                new Response.ErrorListener() {
                    @Override
                    public void onErrorResponse(VolleyError error) {
                        Log.d(TAG, "Error message: " + error.getMessage());
                    }
                })
        {
            @Override
            protected Map<String,String> getParams(){
                Map<String,String> params = new HashMap<>();
                params.put("secret", Site_Secret_Key);
                params.put("response", responseToken);
                return params;
            }
        };
        request.setRetryPolicy(new DefaultRetryPolicy(50000,DefaultRetryPolicy.DEFAULT_MAX_RETRIES,DefaultRetryPolicy.DEFAULT_BACKOFF_MULT));
        requestQueue.add(request);
    }
}
<androidx.constraintlayout.widget.ConstraintLayout
    xmlns:android="http://schemas.android.com/apk/res/android"
    xmlns:app="http://schemas.android.com/apk/res-auto"
    xmlns:tools="http://schemas.android.com/tools"
    android:layout_width="match_parent"
    android:layout_height="match_parent"
    tools:context=".MainActivity">
    <LinearLayout
        android:layout_height="match_parent"
        android:layout_width="match_parent"
        android:orientation="vertical">

        <Button
            android:id="@+id/reCaptcha"
            android:layout_height="wrap_content"
            android:layout_width="wrap_content"
            android:text="Show reCAPTCHA"/>

        <TextView
            android:id="@+id/verifyText"
            android:layout_width="wrap_content"
            android:layout_height="wrap_content"
            android:capitalize="characters"
            android:text="Hello World"
            android:textSize="24sp" />

    </LinearLayout>
</androidx.constraintlayout.widget.ConstraintLayout>

The dollar sign ($) and the underscore (_) characters are JavaScript (js) identifiers, which just means that they identify an object in the same way a name would. The objects they identify include things such as variables, functions, properties, events, and objects.
For this reason, these characters are not treated the same way as other special symbols. Instead, JavaScript treats $ and _ as if they were letters of the alphabet.
A js identifier — again, just a name for any object — must start with a lower or upper case letter, underscore (_), or dollar sign ($); subsequent characters can also include digits (0-9). Anywhere that an alphabetic character is allowed in js, 54 possible letters are available: any lowercase letter (a through z), any uppercase letter (A through Z), $ and _.
What is the ($) Identifier
The dollar sign is commonly used as a shortcut to the function document.getElementById(). Because this function is fairly verbose and used frequently in js, the $ has long been used as its alias, and many of the libraries available for use with JavaScript create a $() function that references an element from the DOM if you pass it the id of that element.
There is nothing about $ that requires it to be used this way, however. But it has been the convention, although there is nothing in the language to enforce it.
The dollar sign $ was chosen for the function name by the first of these libraries because it is a short one-character word, and $ was least likely to be used by itself as a function name and therefore the least likely to clash with other code in the page.
Now multiple libraries are providing their own version of the $() function, so many now provide the option to turn off that definition in order to avoid clashes.
Of course, you don’t need to use a library to be able to use $(). All you need to substitute $() for document.getElementById() is to add a definition of the $() function to your code as follows:
function $(x) {return document.getElementById(x);}
What about (_) Identifier
A convention has also developed regarding the use of _, which is frequently used to preface the name of an object’s property or method that is private. This is a quick and easy way to immediately identify a private class member, and it is so widely used, that almost every programmer will recognize it.
This is particularly useful in JavaScript since defining fields as private or public is done without the use of the private and public keywords (at least this is true in the versions of JavaScript used in web browsers — js 2.0 does allow these keywords).
Note that again, as with $, the use of _ is merely a convention and is not enforced by JavaScript itself. As far as js is concerned, $ and _ are just ordinary letters of the alphabet.
Of course, this special treatment of $ and _ applies only within JavaScript itself. When you test for alphabetic characters in the data, they are treated as special characters no different from any of the other special characters.

Okay with the assumption that you are a ” something that reference newbie” and be aware I am probably two years in the game and just now understanding this behind javascript.
So as you may already know ‘Getters’ and ‘Setters’ are common archetypal methods in several other programming languages, specifically more within object-oriented languages like C#, Java, and Objective- C. Solet go ahead and dig right into it.
In most object-oriented languages, ‘Getters’ and ‘Setters’ refer to the properties of a given object. Getters are methods that return the value of that property, and as you may assume setters set them. Now Javascript has many object-oriented features, and this taps into some of those.
The reason they’re a thing and why they exist is a lot more clear in other languages in my personal opinion. So I will go on a tangent briefly so you can understand what I mean and the language of my choice will be Java. Okay, so let’s assume that you want to make some cars. To do that, in java we need a class called “Cars”
class Car {
   private int year;
   private string make;
   private string model;
   private string vin;
   private string color;
}
To make a car, we’d do this
//create a new car that will be called infiniti
Car infiniti = new Car();
A result, since Infiniti is a car and we said that Cars have a year and a make, we know Infiniti has these.
Don’t worry I will each the code snippet stated above, take note of the word private? That means that only Infiniti knows its year and its make and most importantly, it’s own vin. What this means is that Java, the following would not run and would fail:
CarJacker someRandomThief = new CarJacker();
someRandomThief.attemptingToGetVin(infiniti.vin);
In JS, you can do that –access the property directly through the dot operator. Now, why on the earth would you want that in a language? Because it makes things easier to maintain, it makes code safer and of course cleaner in the long run. When those properties are private, you can prevent other parts of a program you’re writing from accidentally changing them and weird bugs from showing up. this protecting of properties from outside objects is called encapsulation and is hugely important in OOP. Some would consider this a great feature but it can also be super annoying, because how often do we have variables that we never want any other part of the program to access?
Finally entering into the fray are ‘Getters’ and ‘Setters’. Commonly in Java and other languages as stated before getters and setters methods which allow “outsiders” to access those properties.
class Car {
   private int year;
   private string make;
   private string model;
   private string vin;
   private string color;

   public string getVinNumber() {
      //this method returns the vin number of the car
      return vin;
   }

   public void setVinNumber(string newVinCreated) {
       //'this' refers to the object itself --Infiniti, etc
       this.vin = newVinCreated;
   }
}
As a result, outside objects can now interact! So if our car thief got lucky, it could instead:
CarJacker someRandomThief = new CarJacker();
//now we just stole a new car
someRandomThief.attemptingToGetVin(infiniti.getVinNumber());
Now in Java, and the other languages that I know of, ‘getter’ and ‘setter’ are common but not formal: ie, I could call getVinNumber() something as unrelated as UnlessMethodName() and it would still work–but would just be a note helpful name.
I know this was much longer than some of my other posts but it all has a purpose of course. Now within the js you have “get” and “set” doing those things because of the OOP idea of encapsulation and getters and setters, which is a useful idea–and sort of a hard sell in particular in js, where it’s not enforced because you don’t have to declare whether something is private, so it becomes a sort of arbitrary weird layer unless you understand the original intended purpose.
Ultimately the pattern behind is a thing I dislike about JavaScript — and I’ll be as honest as I can be, I’ve read that documentation so many times before, and even again as I was preparing this post and without much it still makes very little sense to me, and I’ve had a lot more experience since the first time I read it along with a hunk of object-oriented under my belt… and it still is really hard to follow.
In short, get latest() is a means of having things happen when you want the value of latest, and enables that to happen–since you have to have a function or method for things to happen–while still letting you skip the “()” because it’s single value representing a property.
- JS has a prototypical inheritance, not class-based. Which is far from the only difference, but a huge one.
- As with everything, there are differences of opinion and you can still have crazy OOP code, it’s not perfect but that’s the intended purpose.
- I strongly feel that stuff like Raccoon raccoon = new Raccoon() leads too quickly to semantic satiation and can lead to more bugs and always go for more specific or least different variable names when I can, but anyways.

In the beginning, JS did not have a way to import/export modules. This was a problem for many developers and if you don’t believe then picture this. You’re writing an app in just a single file, I know I know it would be a nightmare.
So as time progress, people of higher intellect than myself attempted to add modularity to javascript. The ones that shouldn’t surprise you is UMD and ESM but there are others of course like CommonJS, Native JS and AMD. There are several others but the two from above are considered some of the big players
I am going to tackle some brief information like syntax, purpose and common behaviors. My goal is to help others that may be confused when dealing with particular issues with modules.
UMD
Universal Module Definition or as referenced UMD.
– Works on front and back end (hence the name universal).
– Unlike the other modules, UMD is more like a pattern to configure several module systems. Check out other patterns
– UMD is usually used as a fallback module when using bundler like rollup/Webpack
(function (root, factory) {
if (typeof define === "function" && define.amd) {
define(["jquery", "underscore"], factory);
} else if (typeof exports == "object") {
module.exports = factory(require("jquery"), require("underscore"));
} else {
root.Requester = factory(root.$, root._);}}(this, function ($,_) {	//this is where I defined my module implementation	var Requester = {//...};
return Requester;}));
ESM
ES Module short as ESM. It is javascript’s proposal to implement as standard module system. I am sure many of you have seen this: import React from 'react'
- Works in many modern browsers
- Tree-shakeable, due to ES6’s static module structure
- ESM allows bundlers like rollup to remove unnecessary code, allowing sites to ship less code to get faster load
- can be called in HTML
<script type="module"> import {func1} from 'my-lib';
func1(); </script>
Summary
– ESM is the best module format thanks to its simple syntax, async nature, and tree-shakeability.
– UMD works everywhere and usually used as a fallback in case ESM does not work
Thanks for reading, devs! In the future, I plan to write in depth about each module, especially ESM because it is packed with many awesomeness.
We hear a lot about Machine Learning these days as it has become one of the hottest buzzwords around. However, we are approached by many people who don’t seem to have a clear idea on how it could be applied to add value to their business. Since it is a very broad topic with different types of applications based on the desired goals and objectives, we aim to create a series of blog posts, each targeting a different industry, and just touch on some of the different ways in which Machine Learning can help add value to a business within that particular industry. Today, we’ll start with eCommerce, as it is one of the low hanging fruits that can quickly be picked for enhancement via Machine Learning.
What kind of Machine Learning is applicable in eCommerce?
Machine Learning comes in several different forms such as Supervised Learning, Unsupervised Learning, Semi-Supervised Learning and Reinforced Learning. The scope of this blog won’t delve into the technical details, but we’ll just preface our eCommerce based solutions discussion with the information that while Machine Learning can be used to do things like drive cars, perform facial recognition, or identify a car’s license plate from CCTV footage, what we aim to do in our eCommerce implementation is to be able to identify user behavior patterns to perform predictive analysis and make proactive decisions driven by data. We’ll explain in further detail.
Recommendation Engine
Perhaps one of the biggest reasons why Amazon was able to demolish all its opponents in the eCommerce industry is/was largely due to their incredible recommendation engine which is entirely based on Machine Learning. A recommendation engine takes in past user behavior analytics information as training data and learns the different patterns and trends. After ingesting millions upon millions of records of these purchasing habits of users, along with their profiles (Supervised Learning), the system will be able to predict how a new user may end up browsing the website, or what products they may be interested in, based on their browsing habits, the items in the cart, and what people with a similar profile have done in the past. When the user completes their transaction, the recommendation will take into account if its recommendations were successful or not, and further improve its algorithm (Reinforced Learning).
A Recommendation Engine is similar to the rack you find during checkout at the grocery store (usually contains candy, gum, magazines, etc.). It is an opportunity to remind the shopper of an item that they may want/need but had forgotten about, or to entice them to buy something they weren’t even planning on buying in the first place. The more accurate these recommendations are to the shopper’s wants & needs, the more likely they are to purchase additional items.
Price Optimization
Another area in which Machine Learning is providing a great deal of assistance to the business team is in Price Optimization. Prices for products can fluctuate a great deal depending on dozens—if not hundreds—of variables. A pricing engine can be created to take into account a great deal of information from the shopper’s profile, current trends, competitor prices, product abandonment rates, and much more, and determine what percentage discount to offer the shopper on a specific product in order to increase the potential of making the sale, while keeping a healthy profit margin on the product. When dealing with a catalog of hundreds of millions of products & variants, with hundreds of factors going into pricing each one of them, you can see how quickly it can become infeasible for humans to do this task with full coverage. By utilizing Machine Learning to optimize pricing on a catalog of products, eCommerce stores can unlock a massive competitive advantage.
Retargeting, Discounts & Upsells
A shopper may not always complete the purchase. They may browse for a while, even add items to their cart, and eventually leave without completing the transaction. Machine Learning can help add value here as well. Retargeting campaigns can be executed to reach out to previous customers who have bought, abandoned a cart, or just browsed your website. These campaigns can be supercharged with Machine Learning by looking at historic data of similar shopper profiles and how they may have been converted in the past via retargeting. In some cases, Facebook or Instagram ads may have worked. In other cases, offering a discount valid for 24 hours on the products in their abandoned cart may have worked. It all depends on what the data is telling you, and that is where Machine Learning shines. As it is already analyzing hundreds of millions of past shoppers’ habits and outcomes, it will be able to predict what is most likely to work when attempting to convert a potential customer with similar habits & profile details.
Conclusion
These are just a few tips and tricks that are being used by eCommerce giants such as Amazon and Walmart, and more stores are jumping onboard with this line of thinking (for obvious reasons). With the availability of tools such as Google’s AutoML, and similar offerings from Amazon, Microsoft and others, Machine Learning is no longer the scary black box it once was and there has never been a better time to climb onboard the Machine Learning train as it leaves the station. If you are interested in implementing Machine Learning to add value to your business, reach out to us and we’d be happy to discuss the different options that may be available to you.

Single Page App (SPA)
A single-page application and will refer to as (SPA) is an app that works inside a browser and does not require page reloading during use. You are using this type of applications every day. These are, for instance: Gmail, Google Maps, Facebook or GitHub.
SPAs are all about serving an outstanding UX by trying to imitate a “natural” environment in the browser — no page reloads, no extra wait time. It is just one web page that you visit which then loads all other content using JavaScript — which they heavily depend on.
Multiple Page App (MPA)
Multiple-page applications and will refer to as (MPA) work in a “traditional” way. Every change eg. display the data or submit data back to server requests rendering a new page from the server in the browser. These applications are large, bigger than SPAs because they need to be. Due to the amount of content, these applications have many levels of UI. Luckily, it’s not a problem anymore. Thanks to AJAX, we don’t have to worry that big and complex applications have to transfer a lot of data between server and browser. That solution improves and it allows to refresh only particular parts of the application. On the other hand, it adds more complexity and it is more difficult to develop than a single-page application.
Before Development
You need to consider the goal of the site and who you are targeting overall. If you know you need multiple categories (because, for instance, you run an online shop or publish a lot of other content) — use a multi-page site. If you are sure that your site is appropriate for a pure single-page experience — go for it. And if you like SPA but can just barely fit everything into a single page, consider the hybrid site instead. This is another way I haven’t mentioned before. A hybrid application takes what is the best in both approaches and try to minimize the disadvantages. It is, in fact, a single page application which uses URL anchors as synthetic pages enabling more in build browser navigation and preference functionality. But this is the topic for another article.
Possibly in the near future, everyone will use Single Page Application model (including a hybrid app), as it seems to bring a lot of advantages. Many apps on the market are migrating towards this model. However, as some projects simply cannot fit into SPA, the MPA model is still vivid.
So the new topic that is raving all over within the news and around the water cooler is Bitcoins. Everyone wants to know what it is, how to use it and is it even worth it?
So to start the definition that investor should be familiar is :
Bitcoin is a crytocurrency, a form of electronic cash.
It is a decentralized digital currency without a central bank or single adminstrator that can be sent from user to user on peer-to-peer bitcoin blockchanin network without the need for intermediaries.
I will explain how the system works, how you can use it for your profit, which scams to avoid. I will also direct you to resources that will help you store and use your first pieces of digital currency.
Small wonder that Bitcoin emerged in 2008 just after Occupy Wall Street accused big banks of misusing borrowers’ money, duping clients, rigging the system, and charging boggling fees. Bitcoin pioneers wanted to put the seller in charge, eliminate the middleman, cancel interest fees, and make transactions transparent, to hack corruption and cut fees. They created a decentralized system, where you could control your funds and know what was going on.
Bitcoin has come far in a relatively short time. All over the world, companies, from REEDS Jewelers, a large jewelry chain in the US, to a private hospital in Warsaw, Poland, accept its currency. Billion dollar businesses such as Dell, Expedia, PayPal, and Microsoft do, too. Websites promote it, publications such as Bitcoin Magazine publish its news, forums discuss cryptocurrency and trade its coins. It has its application programming interface (API), price index, and exchange rate.
Problems include thieves hacking accounts, high volatility, and transaction delays. On the other hand, people in third world countries may find Bitcoin their most reliable channel yet for giving or receiving money.
Key Highlights
- October 31, 2008: Bitcoin whitepaper published.
- January 3, 2009: The Genesis Block is mined.
- January 12, 2009: The first Bitcoin transaction.
- December 16, 2009: Version 0.2 is released.
- November 6, 2010: Market cap exceeds $1 million USD.
- October 2011: Bitcoin forks for the first time to create Litecoin.
- June 3, 2012: Block 181919 created with 1322 transactions. It is the largest block to-date.
- June 2012: Coinbase launches.
- September 27, 2012: Bitcoin Foundation is formed.
- February 7, 2014: Mt. Gox hack.
- June 2015: BitLicense gets established. This is one of the most significant cryptocurrency regulations.
- August 1, 2017: Bitcoin forks again to form Bitcoin Cash.
- August 23, 2017: SegWit gets activated.
- September 2017: China bans BTC trading.
- December 2017: First bitcoin futures contracts were launched by CBOE Global Markets (CBOE) and the Chicago Mercantile Exchange (CME).
- September 2018: Cryptocurrencies collapsed 80% from their peak in January 2018, making the 2018 cryptocurrency crash worse than the Dot-com bubble’s 78% collapse.
- November 15, 2018: Bitcoin’s market cap fell below $100 billion for the first time since October 2017.
- October 31, 2018: 10-year anniversary of Bitcoin.
Understanding Bitcoin – What is Bitcoin in-depth?
At its simplest, Bitcoin is either virtual currency or reference to the technology. You can make transactions by check, wiring, or cash. You can also use Bitcoin (or BTC), where you refer the purchaser to your signature, which is a long line of security code encrypted with 16 distinct symbols. The purchaser decodes the code with his smartphone to get your cryptocurrency. Put another way; cryptocurrency is an exchange of digital information that allows you to buy or sell goods and services.The transaction gains its security and trust by running on a peer-to-peer computer network that is similar to Skype, or BitTorrent, a file-sharing system.
Bitcoin Transactional properties:
1.) Irreversible: After confirmation, a transaction can‘t be reversed. By nobody. And nobody means nobody. Not you, not your bank, not the president of the United States, not Satoshi, not your miner. Nobody. If you send money, you send it. Period. No one can help you, if you sent your funds to a scammer or if a hacker stole them from your computer. There is no safety net.
2.) Pseudonymous: Neither transactions or accounts are connected to real-world identities. You receive Bitcoins on so-called addresses, which are randomly seeming chains of around 30 characters. While it is usually possible to analyze the transaction flow, it is not necessarily possible to connect the real world identity of users with those addresses.
3.) Fast and global: Transaction is propagated nearly instantly in the network and are confirmed in a couple of minutes. Since they happen in a global network of computers they are completely indifferent of your physical location. It doesn‘t matter if I send Bitcoin to my neighbor or to someone on the other side of the world.
4.) Secure: Bitcoin funds are locked in a public key cryptography system. Only the owner of the private key can send cryptocurrency. Strong cryptography and the magic of big numbers makes it impossible to break this scheme. A Bitcoin address is more secure than Fort Knox.
5.) Permissionless: You don‘t have to ask anybody to use cryptocurrency. It‘s just a software that everybody can download for free. After you installed it, you can receive and send Bitcoins or other cryptocurrencies. No one can prevent you. There is no gatekeeper.
Where can I find Bitcoins?
First, we would recommend you read this in-depth guide for buying Bitcoin.
You can get your first bitcoins from any of these four places.
- A cryptocurrency exchange where you can exchange ‘regular’ coins for bitcoins, or for satoshis, which are like the BTC-type of cents. Resources: Coinbase and Coinsquare in the US & Canada, and BitBargain UK and Bittylicious in the UK.
- A Bitcoin ATM (or cryptocurrency exchange) where you can change bitcoins or cash for another cryptocurrency. Resources: Your best bets are BTER and CoinCorner
- A classified service where you can find a seller who will help you trade bitcoins for cash. Resources: The definitive site is LocalBitcoins.
- You could sell a product or service for bitcoins. Resources: Sites like Purse.
Caution! Bitcoin is notorious for scams, so before using any service look for reviews from previous customers or post your questions on the Bitcoin forum.
If you want to buy cryptocurrency quick and easily with your credit card check out the CoinBase!
There are a lot of options on how to buy Bitcoin, available in nearly every country of the world from, Gift cards, ATM, local Traders, broker, exchanges: A better guide that will explains, how to buy Bitcoin anywhere in the world.
Maybe you heard about this crazy cryptocurrency Bitcoin. The future of money, the revolution of payment, the digital gold, slayer of capital controls, holy grail of Fintech. Now you maybe want to know more. The best way to learn is just to try it. Buy a Bitcoin, pay with it, store it in your digital wallet, watch the price rise or go down. But where can you buy it? And how?
For many people, the first acquisition of a Bitcoin is a terrifying process. It seems so complicated. But actually, it is not. There are a lot of options to easily, fast and comfortably buy your first Bitcoin.
Which one is the best depends on your country and your preferences?
If you are in a hurry, you can just click on the link in the table to find out your options on how to buy Bitcoin.
TLDR:
- Use Regular Fiat Money to Buy Bitcoin.
- Once you have a Bitcoin wallet, you use a traditional payment method such as a credit card, bank transfer (ACH), debit card, interact or E-transfer to buy Bitcoins on a Bitcoin exchange.
- The Bitcoins are then transferred to your crypto wallet.
To find the perfect method to buy your first Bitcoin however you should first take into account several factors:
- How much private information do you want to disclose?
- How do you want to pay?
- Where do you live
Depending on these factors you should easily be able to decide which platform fits your needs.
I will explain the options you have to disclose private information (or not disclose it) and include what payment channels you can use. After this, you will find the common methods that is most popular to buy Bitcoin.
How To Buy Bitcoin Anywhere in The World
Private Information
Bitcoin is a financial tool and thus subject to financial regulation in most jurisdictions. Nearly everywhere Anti-Money-Laundering-Rules (AML) are applied to platforms that sell Bitcoins or enable users to buy and sell Bitcoins. Most of these platforms have to adopt Know Your Customer rules (KYC) to verify the identity of its users.
Since Bitcoin transactions are saved publicly visible on the blockchain and can be traced back, the degree of private information you disclose with buying Bitcoins can have serious implications on your privacy.
There are several grades of KYC with an increasing amount of private information you have to disclose. The following list starts with the lowest grade:
- No KYC: No KYC means that the platform or the seller of Bitcoins does not know who you are. You don‘t have to show an identity document, and you pay with a private means of payment like cash, Moneygram, Paysafecard or Western-Union. Buying Bitcoin without KYC is possible in some jurisdictions – for example with P2P-marketplaces like LocalBitcoins, ATMs or Gift Cards – but is usually more expensive than other options.
- KYC Light: This degree of KYC identifies you by your payment channel and/or your phone numbers. If you pay with your bank account, PayPal, credit card or other common means of payment, the payment providers know your identity. On most platforms, be it direct exchanges, exchange platforms or marketplaces, you can buy a limited amount of Bitcoins with KYC Light.
- Full KYC: On top of verifying your identity with your phone number and your bank account, Full KYC means that you provide documents that prove your identity. This can be a passport, an ID card, a driver‘s license, a utility bill or a combination of all of this. Some platforms demand that you provide an approval of your identity documents by a notary or a trusted third party like your bank; some are satisfied if you submit a photo showing you holding your ID card or take part in the process of video identification. If you want to invest larger amounts of money or trade on exchanges, there‘s usually no way around Full KYC.
Payment
Bitcoin is money, but to buy Bitcoins, you need to send money to someone else. The more advanced the financial system of your country is, The better the financial system you live in, the easier it is to exchange your money in Bitcoins.
Here is an incomplete not-complete list of commons means of payment to buy Bitcoin:
- Bank transfer: Everybody might know the good old Bank transfer. Mostly with online banking you send money to a seller of Bitcoins and get the Bitcoins when the payments are done. In most countries, this needs 1-3 days. Direct debiting is usually not accepted common. Most exchange platforms only accept bank transfers.
- Credit Card: Credit cards are one of the most common means of payment. But only a few direct commercial vendors accept credit cards. The reason is that Bitcoin transactions cannot be undone, while credit card transactions can be reversed. This has resulted in losses for vendors which accepted credit cards. Also, vendors risk that people buy Bitcoin with stolen credit cards.Use Bitcoins to profit from stolen credit card numbers and apply algorithms to reduce the risk.
- PayPal: A few platforms accept PayPal, but most reject it for the same problems as credit cards: PayPal transactions can be easily undone, and when this is done after the buyer has transferred the acquired Bitcoin to another wallet, the vendor might lose. This is why eBay is a bad place to trade Bitcoins. But, like with credit cards, some platforms accept PayPal.
- Other Payment Channels (Sofort, iDeal, Skrill…): The world of payment is rich with payment providers. In the EU alone you have dozens of them. Many direct exchanges support a rich collection of them. If you use a common provider, in Germany Sofort, in the Netherlands iDeal and so on, you have a good chance that your domestic direct exchange accepts it.
- Private Payment Channels (Cash, Western Union, Paysafecard, etc.): Most commercial platforms don‘t accept these means of payment. You find very few exchange platform and most probably no direct exchange where these payments are accepted. But often you‘ll find a seller on p2p marketplaces you can pay with cash or other private means of payments. A good chance might also be an ATM where you can buy Bitcoins with cash.
Different Ways To Buy Bitcoin
Now we‘re coming closer to the acquisition of your Bitcoin. In this part of our guide, we present you several common models that enable you to change fiat-money to digital cash – in Bitcoin. Each model has its own advantages and disadvantages.
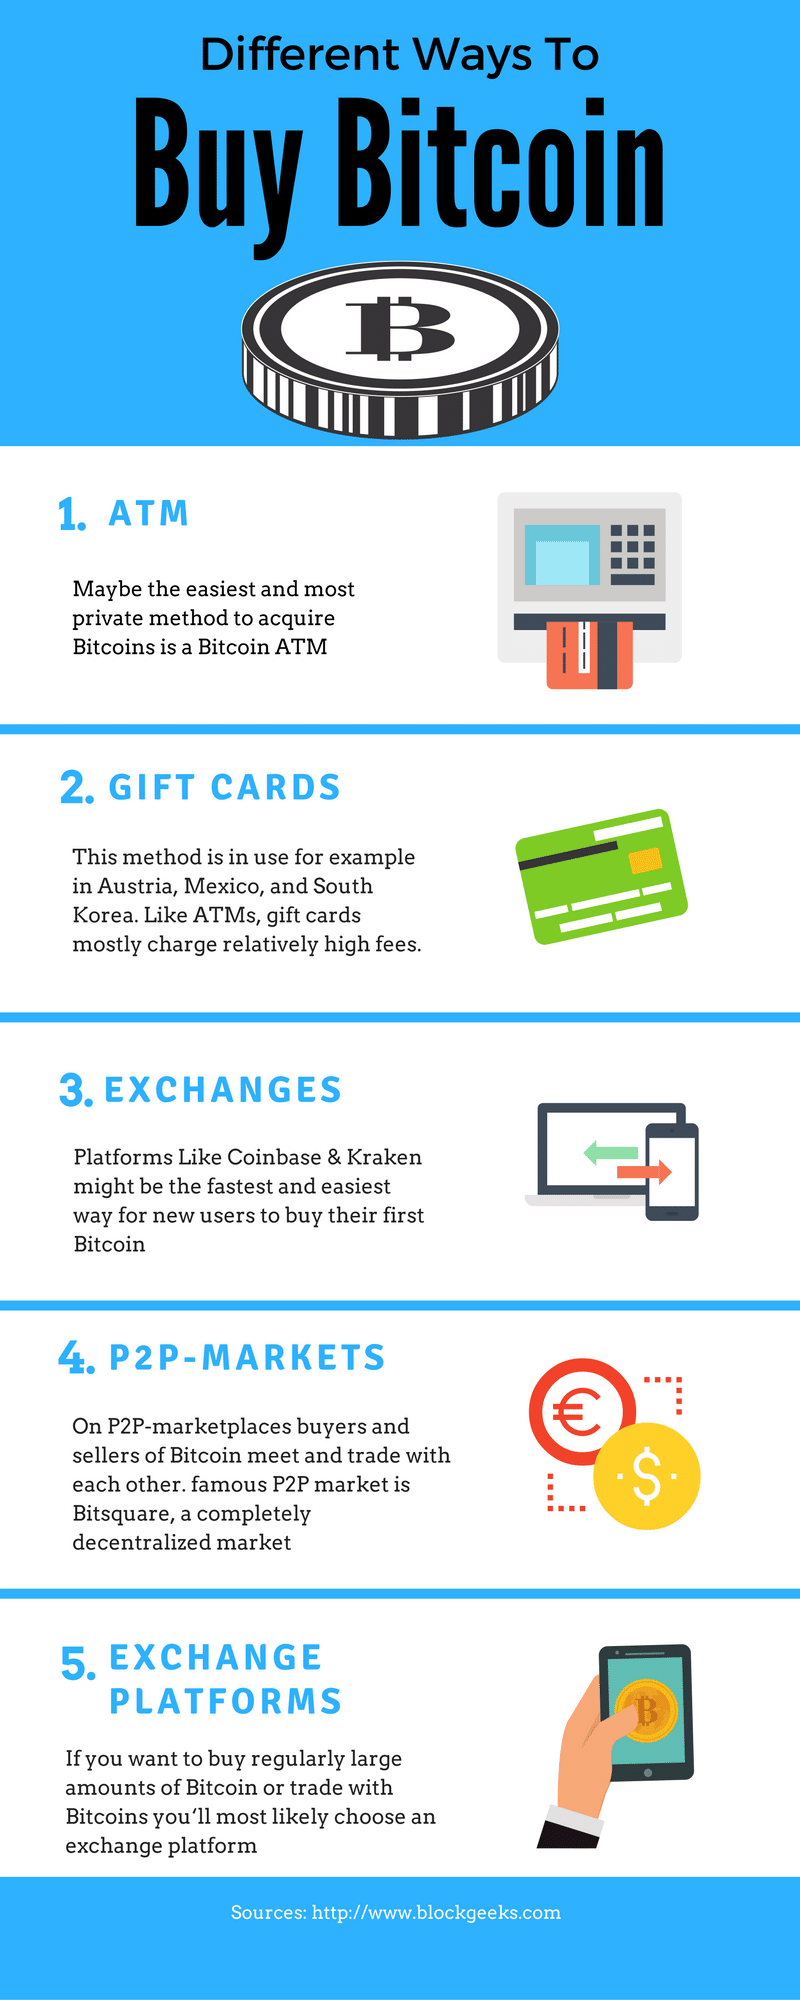
- ATM: Maybe the easiest and most private method to acquire Bitcoins is a Bitcoin ATM. You know it, these machines where you can get money with your card. Some companies like Lamassu produce ATM-machines for Bitcoins, where you can buy Bitcoin with cash. If the operators of these machines wish, they can apply some KYC-rules, from mobile phone verification to biometric methods. On Coin-ATM-Radar.com you find a global map with these machines. Another kind of ATM is to just use an existing net of ATMs, like that from banks or train stations, to sell Bitcoins. This has been done for example in the Swiss, in the Ukraine or in Spain. ATMs mostly have a relatively high fee of 3-6 percent or even more.
- Gift Cards/Voucher: This is another easy method to buy Bitcoins. You go to a kiosk or some other shop, buy a gift card or a voucher, visit a website, where you can use the code on the card to get your Bitcoin. This method is in use for example in Austria, Mexico, and South Korea. Like ATMs, gift cards mostly charge relatively high fees.
- Direct commercial exchanges/brokers: These vendors are like the exchange offices you might know from an airport, but digital. They buy Bitcoins on an exchange and sell it to customers. You visit a website, choose your means of payment, pay and get Bitcoins for prices set by the platform. For most of these platforms, you need your own wallet, while some, for example, Coinbase and Circle, give you the option to save and spend the Bitcoins with a wallet they provide. Since you can use a great variety of payment channels, even credit cards, and PayPal, such platforms might be the fastest and easiest way for new users to buy their first Bitcoin. The fees of direct commercial exchanges vary between 1 and 5 percent. Some of them earn money by using the spread between buy and sell. Most demand extra fees for some means of payment like credit cards.
- P2P-Markets: On P2P-marketplaces buyers and sellers of Bitcoin meet and trade with each other. The fees on these markets are relatively low with 0 to 1 percent; the spread depends on the liquidity of the market and the payment channel. Other than with direct you can not only take, but make an offer: You set a price and wait until someone sells you a Bitcoin. This enables you to buy relatively large amounts of Bitcoin at relatively low prices. The most famous P2P-market is LocalBitcoins. This worldwide platform serves a lot of currencies and lets buyers and sellers decide which means of payment they use. It is often used to facilitate anonymous exchanges, sometimes for extraordinarily high prices. Bitcoin.de, the largest P2P-market in the Eurozone offers a good liquidity and is a nice option to easily change Euro to Bitcoin. The third famous P2P market is bitsquare, a completely decentralized market, which is nothing more than a software that connects people.
- Exchange platforms: If you want to buy regularly large amounts of Bitcoin to good prices or trade with Bitcoins you‘ll most likely choose an exchange platform. Exchanges act as an escrow for its clients and save both Bitcoin and Fiat-money on behalf of their customers. Here you can offer your own orders to buy or sell Bitcoin, and the Their trading engine of the exchanges cumulates these orders and s offers from buyers and sellers and processes trades. Often exchanges have more options to trade like margin trading. Usually, fees and the spread are low. But the process to start an account on exchanges can be complicated, requires privacy disclosing information and needs you to trust the exchange with your money.
Warnings about exchanges, wallets and banks
Despite the proof of identity requirements, remember exchanges and wallets don’t provide the same protections banks do.
For example, there is often no or limited insurance for your account if the exchange goes out of business or is robbed by hackers, such as was the case with the infamous failed exchange Mt Gox.
Bitcoin does not have legal status as a currency in most of the world, and authorities usually do not know how best to approach thefts. Some larger exchanges have replaced customer funds after a theft from the exchange itself, but at this stage, they are not legally obliged to do so.
How to buy Bitcoin in your country?
Worldwide: Understand nearly everywhere in the world, you have a chance to use local bitcoins, BitSquare or a Bitcoin ATM. While these are options you could use, it is worth to look for further options available in your country. Below I am only going to reference the buying of bitcoin only with the USA
USA
The USA is one of the biggest markets for Bitcoin buyers. Buyers can choose from a wide variety of options to buy Bitcoins that you will, you find beside LocalBitcoins and ATMs the direct vendors Coinbase, Circle, and India coin, the P2P-market Paxful and the exchange Kraken.
Buy Bitcoin In USA
- Direct Exchanges: With Coinbase and Kraken two major platforms offer an easy way to buy Bitcoins with low fees and save them in an online-wallet. Both platforms accept both bank transfers and credit cards. Indacoin is another platform for the direct exchange, but without an integrated wallet. A next option, Expresscoin, enables the acquisition of Bitcoins with cash via Billpay.
- P2P-Markets: Beside LocalBitcoins and Bitsquare Bitquick and Paxful are P2P-markets available for customers in the US. On Bitquick you pay by depositing leaving cash on the bank of the seller, on Paxful the seller can choose whatever payment-channel he wants, including PayPal, Western Union, credit and debit cards, gift cards and much more. While prices on Paxful are usually quite high, Bitquick charges a fee of 2 percent.
- Exchanges: If you want to buy Bitcoins with Dollar on an exchange, you have a couple of platforms to choose. The biggest exchanges are Bitstamp; Coinbase‘s GDAX and Bitfinex, followed by BTC-E, Kraken, and Gemini. While most exchanges strictly accept bank transfers, BTC-E offers additionally the funding of an account with Credit Cards and payment providers like PerfectMoney, Paysafecards and more.
Now for the Conclusion
Buying bitcoins is not always as easy as newcomers expect. The good news is the number of options is increasing, and it is getting easier all the time.