Gesture Controls for Android w/Kotlin

If you have never used or unaware of what is gestures control. Incorporating gesture functionality makes an app more functional and engaging for users. As you will find in this tutorial the objective will be to implement two different types of gestures in the application. Assuming this is not your first rodeo lets dive into the development process.
Project Creation
Well of course you need somewhere to start so firing up your Android Studio it you haven’t already. Select the project you prefer to use but for this tutorial we are going to use the “Empty Activity” template just to keep it simple. (If you require more content on the different templates check out: Blah Blah)
NOTE: minimum SDK for this project is 5.0
Update Activity Layout
After you project has finished loading and building itself, we are going to head over ‘activity_main.xml’. First let’s change the parent layout from constraint to frame layout. Withing the frame we are going to use the Material Cardview and inside the card view we will add the constraint layout. Last the constraint layout will hold the important stuff which are buttons and text view. Let’s see how the code looks altogether.
<?xml version="1.0" encoding="utf-8"?>
<com.google.android.material.circularreveal.CircularRevealFrameLayout xmlns:android="http://schemas.android.com/apk/res/android"
    xmlns:app="http://schemas.android.com/apk/res-auto"
    xmlns:tools="http://schemas.android.com/tools"
    android:layout_width="match_parent"
    android:layout_height="match_parent"
    android:id="@+id/layout_parent"
    android:background="@color/design_default_color_primary"
    tools:context=".MainActivity">

    <com.google.android.material.card.MaterialCardView
        android:layout_width="match_parent"
        android:layout_height="match_parent"
        android:id="@+id/cv_display"
        android:layout_gravity="center"
        android:layout_margin="20dp"
        app:cardCornerRadius="15dp">

        <androidx.constraintlayout.widget.ConstraintLayout
            android:layout_width="match_parent"
            android:layout_height="match_parent">

            <androidx.appcompat.widget.AppCompatTextView
                android:id="@+id/tv_question"
                android:layout_width="wrap_content"
                android:layout_height="wrap_content"
                android:layout_marginTop="20dp"
                android:text="@string/txt_question_value"
                android:textSize="70sp"
                app:layout_constraintEnd_toEndOf="parent"
                app:layout_constraintStart_toStartOf="parent"
                app:layout_constraintTop_toTopOf="parent" />

            <androidx.appcompat.widget.AppCompatTextView
                android:id="@+id/tv_solution"
                android:layout_width="wrap_content"
                android:layout_height="wrap_content"
                android:layout_below="@id/tv_question"
                android:layout_marginTop="10dp"
                android:text="@string/txt_answer_value"
                android:textSize="40sp"
                app:layout_constraintBottom_toTopOf="@id/tv_points"
                app:layout_constraintEnd_toEndOf="parent"
                app:layout_constraintStart_toStartOf="parent"
                app:layout_constraintTop_toBottomOf="@id/tv_question" />

            <com.google.android.material.floatingactionbutton.FloatingActionButton
                android:id="@+id/btn_addition"
                android:layout_width="wrap_content"
                android:layout_height="wrap_content"
                android:layout_below="@id/tv_question"
                android:contentDescription="@string/txt_add_descriptor"
                android:src="@drawable/ic_baseline_add_24"
                app:layout_constraintEnd_toEndOf="parent"
                app:layout_constraintBottom_toBottomOf="@+id/tv_solution"
                app:layout_constraintStart_toEndOf="@+id/tv_solution"
                app:layout_constraintTop_toTopOf="@+id/tv_solution" />

            <com.google.android.material.floatingactionbutton.FloatingActionButton
                android:id="@+id/btn_subtraction"
                android:layout_width="wrap_content"
                android:layout_height="wrap_content"
                android:layout_below="@id/tv_question"
                android:layout_toStartOf="@+id/tv_solution"
                android:contentDescription="@string/txt_minus_descriptor"
                android:src="@drawable/ic_baseline_remove_24"
                app:layout_constraintBottom_toBottomOf="@id/tv_solution"
                app:layout_constraintEnd_toStartOf="@+id/tv_solution"
                app:layout_constraintStart_toStartOf="parent"
                app:layout_constraintTop_toTopOf="@+id/tv_solution" />

            <androidx.appcompat.widget.AppCompatTextView
                android:id="@+id/tv_points"
                android:layout_width="wrap_content"
                android:layout_height="wrap_content"
                android:layout_below="@id/tv_solution"
                android:layout_marginBottom="30dp"
                android:text="@string/txt_string_score"
                android:textSize="30sp"
                app:layout_constraintBottom_toBottomOf="parent"
                app:layout_constraintEnd_toEndOf="@id/btn_addition"
                app:layout_constraintStart_toStartOf="@id/btn_subtraction" />

        </androidx.constraintlayout.widget.ConstraintLayout>
    </com.google.android.material.card.MaterialCardView>
</com.google.android.material.circularreveal.CircularRevealFrameLayout>
inner class GestureControlListener : GestureDetector.SimpleOnGestureListener() {

        override fun onFling(evt1: MotionEvent, evt2: MotionEvent, xVelocity: Float, yVelocity: Float) : Boolean {

            pts -= 75
            generateQuestion(userAnsw)
            view.setBackgroundColor(Random.nextInt())

            Snackbar.make(view, "Skipped", Snackbar.LENGTH_SHORT).show()
            cv.text = "Current Score: $pts"
            return true
        }
}
Writing Kotlin Code
Now we’ll create an inner class for detecting gestures that extends to ‘GestureDetector.SimpleOnGestureListener’. Within the class we will keep it simple and override the two functions that detects fling and double tap gestures.
class MainActivity : AppCompatActivity() {

    /** Global Variables Start **/
    //gesture
    lateinit var gdc: GestureDetectorCompat

    ///Textviews
    lateinit var qv: AppCompatTextView
    lateinit var sv: AppCompatTextView
    lateinit var cv: AppCompatTextView

    //Buttons
    lateinit var ab: FloatingActionButton
    lateinit var sb: FloatingActionButton

    //view
    lateinit var view:FrameLayout

    //integer variables
    var pts = 0
    var userAnsw = 0
    var questionValue1 = 0
    var questionValue2 = 0
    /** Global Variables end **/

    override fun onCreate(savedInstanceState: Bundle?) {
        super.onCreate(savedInstanceState)
        setContentView(R.layout.activity_main)
    }

}
Comprehending what we just declared. First the GestureDetectorCompat object contains functions which we will override to enable us to respond to the different gestures. Then we have the next 6 variables that are associated with the Views within the cardview. Then the variables that will represent the score along with the users answer, and then the question that is displayed to the user.
Setup Views and Listeners
We’ll start by referring to all our views. After we have accomplished that will set up onClickListerners to increase or decrease with the floating action button. Now that the click listeners are set, we need to define a way to generate new questions for the user to answer. We’ll create a function called generateQuestion that accepts a numeric parameter. The objective of the function will assign two random numbers based on the parameter passed in and assigned to the variable created earlier questionValue1 and questionValue2.
class MainActivity : AppCompatActivity() {

    /** Global Variables Start **/
    //gesture
    lateinit var gdc: GestureDetectorCompat

    ///Textviews
    lateinit var qv: AppCompatTextView
    lateinit var sv: AppCompatTextView
    lateinit var cv: AppCompatTextView

    //Buttons
    lateinit var ab: FloatingActionButton
    lateinit var sb: FloatingActionButton

    //view
    lateinit var view:FrameLayout

    //integer variables
    var pts = 0
    var userAnsw = 0
    var questionValue1 = 0
    var questionValue2 = 0
    /** Global Variables end **/

    override fun onCreate(savedInstanceState: Bundle?) {
        super.onCreate(savedInstanceState)
        setContentView(R.layout.activity_main)

        //lets do some work
        view = findViewById<FrameLayout>(R.id.layout_parent)
        qv =  findViewById(R.id.tv_question)
        sv = findViewById(R.id.tv_solution)
        cv = findViewById(R.id.tv_points)
        ab = findViewById(R.id.btn_addition)
        sb = findViewById(R.id.btn_subtraction)

        //assign listeners
        ab.setOnClickListener {
            userAnsw++
            sv.text = "$userAnsw"
        }

        sb.setOnClickListener {
            userAnsw--
            sv.text = "$userAnsw"
        }

        generateQuestion(userAnsw)
    }


    //generate question function for user
    fun generateQuestion(num: Int) {
        var randomNum = 0
        randomNum = if (num == 0) 12
        else num

        questionValue1 = Random.nextInt(randomNum)
        questionValue2 = Random.nextInt(randomNum)

        val problem = "$questionValue1 + $questionValue2"
        qv.text = problem
    }
}
Creating an Inner Class
Now we’ll create an inner class for detecting gestures that extends to ‘GestureDetector.SimpleOnGestureListener’. Within the class we will keep it simple and override the two functions that detects fling and double tap gestures.
class MainActivity : AppCompatActivity() {

    /** Global Variables Start **/
    //gesture
    lateinit var gdc: GestureDetectorCompat

    ///Textviews
    lateinit var qv: AppCompatTextView
    lateinit var sv: AppCompatTextView
    lateinit var cv: AppCompatTextView

    //Buttons
    lateinit var ab: FloatingActionButton
    lateinit var sb: FloatingActionButton

    //view
    lateinit var view:FrameLayout

    //integer variables
    var pts = 0
    var userAnsw = 0
    var questionValue1 = 0
    var questionValue2 = 0
    /** Global Variables end **/

    override fun onCreate(savedInstanceState: Bundle?) {
        super.onCreate(savedInstanceState)
        setContentView(R.layout.activity_main)

        //lets do some work
        view = findViewById<FrameLayout>(R.id.layout_parent)
        qv =  findViewById(R.id.tv_question)
        sv = findViewById(R.id.tv_solution)
        cv = findViewById(R.id.tv_points)
        ab = findViewById(R.id.btn_addition)
        sb = findViewById(R.id.btn_subtraction)

        //assign listeners
        ab.setOnClickListener {
            userAnsw++
            sv.text = "$userAnsw"
        }

        sb.setOnClickListener {
            userAnsw--
            sv.text = "$userAnsw"
        }

        generateQuestion(userAnsw)
    }


    //generate question function for user
    fun generateQuestion(num: Int) {
        var randomNum = 0
        randomNum = if (num == 0) 12
        else num

        questionValue1 = Random.nextInt(randomNum)
        questionValue2 = Random.nextInt(randomNum)

        val problem = "$questionValue1 + $questionValue2"
        qv.text = problem
    }

    /**
    *
    * */
    inner class GestureControlListener : GestureDetector.SimpleOnGestureListener() {


    }
}
The function we just wrote above objective is supposed to detect the fling gesture and when a user uses the fling gesture the application will skip the question and displays a new question. Then we call the function generateQuestion and new questions will be assigned to the AppCompatTextview. A brief message will appear to inform the user that the question was skipped.
class MainActivity : AppCompatActivity() {

    /** Global Variables Start **/
    //gesture
    lateinit var gdc: GestureDetectorCompat

    ///Textviews
    lateinit var qv: AppCompatTextView
    lateinit var sv: AppCompatTextView
    lateinit var cv: AppCompatTextView

    //Buttons
    lateinit var ab: FloatingActionButton
    lateinit var sb: FloatingActionButton

    //view
    lateinit var view:FrameLayout

    //integer variables
    var pts = 0
    var userAnsw = 0
    var questionValue1 = 0
    var questionValue2 = 0
    /** Global Variables end **/

    override fun onCreate(savedInstanceState: Bundle?) {
        super.onCreate(savedInstanceState)
        setContentView(R.layout.activity_main)

        //lets do some work
        view = findViewById<FrameLayout>(R.id.layout_parent)
        qv =  findViewById(R.id.tv_question)
        sv = findViewById(R.id.tv_solution)
        cv = findViewById(R.id.tv_points)
        ab = findViewById(R.id.btn_addition)
        sb = findViewById(R.id.btn_subtraction)

        //assign listeners
        ab.setOnClickListener {
            userAnsw++
            sv.text = "$userAnsw"
        }

        sb.setOnClickListener {
            userAnsw--
            sv.text = "$userAnsw"
        }

        generateQuestion(userAnsw)
    }

    //generate question function for user
    fun generateQuestion(num: Int) {
        var randomNum = 0
        randomNum = if (num == 0) 12
        else num

        questionValue1 = Random.nextInt(randomNum)
        questionValue2 = Random.nextInt(randomNum)

        val problem = "$questionValue1 + $questionValue2"
        qv.text = problem
    }

    /**
    *
    * */
    inner class GestureControlListener : GestureDetector.SimpleOnGestureListener() {

        override fun onFling(evt1: MotionEvent, evt2: MotionEvent, xVelocity: Float, yVelocity: Float) : Boolean {

            pts -= 75
            generateQuestion(userAnsw)
            view.setBackgroundColor(Random.nextInt())

            Snackbar.make(view, "Skipped", Snackbar.LENGTH_SHORT).show()
            cv.text = "Current Score: $pts"
            return true
        }

    }
}
Now we’ll add another function to override in the inner class which is onDoubleTap. As you are probably already aware this function detects a double tap gesture. The double tap gesture will act as a submission for the user answers to the question presented. Upon submission the answer is checked in the conditional and they are found equal the user score is increased and reflected in the view. A new problem is generated but if is found not to be equal then a deduction from the score is applied and brief message is display to the user before generating a new question.
inner class GestureControlListener : GestureDetector.SimpleOnGestureListener() {

        override fun onFling(evt1: MotionEvent, evt2: MotionEvent, xVelocity: Float, yVelocity: Float) : Boolean {

            pts -= 75
            generateQuestion(userAnsw)
            view.setBackgroundColor(Random.nextInt())

            Snackbar.make(view, "Skipped", Snackbar.LENGTH_SHORT).show()
            cv.text = "Current Score: $pts"
            return true
        }


        override fun onDoubleTap(evt: MotionEvent?): Boolean {

            if (userAnsw == questionValue1 + questionValue2) pts = 100*125
            else {
                pts -= 125
                view.setBackgroundColor(Color.RED)
                Snackbar.make(view, "Incorrect", Snackbar.LENGTH_SHORT).show()
            }

            generateQuestion(userAnsw)
            cv.text = "Current Score: $pts"
            return true
        }
}
Finally, we need to override onTouch in the MainActivity. When a touch is detected the function fires, so we’ll use this function to call the gestureDetector onTouchEventFunction.
class MainActivity : AppCompatActivity() {

    /** Global Variables Start **/
    //gesture
    lateinit var gdc: GestureDetectorCompat

    ///Textviews
    lateinit var qv: AppCompatTextView
    lateinit var sv: AppCompatTextView
    lateinit var cv: AppCompatTextView

    //Buttons
    lateinit var ab: FloatingActionButton
    lateinit var sb: FloatingActionButton

    //view
    lateinit var view:FrameLayout

    //integer variables
    var pts = 0
    var userAnsw = 0
    var questionValue1 = 0
    var questionValue2 = 0
    /** Global Variables end **/

    override fun onCreate(savedInstanceState: Bundle?) {
        super.onCreate(savedInstanceState)
        setContentView(R.layout.activity_main)

        //lets do some work
        view = findViewById<FrameLayout>(R.id.layout_parent)
        qv =  findViewById(R.id.tv_question)
        sv = findViewById(R.id.tv_solution)
        cv = findViewById(R.id.tv_points)
        ab = findViewById(R.id.btn_addition)
        sb = findViewById(R.id.btn_subtraction)

        //assign listeners
        ab.setOnClickListener {
            userAnsw++
            sv.text = "$userAnsw"
        }

        sb.setOnClickListener {
            userAnsw--
            sv.text = "$userAnsw"
        }

        generateQuestion(userAnsw)
        gdc = GestureDetectorCompat(this, GestureControlListener())
    }

    override fun onTouchEvent(evt: MotionEvent): Boolean {
        gdc.onTouchEvent(evt)
        return true
    }

    //generate question function for user
    fun generateQuestion(num: Int) {
        var randomNum = 0
        randomNum = if (num == 0) 12
        else num

        questionValue1 = Random.nextInt(randomNum)
        questionValue2 = Random.nextInt(randomNum)

        val problem = "$questionValue1 + $questionValue2"
        qv.text = problem
    }

    /**
    *
    * */
    inner class GestureControlListener : GestureDetector.SimpleOnGestureListener() {

        override fun onFling(evt1: MotionEvent, evt2: MotionEvent, xVelocity: Float, yVelocity: Float) : Boolean {

            pts -= 75
            generateQuestion(userAnsw)
            view.setBackgroundColor(Random.nextInt())

            Snackbar.make(view, "Skipped", Snackbar.LENGTH_SHORT).show()
            cv.text = "Current Score: $pts"
            return true
        }


        override fun onDoubleTap(evt: MotionEvent?): Boolean {

            if (userAnsw == questionValue1 + questionValue2) pts = 100*125
            else {
                pts -= 125
                view.setBackgroundColor(Color.RED)
                Snackbar.make(view, "Incorrect", Snackbar.LENGTH_SHORT).show()
            }

            generateQuestion(userAnsw)
            cv.text = "Current Score: $pts"
            return true
        }
    }
}
Install, Test, Conclude
Use the virtual or install on your device. When you increase or decrease the answer to the sum of the presented question. To submit your answer then double tap and if the answer is correct, you score will increase and a new problem will be presented to you. However, if you fling across the screen then problem is skipped, and a message is displayed to your user. With that I believe we have accomplished the task set out before us. If you are confused about anything, please don’t hesitate to contact me or check out the github repository on the project. You now have the “JUICE”!
Note: This class override a variety of functions
- Published in Android, blog, Kotlin, Mobile Development, Programming Languages, Tutorial
Android Rating: In-App Review API

Well Congratulations because you have coded, debugged and now published you app. The app itself is being used around the world by everyone but unfortunately that is not the end of the road for the application. Now that app is published the new objective is now collecting feedback and producing new updates which is accomplished by taking users feedback. An app rating and reviews are crucial factor to keep your app alive and have the downloads keep going. In the past the user would be prompted with a dialog with fancy buttons and upon ‘click’ the user is redirected to the Play Store. If the end user is anything like me, I find it annoying and complicated for the whole transition. Fear not Google understood and provided and API, which provide a rating widget in the app itself and the end user never has to leave the app itself.
Keep In Mind
- This API only functions with Android 5(API level 20+)
- The API is subject to quotas. Also the API decides how often the review widget should be shown to user.
- Note: More about quotas
- The flow process is controlled by the API. As the developer/designer you should not waste your time trying to alter the design.
- Note: More about Design Guidelines
- Furthermore the flow doesn’t notify us if the end user has completed the review or not
Integrating the API
Simple task here and can be accomplished with very little or minimal code. So enough talk and more implementing:
Since this API is apart of the Play Core API, so we need to add it to the library within the buid.gradle. In the code below you will notice that I am including the material library because I want to show a fallback if there is any error in-app review API.
//build.gradle
dependencies {

    implementation 'androidx.appcompat:appcompat:1.3.0'
    implementation 'com.google.android.material:material:1.5.0' //optional material library
    implementation 'com.google.android.play:core:1.10.3' //play core library
    implementation 'androidx.constraintlayout:constraintlayout:2.0.4'
    testImplementation 'junit:junit:4.13.2'
    androidTestImplementation 'androidx.test.ext:junit:1.1.3'
    androidTestImplementation 'androidx.test.espresso:espresso-core:3.4.0'
}
Now that has been accomplished, we need to create an instance of ReviewManager. This class provides necessary methods to start the review flow.
- New instance created, now a call the requestedReviewFlow() task returns ReviewInfo upon successful completion
- ReviewInfo object , needs to call launchReviewFlow() method which begins the review flow
- If requestReviewFlow fails, then we launch the usual Rate App dialog which then redirects the user to the Play Store.
- showRateApp() method starts the in-app review flow. The showRateAppFallbackDialog() method then acts as a fallback method if requestedReviewFlow throws an error.
package com.programmingninja.inappreview;

import androidx.appcompat.app.AppCompatActivity;
import android.os.Bundle;
import com.google.android.material.dialog.MaterialAlertDialogBuilder;
import com.google.android.play.core.review.ReviewInfo;
import com.google.android.play.core.review.ReviewManager;
import com.google.android.play.core.review.ReviewManagerFactory;
import com.google.android.play.core.tasks.Task;


public class MainActivity extends AppCompatActivity {

    private ReviewManager rm;

    @Override
    protected void onCreate(Bundle savedInstanceState) {
        super.onCreate(savedInstanceState);
        setContentView(R.layout.activity_main);

        doInit();
    }

    private void doInit() {
        rm = ReviewManagerFactory.create(this);
        findViewById(R.id.btn_rating).setOnClickListener(view -> showRateApp());
    }

    public void showRateApp() {
        Task<ReviewInfo> request = rm.requestReviewFlow();
        request.addOnCompleteListener(task -> {
           if (task.isSuccessful()) {
               //reviewinfo object
               ReviewInfo ri = task.getResult();

               Task<Void> flow = rm.launchReviewFlow(this, ri);
               flow.addOnCompleteListener(task1 -> {

               });
           } else {
               //
               showRateAppFallbackDialog();
           }
        });
    }

    private void showRateAppFallbackDialog() {
        new MaterialAlertDialogBuilder(this)
                .setTitle(R.string.app_title)
                .setMessage(R.string.app_user_message)
                .setPositiveButton(R.string.app_btn_positive, (dialog, which) -> {

                })
                .setNegativeButton(R.string.app_btn_negative, (dialog, which) -> {

                })
                .setNeutralButton(R.string.app_btn_neutral, (dialog, which) -> {

                }).show();
    }
}
Install, Test, Conclude
To test the this action, you should have the app approved and published within the PlayStore. Don’t worry the app doesn’t need to be available to the public.
- Published in Android, blog, Java, Programming Languages, Tutorial
QR Reader in Android w/ Kotlin

You may have noticed that QR codes are popping up all around and many of us have become accustomed to using these codes to quickly access information. As a developer know that qr codes are quick, easy, convenient, and alluring for users to scan. Within this read you will learn to implement a QR code scanner in Android Studio with very few steps.
Project Creation
Well of course you need somewhere to start so firing up your Android Studio it you haven’t already. Select the project you prefer to use but for this tutorial we are going to use the “Empty Activity” template just to keep it simple. (If you require more content on the different templates check out: Blah Blah)
NOTE: minimum SDK is 7.0
Adding Gradle Dependency and Manifest
Before we can access the class from ZXing we need to import the dependency to the module build.gradle file. (I always suggest using the latest stable version with that I suggest using the project structure when import dependencies) We also need to add permission to the AndroidMainfest.xml to access to the camera.
NOTE: If you are not familiar with using the Project Structure, please see blog regarding this feature in android studio.
// build.gradle
dependencies {

    implementation 'androidx.core:core-ktx:1.7.0'
    implementation 'androidx.appcompat:appcompat:1.3.0'
    implementation 'com.google.android.material:material:1.4.0'
    implementation 'androidx.constraintlayout:constraintlayout:2.0.4'
    implementation 'com.journeyapps:zxing-android-embedded:4.3.0' //added
    testImplementation 'junit:junit:4.13.2'
    androidTestImplementation 'androidx.test.ext:junit:1.1.3'
    androidTestImplementation 'androidx.test.espresso:espresso-core:3.4.0'
}
// AndroidMainifest.xml
<manifest xmlns:android="http://schemas.android.com/apk/res/android"
    package="com.programmingninja.qrreader">

    <uses-permission android:name="android.permission.CAMERA" />

    <application
        android:allowBackup="true"
        android:icon="@mipmap/ic_launcher"
        android:label="@string/app_name"
        android:roundIcon="@mipmap/ic_launcher_round"
        android:supportsRtl="true"
        android:theme="@style/Theme.QRReader">
        <activity
            android:name=".MainActivity"
            android:exported="true">
            <intent-filter>
                <action android:name="android.intent.action.MAIN" />
                <category android:name="android.intent.category.LAUNCHER" />
            </intent-filter>
        </activity>
    </application>
</manifest>
Updating Layout
Now that we have completed the lightweight stuff lets begin by updating the activity_main.xml. We are going to keep the ConstraintLayout and add within it AppCompatTextView and AppCompatImageButton.
<?xml version="1.0" encoding="utf-8"?>
<androidx.constraintlayout.widget.ConstraintLayout xmlns:android="http://schemas.android.com/apk/res/android"
    xmlns:app="http://schemas.android.com/apk/res-auto"
    xmlns:tools="http://schemas.android.com/tools"
    android:layout_width="match_parent"
    android:layout_height="match_parent"
    tools:context=".MainActivity">

    <androidx.appcompat.widget.AppCompatTextView
        android:layout_width="wrap_content"
        android:layout_height="wrap_content"
        android:id="@+id/tv_message"
        android:text="Tap Button Below to Begin Scanning!"
        app:layout_constraintBottom_toBottomOf="parent"
        app:layout_constraintLeft_toLeftOf="parent"
        app:layout_constraintRight_toRightOf="parent"
        app:layout_constraintTop_toTopOf="parent" />

    <androidx.appcompat.widget.AppCompatImageButton
        android:layout_width="wrap_content"
        android:layout_height="wrap_content"
        android:id="@+id/img_btn_qr"
        app:layout_constraintBottom_toBottomOf="parent"
        app:layout_constraintEnd_toEndOf="parent"
        app:layout_constraintStart_toStartOf="parent"
        app:layout_constraintTop_toBottomOf="@+id/tv_message"
        android:src="@drawable/ic_baseline_qr_code_scanner_24"/>
</androidx.constraintlayout.widget.ConstraintLayout>
Finally Some Kotlin Writing
Within this class we need to use the ZXing IntentIntegrator to override the onActivityResult function. IntentIntegrator allows us to start the scanner with a few lines of code. The result will then appear in our Activity’s and if the user has not provided permission, yet they are present a message to provide access. After access is provided and user scans a code a new AlertDialog is present to perform action from the QR code itself. I will provide the code and blew the snippet you will be informed of everything is greater detail
package com.programmingninja.qrreader

import android.app.SearchManager
import android.content.DialogInterface
import android.content.Intent
import androidx.appcompat.app.AppCompatActivity
import android.os.Bundle
import androidx.appcompat.app.AlertDialog
import androidx.appcompat.widget.AppCompatButton
import androidx.appcompat.widget.AppCompatImageButton
import androidx.appcompat.widget.AppCompatTextView
import com.google.zxing.integration.android.IntentIntegrator

@Suppress("DEPRECATION")
class MainActivity : AppCompatActivity() {
    override fun onCreate(savedInstanceState: Bundle?) {
        super.onCreate(savedInstanceState)
        setContentView(R.layout.activity_main)

        val msgTxt:AppCompatTextView = findViewById(R.id.tv_message)
        val imgBtn:AppCompatImageButton = findViewById(R.id.img_btn_qr)

        imgBtn.setOnClickListener {
            val intentIntegrator = IntentIntegrator(this)

            intentIntegrator.setDesiredBarcodeFormats(listOf(IntentIntegrator.QR_CODE))
            intentIntegrator.initiateScan()
        }
    }

    override fun onActivityResult(requestCode: Int, resultCode: Int, data: Intent?) {
        super.onActivityResult(requestCode, resultCode, data)

        val res = IntentIntegrator.parseActivityResult(resultCode,data)

        if (res != null) {
            AlertDialog.Builder(this).setMessage("Would you like to go to ${res.contents}?")
                .setPositiveButton("Accept", DialogInterface.OnClickListener{
                    dialogInterface, i -> val intent = Intent(Intent.ACTION_WEB_SEARCH)
                    intent.putExtra(SearchManager.QUERY, res.contents)
                    startActivity(intent)
                })
                .setNegativeButton("Deny", DialogInterface.OnClickListener{ dialogInterface, i ->  })
                .create()
                .show()
        }
    }
}
Let’s first review the onCreate function, we are referencing the views in the layout, then we assign an OnClickListener to our AppCompatImageButton which then use an instance of IntentIntegrator which begin the scan. We are settubg tge setDesiredBarcodeFormats function on the variable intentIntegrator. This function allows us to narrow down our barcode format to only focus. The ZXing IntentIntegrator class has support for several barcode formats, however for this tutorial we are going to focus on QR codes. Start the scan using the variable iIntegrator initiateScan function.
Now we create a function called onActivityResult and for this function to work we have to call the super.OnActivityResult function. In this function we create a variable called ‘res’ which holds the data collected from iIntegrator parseActivityResult function. Inside the function is a conditional statement to check if the scan is empty
Within the statement, we build an AlertDialog with a positive and negative button and each button have an action assigned to them. If the positive button is selected then an Intent will be used to start an internet search with QR code’s data but if the negative button is selected then user remains within the app.
Install, Test and Verify
If everything is implemented correctly, we can test the app, run it in the android studio and install it on a device. Now that the app installed, the app will open automatically and display the text and image button. when the user it will request permission to access the camera in your Setting. The camera reads the code and presents it in the AlertDialog a message that is stored in the qr code.

android-tutorial (this link opens in a new window) by daurislittle (this link opens in a new window)
Android Tutorial beginner and advance
- Published in Android, blog, Kotlin, Programming Languages, Tutorial
“Structs vs Classes” and using them

This is because it plays a significant role in choosing the right abstraction mechanism keeping both performance and modeling in mind. As you can only imagine this topic is simply the tip of the iceberg. Many advanced concepts and questions of classes and structs in swift. With that being, I have broken this topic into two parts.
Structs & Classes — What are they?
Consider them like templates or guidebook that contains variables and methods used to all object of the said kind. In short, they assist in keeping the code organized for future maintenance and reusability.
Class features over structs
- Inheritance
- inherit the characteristics of another class
- Type-casting
- checks and interprets the type of a class instance at runtime
- Deinitializers
- enable an instance of a class to free up any resources it has assigned
- Reference Count
- allows multiple references to a class instance
Value & reference types
- Value types
- each instance keeps an independent copy of its data
- example: structs, enums, or tuples
- changing one instance will have no effect on the other
- each instance keeps an independent copy of its data
- reference type
- Instances share a single copy of the data.
- changing data in one instance will change the data for all instance pointing to the same instance
- example: classes
Deciding to class or struct
when deciding on a new model we, as developers, should carefully contemplate the use cases of the model. With that stated, you should decide between structs and classes.
using classes:
class Network {
   var url:String
   init(url:String) {
      self.url = url
   }
}

var req = Network(url: "https://daurislittle.com")
var newReq = req
newReq.url = "https://facebook.com"

if req === newReq {
   print(req.url)
   print(newReq.url)
}
- comparing instance identity with “===” makes sense
- Creating a shared and mutable state
- if your intent is to share the state among the threads and variables use classes
using structs:
You will note the code below compare the value of the Network URLs and not the memory addresses.
struct Network {
   var url:String
}

extension Network:Equatable{}

let req = Network(url: "https://daurislittle.com")
let newReq = Network(url: "https://facebook.com")

if req == newReq {
   print("Both the request contains the same address")
}
- comparing instance data with “==” makes sense
- data needs to be compared and the memory locations of these data are not important
Now you can see that both the requests have different URLs as each request have a different copy of the URLs
struct Network {
   var url:String
}

extension Network:Equatable{}

var req = Network(url: "https://daurislittle.com")
var newReq = req

newReq.url = "https://facebook.com"

print(req.url) //https://daurislittle.com
print(newReq.url) //https://facebook.com
Now you can see that both the requests have different URLs as each request have a different copy of the URLs
- Data can be used in code across multiple threads
- when passing and copying value types in a multi-threaded environment we can be sure that each context will have a separate unique copy which will not impact the others
- This helps avoid a lot of unintentional bugs
- when passing and copying value types in a multi-threaded environment we can be sure that each context will have a separate unique copy which will not impact the others
Memory Allocation w/structs and classes
structs are allocated in the stack memory. References of the class objects can be created on the stack but all the properties of the class’s object will be kept in the heap
Reference counting
As stated above classes support heap allocations they need to maintain reference counts for allocation and deallocating objects. On the other hand, structs do not need reference counting. However, if structs contain references then they would incur twice the number of reference counting overhead as compared to a class.
Method Dispatching
Classes use method dispatch but if a class is marked as “final“, the compiler will use static dispatch. Stucts uses “static” dispatch.
Memberwise initializers
Memberwise initializers are those initializers which the compiler generates automatically for structs. We can initialize a struct’s object using these initializers even though we have not provided any custom initializers.
enum RequestType {
   case get, post, delete
}

struct Network {
   val url:String
   var type:RequestType

   //Memberwise init generated by the compiler
}

var req = Network(url:"https://daurislittle.com", type: .get)
Note: order arguments in these initializers are decided by the order of the declared properties in struct.
However, as a developer we can write any custom initializer, the compiler now though will not generate the memberwise initializer. You can use both generated memberwise and custom initializers, just need to add the custom initializer within the extension of the struct.
enum RequestType {
   case get, post, delete
}

struct Network {
   val url:String
   var type:RequestType //Memberwise init generated by the compiler
}

extension Network {
   initi(URL:String) {
      self = Network.init(url: url, type: .get)
   }
}

var req = Network.init(url:"https://daurislittle.com")
Keyword “mutating” and when to use it
When changing the property of any struct, using the keyword “mutating” before the “func” keyword when defining a method. This is because the self parameter that’s implicitly passed into every method is immutable by default.
extension Network {
   mutating func updateUrl(url:String) {
      self.url = url
   }
}
//self is passed as a var
The “mutating” keyword allows the compiler to decide which methods can’t be called on let constants. If we try to call a mutating method on a “let” constants. If we try to call the mutating method on a let variable, the compiler shows an error.
- Published in blog, iOS, Programming Languages, Swift
Using WooCommerce in 2021

Getting WooCommerce ’21
Starting from scratch or upgrading your site to incorporate WooCommerce is no problem. From adding products and managing orders to offering coupons and creating reports, WooCommerce packs a lot of punch. There are plenty of exciting new WooCommerce plugins and extensions available to make your client’s online storefront attract and retain more customers.
From a web development perspective, WooCommerce offers tons of options to get your client’s storefront up and running. The sooner their storefront is live, the sooner they can start reeling in customers and giving them the shopping experience they need to keep them coming back for more. Sell products, services, subscriptions or bookings.
WooCommerce Settings
Needing to attract new and recurring customer is simple by using categories, product tags and attributes. As a site grows so does the demand and features the lives within the site and WooCommerce allows the configuration to be modified to meet customer expectations. No fear if you decide to sell and ship to different countries or even accept different currency with various payment gateway preferences. With that what all can you do with WooCommerece:
- Change countries to sell and ship to
- payment gateway preferences
- difference checkout options
- Dont forget coupons and/or discounts
Product Adding
From adding to organizing along with special offerings in your shop. Well guess who does it with very little knowledge, WooCommerce does. After installing WooCommerce simply select the “Products” within your dashboard. Furthermore WooCommerce walks the user through adding a product: name, description, category assignment.
Defined Product types :
- Downloadable products
- Shippable products
- virtual products
- Variable products
Using Coupons
How to promote the business and attract more customer to stop and buy? It simple offer discounts with coupons. Once on the dashboard select couplns and follow the prompts:
- Create your own details along with coupons codes
- Designate how oftern the coupon can be used by a customer
- Assign restrictions for example minimum or maximum total of an order
Advance Features
Also within WooCommerce there are ton of advance features to launch a business.
- Theme Customizations
- various woocommerce themes can be purchased and customized
- Shipping
- Designate options like pickup, local delivery or shipping
- PayPal Acceptance
- Enable PayPal checkout along with all major credicards
- Social Login
- Account creation/login process by allowing customers to use logins from the popular social media platforms
- Analytics
- Deep eCommerce insights including checkout flow analysis, sales by product and category, average order value, and more.
- Cart & Checkout add-ons
- Cross-sell related products after a customer adds an item to their cart using Cart Add-ons. Then offer upsells like insurance, gift wrapping, and more at checkout using Checkout Add-ons
Order Managements
Nothing is like getting a notification of a successful order being placed but managing and fulfiling the order isn’t as exciting. No worries through because WooCommerce simplifies this process when dealing with order management. Within the dashboard you can review the order process display, for example filtering orders by customer or date along with soting on any of the following with ascending/descending with order number, date or total. In addition with the email customizer you can setup and configure ceamless communcation with customers.
WooCommerce Reporting
Need a second set of eyes on the business growth, marketing strageries, as well as buget playing then you hired the right person, WooCommerce. WooCommerce delievers reporting like order and customer reports that are represeneted in various graph and charts that makes it easier to comprehend.
- Published in blog, E-Commerce
Using let or var within Swift

I know I know I know before you say anything I understand this statement is probably ridiculous. However, this topic could aid someone or more likely open the floor to discuss concepts in general so without hesitation, we will dive into it.
let and var so what are they and their differences
As you probably already know both let and var are for creating variables within Swift. Now with let it helps create an immutable variable(s) so consider it a constant but var is used for creating a mutable variable(s). Nonetheless, a variable created by either of them holds a reference or a value.
The difference between the two is that when a developer creates a constant with let the value must be assigned before you can use it. While when you declare a variable with var it can be used before or after an assignment or never use it as well as reassigning it on the fly.
Mutate function parms
function parameters are constants by default. Trying to change their value within the function body results in a compile-time error.
func pokedex(for name: String) {
   name = "charmander"
}

pokedex(for: "mex")

//Line 2 cannot assign to value is let constant
Test: Build & Compile
struct Pokemon {
   var name: String
   let weakness: String
}

let trainerAPokemon = Pokemon(name: "Charmander", weakness: "water")
trainerAPokemon .name = "Bulbasaur"
trainerAPokemon .weakness = "fire"

var trainerBPokemon = Pokemon(name: "Pikachu", weakness: "rock")
trainerBPokemon.name = "Squirtle"
trainerBPokemon.weakness = "electricity"
In the example above we are using a struct. Whenever you try to muate them they get copied with mutation applied to them and reassigned back.
Now let’s review everything within the block. The let variable within the struct cant is mutated as it would mean you are mutating the value of an immutable variable. However, our friend the var variable within the struct can be mutated.
- Line 7
- cannot assign to the property trainerAPokemon because it is a let constant
- Line 8 & 12
- cannot assign to the property weakness because it is a let constant
Test: Build & Compile
class Pokedex {
   var name: Int
   let num: String

   init(name: String, num: Int) {
      self.name = name
      self.num = num
   }
}

let trainerA = Pokedex(name: "Lucario", num: 448)
trainerA.name = "Squirtle"
trainerA.num = 7

var trainerB = Pokedex(name: "Bulbasaur", num: 1)
trainerB.name = "Gengar"
trainerB.num = 94
In the example above we are now using a classes. When attempting to mutate them, the object stored elsewhere in memory gets mutated while the reference to it remains the same.
You can modify a class’s members whether or not the variable referencing it is mutable
- Line 13 & 17
- cannot assign to property num because it is a let constant
- Published in blog, iOS, Programming Languages, Swift
Using forEach, forEnumerated, forIn within Swift
Swift provides us with multiple ways to loop through items in a collection, they are:
for pokemon in pokemons {
   print(pokemon)
}

pokemons.forEach { (pokemon) in
   print("Pokemon", pokemon)
}

for (index, element) in pokemons.enumerated() {
   print("Number:", index, "Pokemon:", element)
}
Using for in
many programming languages the for in loo is called for-each. Standard loop statement in other languages uses this format:
for (i = 0; i < n; i++) {
   ///some fancy collecion to loop thur
}
Please note: Swift 3 no longer supports c-style for-loops
Now when using swift this approach is a little different, the rationale of this for-in syntax is it can be used to loop over ranges, iterators, strings, sequences, and collections with the same syntax.
let pokemons = ["Pikachu", "Charmander", "Squirtle", "Bulbasaur"]

for i in 0...< pokemons.count {
   print("Pokemon \(i+1):" pokemons[i])
}

//output:
Pokemon 1: Pikachu
Pokemon 2: Charmander
Pokemon 3: Squirtle
Pokemon 4: Bulbasaur
Within Swift the use of object types like arrays, dictionaries, and sets are known as collection. Any collection can be iterated with a for-in loop. For example with dictionary:
let pokedex = ["Electric":"Pikachu","Water":"Squirtle","Fire":"Charmander","Grass":"Bulbasaur"]

for (type, pokemon) in pokedex {
   print("The \(type)'s Pokemon is \(pokemon))
}

//output
The Electric's Pokemon is Pikachu
The Water's Pokemon is Squirtle
The Fire's Pokemon is Charmander
The Grass's Pokemon is Bulbasaur
In addition, Swift also provided two range operators lowerBound...upperBound as a shortcut for expressing a range of values.
Take note: lowebound is greater than upperBound the code will crash
for i in 0...5 {
   print(i)
}
//output
0
1
2
3
4
5

for i in 0..<5 {
   print(i)
}

//output
0
1
2
3
4
If interested in reversing the range while looping, we can easily achieve that using reversed
for i in (0...5).reversed() {
   print(i)
}

//output
5
4
3
2
1
0
Stride
As I referenced before, C-Style for loops are no longer supported within Swift 3, so you’re probably asking how to acquire the ‘increment of the counter’ (i++). We accomplished this by using stride, and this helps us to move from one value to another using any incremental value, we can also specify whether the upperBound is inclusive or exclusive.
for i in stride(from 0, to: 10, by: 2) {
   print(i)
}

//output
0
2
4
6
8
Using for each
pokemons.forEach {
   print("Pokemon", pokemon)
}

//output
Pokemon Mewtwo
Pokemon Snorlax
Pokemon Eevee
Swift provides a dedicated method forEach for specific, unlike the above forIn this method can’t break the loop partway (at some point). It has to loop over each item in the sequence. It has to loop over each item in the sequence. This helps people reading your code to figure out your intent: that you want to act on all items, and won’t stop in the middle.
Please note:
breakstops execution in a loop immediately and continues directly after the loop.
continueonly exits the current iteration of the loop — it will jump back to the top of the loop and resumes up from there for next iteration
var oddNumbers = [Int]()

for numbers in (0...100) {
   guard oddNumbers.count < 15 else {
      break
   }

   guard numbers % 3 == 0 else {
      continue
   }

   oddNumbers.append(numbers)

   print(oddNumbers)
}
the same cannot be achieved in forEach with break and continue, so we need something like:
let oddNumbers = (0...100).filter {numbers -> Bool in
   return numbers % 3 == 0
}.prefix(10)

print(oddNumbers)
Using for enumerated
This Swift loop iterates to each of the items by also telling the index of it. In case if we need to iterate the elements and need their index also, then forEnumerated is the perfect loop for us.
Nested for loops:
var pokedex = ["001", "002", "003"]
var pokemons = ["Bulbasaur", "Ivysaur", "Venusaur"]

for i in 0..< pokedex.count {
   var string = "\(pokedex[i]) is "

   for _ in 1...3 {
      string += "\(pokemons[i])"
   }

   print(string)
}

//output
001 is Bulbasaur
002 is Ivysaur
003 is Venusaur
While:
// a while loop performs a set of statements until a condition becomes false
while condition {
   //statements
}

var index = 0
while index < pokemons.count {
   print(pokemon[index])
   index += 1
}

//output
Bulbasaur
Ivysaur
Venusaur
Repeat:
//repeat while loop is similar to do while loops in other languages

repeat {
   statements
} while condition

var index = 0
repeat {
   print (pokemons[index])
   index += 1
} while index < pokemons.count

//output
Bulbasaur
Ivysaur
Venusaur
It is similar to the above while loop but the major difference is that this loop evaluates the condition after running the statements. Either way, both while and repeat are best used in the loops where the numbers of steps are unknown.
- Published in blog, iOS, Programming Languages, Swift
Did Someone Say Reflection C#

Maybe you are new to the .Net lifestyle or maybe you are a veteran, either way, you ended up here to get a better understanding of what reflection is all about. To begin reflection is the process of describing various metadata of types, methods, and fields in code, that is literal Microsoft definition but no worries I will explain it. So before we dive into anything else you should already have an understanding of namespaces are and why we use them.
With reflection in C#, you can dynamically create an instance of a type and bing that type to an existing object. Moreover, you can get the type from an existing object and access its properties. When you use attributes in your code, reflection gives you access as it provides objects of the type that describe modules, assemblies, and types.
So in this article, I’ll discuss C# Reflection with various examples. Here we’ll learn the way of getting type information using different ways and use of properties and methods of C# Reflection type class.
Here’s a simple example of reflection using the static method GetType – inherited by all types from the Object base class – to obtain the type of a variable,
//using GetType to obtain type information
int a = 42;
System.Type type = a.GetType();
System.Console.WriteLine(type);
//the output will display as the following
//System.Int32
Defining Reflection in C#
To understand reflection, there are a few basics you should understand about modules, types, and members:
- Assemblies contain modules
- Modules contain types
- Types contain members
You need to use Reflection when you want to inspect the contents of an assembly. For example, you can get all members of the object by typing “.” before an object when viewing your Visual Studio editor IntelliSense.
A program reflects on itself when it extracts metadata from its assemblies, then uses it to modify its behavior or inform the user. When you write a C# program that uses reflection, you can use either the TypeOf operator or the GetType() method to get the object’s type.
Examples of Reflection in C#
Implementing reflection in C# requires a two-step process. You first get the “type” object, then use the type to browse members such as “methods” and “properties”. This is how you would create instances of DateTime class from the system assembly:
//create instance of class DateTime
DateTime dt = (DateTime) Activator.CreateInstance(typeof(DateTime);
Namespace Test
{
   public class YuGiOh
   {
      public YuGiOh() {...}
      public string name
      public static double Attack {get{...} set{...}}
      public static double Defense {get{...} set{...}}
      public static string Attribute() {...}
      public static string MonsterEffect() {...}
      public static int Stars () {get{...} set{...}}
      public static string CardType() {...}
   }
}

//dynamically load assembly file
Assembly yugioh = Assembly.LoadFile(@"c:'Test.dll")

//get type of class YuGiOh from just loaded assembly
Type card = yugioh.GetType("Test.YuGiOh");

//create instance of class YuGiOh
object cardInstance = Activator.CreateInstance(card);
And access its members (the following examples illustrate getting values for the public double Number property):
//get info about property: public double Attack
PropertyInfo cardPropertyInfo = card.GetProperty("Attack");

//get the value of property: public double Attack
double value = (double)cardPropertyInfo.GetValue(cardInstance, null);

//set value of property: public double Attack
cardPropertyInfo.SetValue(cardInstance, 10.0, null);
Then, you
Understanding How Reflection Works
The main class for reflection is the System.Type class, which is an abstract class representing a type in the Common Type System. When you use this class, you can find the types used in a module and namespace and also determine if a given type is a reference or value type. You can parse the corresponding metadata tables to look through these items:
- Fields
- properties
- Methods
- Events
Understanding How Reflection in C# Works
There are several uses including:
- Use Module to get all global and non-global methods defined in the module.
- Use MethodInfo to look at information such as parameters, name, return type, access modifiers, and implementation details.
- Use EventInfo to find out the event-handler data type, the name, declaring type and custom attributes.
- Use ConstructorInfo to get data on the parameters, access modifiers, and implementation details of a constructor.
- Use Assembly to load modules listed in the assembly manifest.
- Use PropertyInfo to get the declaring type, reflected type, data type, name and writable status of a property or to get and set property values.
- Use CustomAttributeData to find out information on custom attributes or to review attributes without having to create more instances.
Other uses for Reflection include constructing symbol tables, to determine which fields to persist and through serialization.
- Published in .NET & .NET Core, blog, C#, Programming Languages
HTML5 Hidden Gems

When people tell me they are interested in web development and ask me where to begin. My response has always been to start with “HTML” it’s easy. Reflecting back on earlier introduction to web development it was really easy especially with html4 and probably hands down the easiest programming language.
HTML is an incredible and powerful markup language that can be used to give web application structure while also providing powerful accessibility benefits.
Today we will focus on 10 HTML element tags that should in your tool bag and ideally, it will aid you and ensure that your site is a more accessible and structurally sound web presence.
- Audio
- Blockquote
- Output
- Picture
- Progress
- Meter
- Template
- Time
- Video
- Word Break OP
Audio
<audio>
   <source src="bulbasaur.mp3" type="audio/mpeg" />
   <source src="bulbasaur.ogg" type="audio/ogg" />
   <source src="bulbasaur.wav" type="audio/wav" />
</audio>
Blockquote
this tag specifies a section that is considered a quote from some other source.
<blockquote>
Lorem ipsum dolor sit amet, consectetuer adipiscing elit. Aenean commodo ligula eget dolor. Aenean massa. Cum sociis natoque penatibus et magnis dis parturient montes, nascetur ridiculus mus.
</blockquote>
Output
This tag is a little fancier because it represents the results of a calculation. You can use the plus sign and equal symbol to indicate that the first and second input values should be “outputted” to the output tag; you can denote this with a for attribute containing the ids of the two elements to combine.
<form oninput="x.value=parseInt(a.value)+parseInt(b.value)">
   <input type="range" id="a" value="50">
   +<input type="number" id="b" value="25">
   =<output name="x" for="a b"></output>
</form>
Picture
This tag allows the user to specify the image sources. Instead of having an image that you scale up and down depending upon the viewport width, multiple images can be designed to fill the browser viewport. the tag is partnered with additional tags <source> and <img> tags. the following attributes are to keep in mind when using the <picture> tag.
- media: accepts any valid media query that you might define within CSS
- type: defines the MIME-type
- sizes: defines a single width value
- srcset: this is a required attribute. defines the URL of the image to display
<picture>
   <source media="(min-width:650px)" srcset="charmander.jpg">
   <source media="(min-width:465px)" srcset="evee.jpg">
   <img src="squirtle .jpg" alt="pokemon" style="width:auto;">
</picture>
The <img> tag is used to provide backward compatibility if a browser doesn’t support the <picture> tag or if none of the <source> tags to match.
Progress
This tag represents the progress of a task. the tag is not a replacement for the <meter> tag, thus components indicating disk space usage or query result relevance should use the <meter> tag.
<progress id="file" value="32" max="100"> 32% </progress>
Meter
this tag defines a scalar measurement within a defined range or a fractional value. Many also refer to this tag as a “gauge”. the tag can be used to display disk usage statistics or to indicate the relevance of search results.
<label for="disk_c">Disk usage C:</label>
<meter id="disk_c" value="2" min="0" max="10">2 out of 10</meter><br>

<label for="disk_d">Disk usage D:</label>
<meter id="disk_d" value="0.6">60%</meter>
Template
This tag contains content that is hidden from the user but will be used to instantiate the HTML code. Using javascript you can render this content with the cloneNode() method.
<template>
   <h2>Pokemon</h2>
   <img src="charmander.jpg" width="214" height="204">
</template>
Time
This tag defines a human-readable date or time. This can be used to encode dates and times in a machine-readable manner so that user agents can add reminders or scheduled events to the user’s calendar. This is also helpful for search engines to produce smarter search results.
<p>Open from <time>10:00</time> to <time>21:00</time> every weekday.</p>

<p>I have a date on <time datetime="2008-02-14 20:00">Valentines day</time>.</p>
Video
This tag specifies a video stream or movie clip. Similar to the audio tag it has formats that are supported: MP4, WebM, and Ogg
<video width="320" height="240" controls>
   <source src="mewtwo.mp4" type="video/mp4">
   <source src="mewtwo.ogg" type="video/ogg">
   Your browser does not support the video tag.
</video>
Word Break Opportunity
If you have a long block of text or a long word you can use this tag to specify where in a body to text it would be ideal to break on.
<p>To learn AJAX, you must be familiar with the XML<wbr>Http<wbr>Request Object.</p>
- Published in blog, HTML5, Programming Languages, Web Application Development
Integrating Google’s reCAPTCHA w/Android

Introduction
Google’s reCAPTCHA API protects your website/app from malicious traffic. You might have seen the reCAPTCHA integrated on web pages. You can integrate the same in your Android apps too using SafeNet API. The service is free to use and it will show a captcha to be solved if the engine suspects user interaction to be a bot instead of a human.
Within this post, I will explain and build a simple button click application that will integrate captcha to avoid bots from submitting forms on there own. But understand that this method is not only limited to form usage but a user can integrate any this module into any app
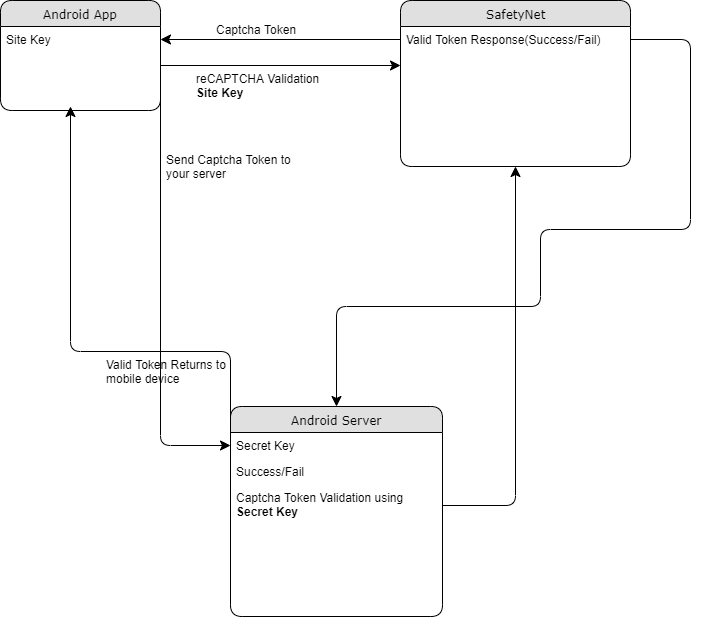
How it works
The following point will explain the simple flow of reCAPTCHA in Android with SafetyNet API.
- First, a user needs to obtain the SafetyNet key pair by registering your app. After completing this a Site & Secret Key.
- The Site Key will be integrated into an Android app and it can be public. Secret Key should be kept on your server and it shouldn’t be exposed.
- When reCAPTCHA is invoked, it will show the Captcha challenge to a user it necessary. In this step, it communicates with the captcha server and returns “User Response Token” using Site Key.
Registering your App w/SafetyNet
To begin before diving into the application creation we need to get the keys that will be validated against.
Fist go to the site following site and sign up if you do not already have an account
- https://www.google.com/recaptcha/intro/v3.html
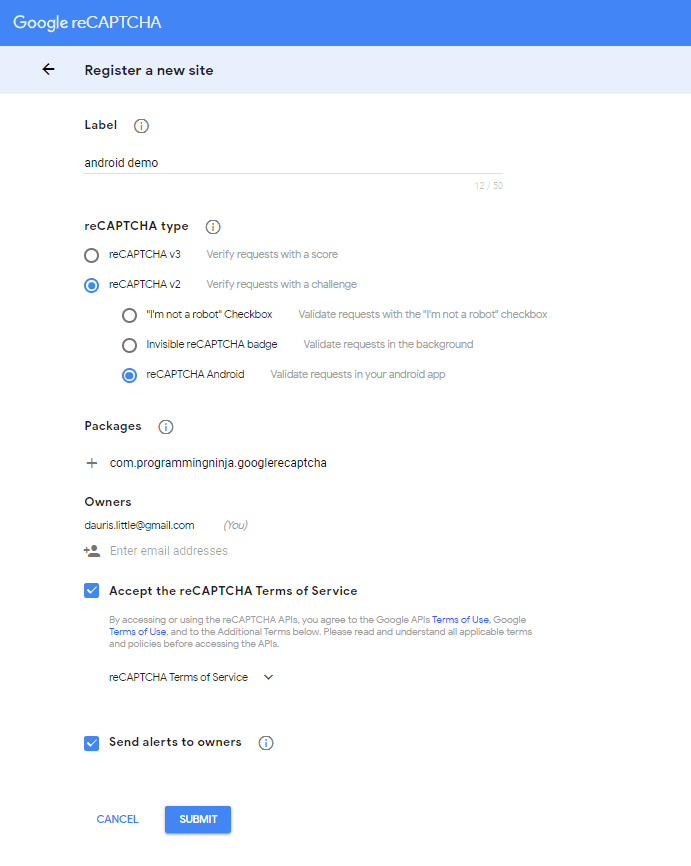
- After accessing your account create
- Register a new account
- Now enter your label, reCAPTCHA type, domains and then accept “Terms of Service”
NOTE: Regarding the label the title be anything that identifies the api key to yourself
NOTE: Regarding the selecting reCAPTCHA if working with android select reCAPTCHA v2 then reCAPTCHA Android
NOTE: Regarding populating the domain should be your Package Name in Package Names Section
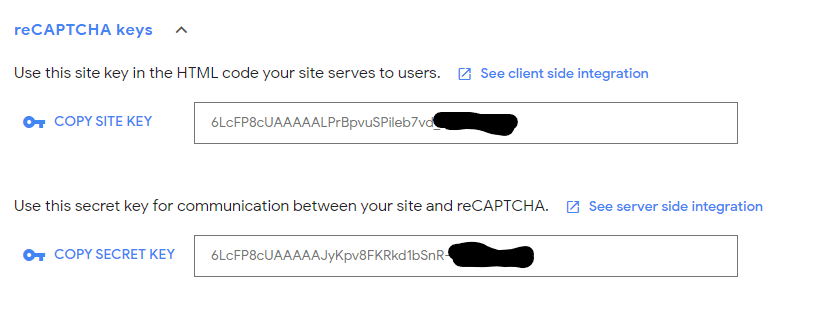
Then, you will get the site key and secret key from SafetyNet API Server and it as well as shows client and server-side integration code snippets. The following figures show the same.
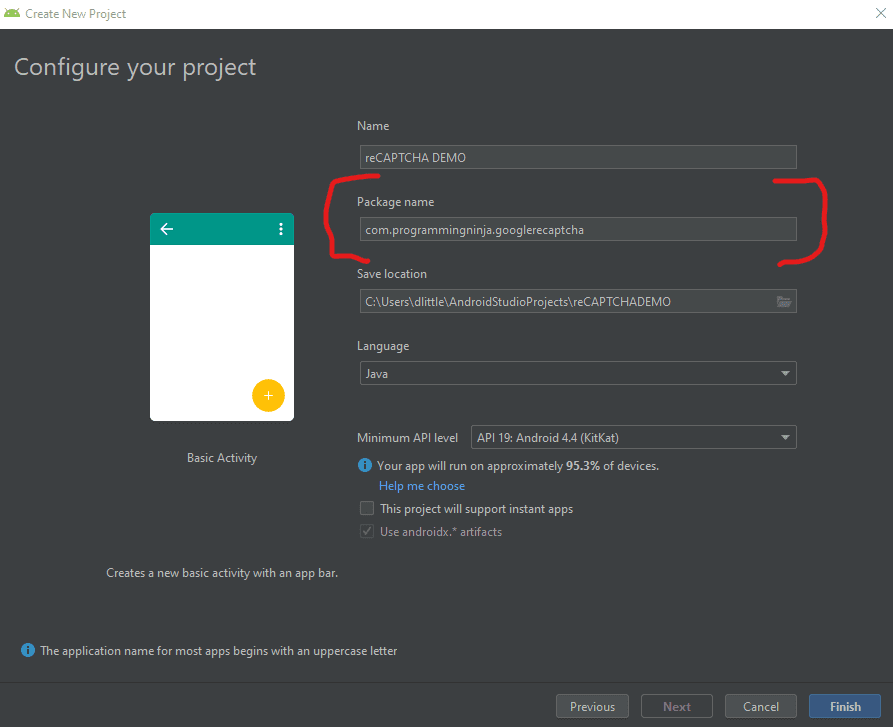
Step 1 – Create New Project w/Android Studio
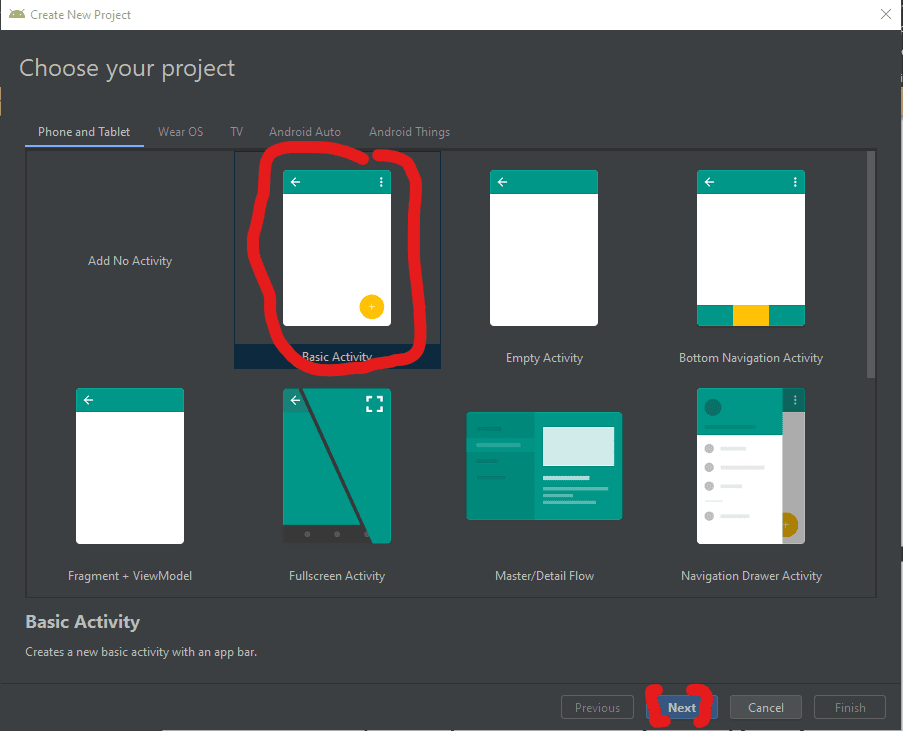
Now lets begin with the fun stuff and to begin you will begin by open Android Studio and then “Create New Project”
- Begin by Start a new Android Studio Project èselect Basic Activity from templates.
NOTE: While creating, use the package name you have registered on reCAPTCHA dashboard.
Step 2 – Setting up the library & AndroidMainfest for the project
Add SafeNet and the Volley dependency to your build.gradle and rebuild the project. Here, I used the following dependency. You can change as per your Android SDK.
NOTE: Volley is used to send HTTP call to our server to validate the captcha token on the server side.
build.gradle
dependencies {
    implementation fileTree(dir: 'libs', include: ['*.jar'])
    implementation 'androidx.appcompat:appcompat:1.1.0'
    implementation 'androidx.constraintlayout:constraintlayout:1.1.3'
    implementation 'com.google.android.material:material:1.0.0'
    testImplementation 'junit:junit:4.12'
    androidTestImplementation 'androidx.test.ext:junit:1.1.1'
    androidTestImplementation 'androidx.test.espresso:espresso-core:3.2.0'

    //dependency for recaptcha (safetynet)
    implementation 'com.google.android.gms:play-services-safetynet:17.0.0'

    //dependency for fast networking for networking
    implementation 'com.android.volley:volley:1.1.0'
}
Now we need to add the app manifest file with the following permission(s). SafetyNet library is used to create the captcha validation in android. Volley library is an HTTP Networkinf library used here for validating captcha response.
AndroidManifest.xml
<uses-permission android:name="android.permission.INTERNET"/>
Step 3 – Implementation of SafetyNet API
If you are still with me then let’s dive into the Java part of the project. We will first ensure that we have all the modules that will be used in the application
Required modules
import android.os.Bundle;
import android.util.Log;
import android.view.View;
import android.widget.Button;
import android.widget.TextView;

import androidx.appcompat.app.AppCompatActivity;
import androidx.annotation.NonNull;

//volley
import com.android.volley.DefaultRetryPolicy;
import com.android.volley.RequestQueue;
import com.android.volley.Request;
import com.android.volley.Response;
import com.android.volley.VolleyError;
import com.android.volley.toolbox.StringRequest;
import com.android.volley.toolbox.Volley;


import com.google.android.gms.common.api.ApiException;
import com.google.android.gms.common.api.CommonStatusCodes;
import com.google.android.gms.safetynet.SafetyNet;
import com.google.android.gms.safetynet.SafetyNetApi;
import com.google.android.gms.tasks.OnFailureListener;
import com.google.android.gms.tasks.OnSuccessListener;

import org.json.JSONObject;

import java.util.HashMap;
import java.util.Map;

import android.view.Menu;
import android.view.MenuItem;
Step 3 – Implementation of SafetyNet API (Continue)
If you are still with me then let’s dive into the Java part of the project. We will first ensure that we have all the modules that will be used in the application
- Replace “Site_Key” and “Site_Secret_Key” with your appropriate “Site Key” and “Secret Key” get from SafetyNet API while registering app.
- The API will check the Server and it has a separate callbacks from success and failure.
- At Success, we will get Captcha Response Token which will be used to validate the user interaction is made by a bot or real human.
- We will discuss how to validate the token with SafetyNet API Server in next step.
NOTE: the call on the created click event
protected void onCreate(Bundle savedInstanceState) {
        super.onCreate(savedInstanceState);
        setContentView(R.layout.activity_main);

        btn = findViewById(R.id.reCaptcha);
        txtV = findViewById(R.id.verifyText);
        btn.setOnClickListener(this);

        requestQueue = Volley.newRequestQueue(getApplicationContext());
    }

    public void onClick(View view){
        SafetyNet.getClient(this).verifyWithRecaptcha(Site_Key)
                .addOnSuccessListener(this, new OnSuccessListener <SafetyNetApi.RecaptchaTokenResponse>(){
                    @Override
                    public void onSuccess(SafetyNetApi.RecaptchaTokenResponse response){
                        if (!response.getTokenResult().isEmpty()){
                            handleCaptchaResult(response.getTokenResult());

                        }
                    }
        })
                .addOnFailureListener(this, new OnFailureListener() {
                    @Override
                    public void onFailure(@NonNull Exception e) {
                        if (e instanceof  ApiException){
                            ApiException apiException = (ApiException)e;
                            Log.d(TAG, "Error Message: " + CommonStatusCodes.getStatusCodeString(apiException.getStatusCode()));
                        } else {
                            Log.d(TAG, "Unknown error type or error" + e.getMessage());
                        }
                    }
                });
    }
Step 4 – Captcha Response Token Validation
- We have to verify the token getting from the server using the secret key.
- It can achieve by using the following.
-
- API Link – https://www.google.com/recaptcha/api/siteverify
- Method – POST
- Params – secret, response (We have to pass the “SECRET_KEY” and “TOKEN” respectively)
NOTE: Volley has
- RequestQueue to maintain the server calls in queue.
- RetryPolicy to retry the server call if it is fail with TimeOut and Retry Count. We can change those values.
- StringRequest is used for getting Response as JSON String.
- Method.POST denotes the call as POST method.
- Params are passed to server using Map, HashMap.
The SafetyNet API provides the response respective to the parameters passed and the success is Boolean Datatype.
void handleCaptchaResult(final String responseToken){
        String url = "https://www.google.com/recaptcha/api/siteverify"; //consider using global variable here
        StringRequest request = new StringRequest(Request.Method.POST, url, new Response.Listener<String>() {
            @Override
            public void onResponse(String response) {
                try {
                    JSONObject jsonObject = new JSONObject(response);
                    if (jsonObject.getBoolean("success")) {
                        txtV.setTextSize(35);
                        txtV.setText("Congratulations! You're not a robot anymore");
                    }
                } catch (Exception ex) {
                    Log.d(TAG, "Error message: " + ex.getMessage());
                }
            }
        },
                new Response.ErrorListener() {
                    @Override
                    public void onErrorResponse(VolleyError error) {
                        Log.d(TAG, "Error message: " + error.getMessage());
                    }
                })
        {
            @Override
            protected Map<String,String> getParams(){
                Map<String,String> params = new HashMap<>();
                params.put("secret", Site_Secret_Key);
                params.put("response", responseToken);
                return params;
            }
        };
        request.setRetryPolicy(new DefaultRetryPolicy(50000,DefaultRetryPolicy.DEFAULT_MAX_RETRIES,DefaultRetryPolicy.DEFAULT_BACKOFF_MULT));
        requestQueue.add(request);
    }
Full Review / Conclusion
In this blog tutorial, I was able to show you how to use Google’s reCAPTCHA in our Android app. Understand using reCAPTCHA in any app, we need to get one Site key and one Secret key and after that, we request for the captcha from the reCAPTCHA server. Once we get the reCAPTCHA and the user has entered the captcha, we send the entered value to the reCPATCA server and get the captcha token. This token is sent to our server and our server along with the secret key send the token to the reCAPTCHA server again. After that, we get some success message and that message is conveyed to our Android app.
NOTE: I have also displayed below the code for the layout for the main activity as well. This is the just a simple layout but the practical could be implemented with very little ease.
import android.os.Bundle;
import android.util.Log;
import android.view.View;
import android.widget.Button;
import android.widget.TextView;

import androidx.appcompat.app.AppCompatActivity;
import androidx.annotation.NonNull;

//volley
import com.android.volley.DefaultRetryPolicy;
import com.android.volley.RequestQueue;
import com.android.volley.Request;
import com.android.volley.Response;
import com.android.volley.VolleyError;
import com.android.volley.toolbox.StringRequest;
import com.android.volley.toolbox.Volley;


import com.google.android.gms.common.api.ApiException;
import com.google.android.gms.common.api.CommonStatusCodes;
import com.google.android.gms.safetynet.SafetyNet;
import com.google.android.gms.safetynet.SafetyNetApi;
import com.google.android.gms.tasks.OnFailureListener;
import com.google.android.gms.tasks.OnSuccessListener;

import org.json.JSONObject;

import java.util.HashMap;
import java.util.Map;

import com.google.android.material.floatingactionbutton.FloatingActionButton;
import com.google.android.material.snackbar.Snackbar;

import androidx.appcompat.widget.Toolbar;


import android.view.Menu;
import android.view.MenuItem;

public class MainActivity extends AppCompatActivity implements View.OnClickListener {

    String TAG = MainActivity.class.getSimpleName();
    Button btn;
    TextView txtV;
 // TODO - replace the SITE KEY with yours
    String Site_Key = "6LcFP8cUAAAAALPrBpvuSPileb7vd"; //consider making global variable(this will not work not a valid key)
 // TODO - replace the Secret KEY with yours
    String Site_Secret_Key = "6LcFP8cUAAAAAJyKpv8FKRkd1bSnR-"; //consider making global variable(this will not work not a valid key)
    RequestQueue requestQueue;

    //application space controls
    @Override
    protected void onCreate(Bundle savedInstanceState) {
        super.onCreate(savedInstanceState);
        setContentView(R.layout.activity_main);

        btn = findViewById(R.id.reCaptcha);
        txtV = findViewById(R.id.verifyText);
        btn.setOnClickListener(this);

        requestQueue = Volley.newRequestQueue(getApplicationContext());
    }

    @Override
    public void onClick(View view){
        SafetyNet.getClient(this).verifyWithRecaptcha(Site_Key)
                .addOnSuccessListener(this, new OnSuccessListener <SafetyNetApi.RecaptchaTokenResponse>(){
                    @Override
                    public void onSuccess(SafetyNetApi.RecaptchaTokenResponse response){
                        if (!response.getTokenResult().isEmpty()){
                            handleCaptchaResult(response.getTokenResult());

                        }
                    }
        })
                .addOnFailureListener(this, new OnFailureListener() {
                    @Override
                    public void onFailure(@NonNull Exception e) {
                        if (e instanceof  ApiException){
                            ApiException apiException = (ApiException)e;
                            Log.d(TAG, "Error Message: " + CommonStatusCodes.getStatusCodeString(apiException.getStatusCode()));
                        } else {
                            Log.d(TAG, "Unknown error type or error" + e.getMessage());
                        }
                    }
                });
    }

    void handleCaptchaResult(final String responseToken){
        String url = "https://www.google.com/recaptcha/api/siteverify"; //consider using global variable here
        StringRequest request = new StringRequest(Request.Method.POST, url, new Response.Listener<String>() {
            @Override
            public void onResponse(String response) {
                try {
                    JSONObject jsonObject = new JSONObject(response);
                    if (jsonObject.getBoolean("success")) {
                        txtV.setTextSize(35);
                        txtV.setText("Congratulations! You're not a robot anymore");
                    }
                } catch (Exception ex) {
                    Log.d(TAG, "Error message: " + ex.getMessage());
                }
            }
        },
                new Response.ErrorListener() {
                    @Override
                    public void onErrorResponse(VolleyError error) {
                        Log.d(TAG, "Error message: " + error.getMessage());
                    }
                })
        {
            @Override
            protected Map<String,String> getParams(){
                Map<String,String> params = new HashMap<>();
                params.put("secret", Site_Secret_Key);
                params.put("response", responseToken);
                return params;
            }
        };
        request.setRetryPolicy(new DefaultRetryPolicy(50000,DefaultRetryPolicy.DEFAULT_MAX_RETRIES,DefaultRetryPolicy.DEFAULT_BACKOFF_MULT));
        requestQueue.add(request);
    }
}
<androidx.constraintlayout.widget.ConstraintLayout
    xmlns:android="http://schemas.android.com/apk/res/android"
    xmlns:app="http://schemas.android.com/apk/res-auto"
    xmlns:tools="http://schemas.android.com/tools"
    android:layout_width="match_parent"
    android:layout_height="match_parent"
    tools:context=".MainActivity">
    <LinearLayout
        android:layout_height="match_parent"
        android:layout_width="match_parent"
        android:orientation="vertical">

        <Button
            android:id="@+id/reCaptcha"
            android:layout_height="wrap_content"
            android:layout_width="wrap_content"
            android:text="Show reCAPTCHA"/>

        <TextView
            android:id="@+id/verifyText"
            android:layout_width="wrap_content"
            android:layout_height="wrap_content"
            android:capitalize="characters"
            android:text="Hello World"
            android:textSize="24sp" />

    </LinearLayout>
</androidx.constraintlayout.widget.ConstraintLayout>
- Published in Android, API, blog, Java, Mobile Development, Programming Languages