Shimmering in Android
You may or may not have been aware of certain UX effects within the Facebook application that fires when attempting to retrieve a large amount of data from the network. This library was created by the developers over at Facebook so big shout out to their developer team. This library serves to provide an alternative method of notifying the user that data is being retrieved rather than using the old traditional ProgressBar. There is no surprise that later on Facebook released an open-source library called shimmer which any developer can now implement the shimmer effect.
In this article, we are demonstrating how to execute the shimmer in any android application. We are going to attempt to fetch data from the API using the dependency Fast Android Networking and then display the data in the recycler view. So let’s get to what you’re interested in the code.
Begining the Application
So fire up the Android Studio and create a new project:
- Select Empty Acivity and select next
- Name: Application Name
- Package Name: com.programmingninja.applicationame
- Language: Kotlin
- Minimum SDK: API 19
- “FINISH”
Adding ‘Dependencies’
Add the following dependencies in your app level build.gradle and sync
dependencies {
    implementation fileTree(dir: "libs", include: ["*.jar"])
    implementation "org.jetbrains.kotlin:kotlin-stdlib:$kotlin_version"
    implementation 'androidx.core:core-ktx:1.3.1'
    implementation 'androidx.appcompat:appcompat:1.1.0'
    implementation 'androidx.constraintlayout:constraintlayout:1.1.3'
    implementation 'androidx.recyclerview:recyclerview:1.2.0-alpha05'
    implementation 'com.github.bumptech.glide:glide:4.11.0'
    testImplementation 'junit:junit:4.12'
    androidTestImplementation 'androidx.test.ext:junit:1.1.1'
    androidTestImplementation 'androidx.test.espresso:espresso-core:3.2.0'

    //adding dependencies
    implementation 'com.github.bumptech.glide:glide:4.11.0'
    implementation 'com.facebook.shimmer:shimmer:0.5.0@aar'
    implementation 'com.amitshekhar.android:android-networking:1.0.2'
    implementation 'androidx.recyclerview:recyclerview:1.2.0-alpha05'
}
Within the ‘values’ folder need to add the color code to use in the application. Note adding this background color should be grey or any non-white color since the shimmering effect won’t be visible if you are using a white background.
<color name="colorGrey">#dddddd</color>
Find the AndroidManifest file and add the following permission within the <manifest></manifest> block
<uses-permission android:name="android.permission.INTERNET" />
To give you some background on the dependencies we add the first is for the media management for loading images. Then we have the Facebook shimmering dependency along with Fast-Android-Networking and using the recyclerview in the project.
Now we are going to create a new layout called layout_item.xml within the layout folder. Please add the following code:
<?xml version="1.0" encoding="utf-8"?>
<androidx.constraintlayout.widget.ConstraintLayout xmlns:android="http://schemas.android.com/apk/res/android"
    xmlns:tools="http://schemas.android.com/tools"
    android:layout_width="match_parent"
    android:layout_height="wrap_content"
    xmlns:app="http://schemas.android.com/apk/res-auto"
    android:id="@+id/item_container">

    <androidx.appcompat.widget.AppCompatImageView
        android:layout_width="60dp"
        android:layout_height="60dp"
        android:id="@+id/img_item_avatar"
        android:padding="4dp"
        app:layout_constraintTop_toBottomOf="parent"
        app:layout_constraintStart_toStartOf="parent"
        app:layout_constraintBottom_toTopOf="parent" />

    <androidx.appcompat.widget.AppCompatTextView
        android:layout_width="0dp"
        android:layout_height="wrap_content"
        android:id="@+id/tv_item_id"
        style="@style/TextAppearance.AppCompat.Medium"
        android:layout_marginStart="8dp"
        android:layout_marginTop="4dp"
        app:layout_constraintEnd_toEndOf="parent"
        app:layout_constraintStart_toEndOf="@+id/img_item_avatar"
        app:layout_constraintTop_toTopOf="parent"
        tools:text="Pokemon No" />

    <androidx.appcompat.widget.AppCompatTextView
        android:layout_width="0dp"
        android:layout_height="wrap_content"
        android:id="@+id/tv_item_name"
        style="@style/TextAppearance.AppCompat.Large"
        android:layout_marginStart="8dp"
        android:layout_marginTop="4dp"
        app:layout_constraintEnd_toEndOf="parent"
        app:layout_constraintStart_toStartOf="@id/tv_item_id"
        app:layout_constraintTop_toBottomOf="@id/tv_item_id"
        tools:text="Pokemon Name" />

    <androidx.appcompat.widget.AppCompatTextView
        android:layout_width="0dp"
        android:layout_height="wrap_content"
        android:id="@+id/tv_item_email"
        app:layout_constraintEnd_toEndOf="parent"
        app:layout_constraintStart_toStartOf="@id/tv_item_name"
        app:layout_constraintTop_toBottomOf="@id/tv_item_name"
        tools:text="Pokemon Attribute" />
</androidx.constraintlayout.widget.ConstraintLayout>
Now create another layout within the folder called layout_shimmer and then add the following code:
<?xml version="1.0" encoding="utf-8"?>
<androidx.constraintlayout.widget.ConstraintLayout
    xmlns:android="http://schemas.android.com/apk/res/android"
    xmlns:app="http://schemas.android.com/apk/res-auto"
    xmlns:tools="http://schemas.android.com/tools"
    android:id="@+id/shimmer_container"
    android:layout_width="match_parent"
    android:layout_height="60dp">

    <androidx.appcompat.widget.AppCompatImageView
        android:layout_width="60dp"
        android:layout_height="0dp"
        android:id="@+id/img_shim_avatar"
        android:background="@color/colorGrey"
        android:padding="4dp"
        app:layout_constraintBottom_toBottomOf="parent"
        app:layout_constraintStart_toStartOf="parent"
        app:layout_constraintBottom_toTopOf="parent" />

    <androidx.appcompat.widget.AppCompatTextView
        android:layout_width="0dp"
        android:layout_height="wrap_content"
        android:id="@+id/tv_shim_id"
        android:background="@color/colorGrey"
        style="@style/TextAppearance.AppCompat.Medium"
        android:layout_marginStart="8dp"
        android:layout_marginTop="4dp"
        app:layout_constraintEnd_toEndOf="parent"
        app:layout_constraintTop_toTopOf="parent"
        app:layout_constraintStart_toEndOf="@+id/img_shim_avatar"
        tools:text="#025" />

    <androidx.appcompat.widget.AppCompatTextView
        android:layout_width="0dp"
        android:layout_height="wrap_content"
        android:id="@+id/tv_shim_name"
        android:background="@color/colorGrey"
        style="@style/TextAppearance.AppCompat.Large"
        android:layout_marginStart="8dp"
        android:layout_marginTop="4dp"
        app:layout_constraintEnd_toEndOf="parent"
        app:layout_constraintStart_toStartOf="@+id/tv_shim_id"
        app:layout_constraintTop_toBottomOf="@id/tv_shim_id"
        tools:text="Pikachu" />

    <androidx.appcompat.widget.AppCompatTextView
        android:layout_width="0dp"
        android:layout_height="wrap_content"
        android:id="@+id/tv_shim_email"
        android:background="@color/colorGrey"
        app:layout_constraintEnd_toEndOf="parent"
        app:layout_constraintStart_toStartOf="@+id/tv_shim_name"
        app:layout_constraintTop_toBottomOf="@id/tv_shim_name"
        tools:text="Electric"/>

</androidx.constraintlayout.widget.ConstraintLayout>
Let’s tackle the activity_main.xml in the layout folder and add the below code but before adding let’s provide some context to the XML:
- We are going to add the ShimmerFrameLayout
- Within the shimmerframelayout we are going to add some placeholders inside a LinearLayout.
- Note: that the added placeholder displays multiple times to create the appearance as a list
Then we will add a recyclerview that will display the list of data fetched after executing the network request from the API.
<?xml version="1.0" encoding="utf-8"?>
<androidx.constraintlayout.widget.ConstraintLayout
    xmlns:android="http://schemas.android.com/apk/res/android"
    xmlns:app="http://schemas.android.com/apk/res-auto"
    xmlns:tools="http://schemas.android.com/tools"
    android:layout_width="match_parent"
    android:layout_height="match_parent"
    tools:context=".MainActivity">

    <com.facebook.shimmer.ShimmerFrameLayout
        android:layout_width="match_parent"
        android:layout_height="match_parent"
        android:id="@+id/frame_shimmer"
        android:orientation="vertical"
        android:layout_gravity="center">
        <!-- Add 20 Placeholder -->
        <androidx.appcompat.widget.LinearLayoutCompat
            android:layout_width="match_parent"
            android:layout_height="wrap_content"
            android:orientation="vertical">
            <include layout="@layout/layout_shimmer" />
            <include layout="@layout/layout_shimmer" />
            <include layout="@layout/layout_shimmer" />
            <include layout="@layout/layout_shimmer" />
            <include layout="@layout/layout_shimmer" />
            <include layout="@layout/layout_shimmer" />
            <include layout="@layout/layout_shimmer" />
            <include layout="@layout/layout_shimmer" />
            <include layout="@layout/layout_shimmer" />
            <include layout="@layout/layout_shimmer" />
            <include layout="@layout/layout_shimmer" />
            <include layout="@layout/layout_shimmer" />
            <include layout="@layout/layout_shimmer" />
            <include layout="@layout/layout_shimmer" />
            <include layout="@layout/layout_shimmer" />
            <include layout="@layout/layout_shimmer" />
            <include layout="@layout/layout_shimmer" />
            <include layout="@layout/layout_shimmer" />
            <include layout="@layout/layout_shimmer" />
            <include layout="@layout/layout_shimmer" />
        </androidx.appcompat.widget.LinearLayoutCompat>
    </com.facebook.shimmer.ShimmerFrameLayout>

    <androidx.recyclerview.widget.RecyclerView
        android:layout_width="match_parent"
        android:layout_height="match_parent"
        android:id="@+id/list_view"
        android:visibility="gone" />

</androidx.constraintlayout.widget.ConstraintLayout>
Create we need to create a data class User:
import com.google.gson.annotations.SerializedName

data class User (
    @SerializedName("id")
    val id: Int = 0,
    @SerializedName("name")
    val name: String = "",
    @SerializedName("email")
    val email: String = "",
    @SerializedName("avatar")
    val avatar: String = ""
)
Then create an adapater to c
import android.view.LayoutInflater
import android.view.View
import android.view.ViewGroup
import androidx.appcompat.view.menu.ActionMenuItemView
import androidx.recyclerview.widget.RecyclerView
import com.bumptech.glide.Glide
import com.programmingninja.crius.R
import kotlinx.android.synthetic.main.layout_item.view.*

class Adapter(private val users: ArrayList<User>) : RecyclerView.Adapter<Adapter.DataViewHolder>() {
    class DataViewHolder(itemView: View) : RecyclerView.ViewHolder(itemView) {
        fun bind(user: User) {
            itemView.tv_item_id.text = "No: ${user.id}"
            itemView.tv_item_name.text = "Hello: ${user.name}"
            itemView.tv_item_email.text = "E: ${user.email}"
            Glide.with(itemView.img_item_avatar.context).load(user.avatar).into(itemView.img_item_avatar)
        }
    }

    override fun onCreateViewHolder(parent: ViewGroup, viewType: Int) = DataViewHolder(LayoutInflater.from(parent.context).inflate(R.layout.layout_item, parent, false))

    override fun getItemCount(): Int = users.size

    override fun onBindViewHolder(holder: DataViewHolder, position: Int) {
        holder.bind(users[position])
    }

    fun addData(list: List<User>) {
        users.addAll(list)
    }
}
After completing the adapter now select your MainActivity and now time to complete the following kt file:
To keep in mind to start the shimmering effect as soon as the application opens, we add the startShimmer() within the onResume() activity lifecycle and then we stop it with stopShimmer() within the onPause() activity lifecycle method.
import androidx.appcompat.app.AppCompatActivity
import android.os.Bundle
import android.view.View
import android.widget.Toast
import androidx.recyclerview.widget.DividerItemDecoration
import androidx.recyclerview.widget.LinearLayoutManager
import com.androidnetworking.AndroidNetworking
import com.androidnetworking.error.ANError
import com.androidnetworking.interfaces.ParsedRequestListener
import com.programmingninja.crius.helper.Adapter
import com.programmingninja.crius.helper.User
import kotlinx.android.synthetic.main.activity_main.*

class MainActivity : AppCompatActivity() {

    private lateinit var adapter: Adapter

    override fun onCreate(savedInstanceState: Bundle?) {
        super.onCreate(savedInstanceState)
        setContentView(R.layout.activity_main)
        setupUI()
        setAPICall()
    }

    private fun setAPICall() {
        AndroidNetworking.initialize(applicationContext)
        AndroidNetworking.get("https://5e510330f2c0d300147c034c.mockapi.io/users").build()
            .getAsObjectList(User::class.java, object : ParsedRequestListener<List<User>> {
                override fun onResponse(responses: List<User>) {
                    frame_shimmer.stopShimmer()
                    frame_shimmer.visibility = View.GONE
                    list_view.visibility = View.VISIBLE
                    adapter.addData(responses)
                    adapter.notifyDataSetChanged()
                }

                override fun onError(anError: ANError?) {
                    frame_shimmer.visibility = View.GONE
                    Toast.makeText(this@MainActivity, "Something went wrong", Toast.LENGTH_LONG).show()
                }
            })
    }

    private fun setupUI() {
        list_view.layoutManager = LinearLayoutManager(this)
        adapter = Adapter(arrayListOf())
        list_view.addItemDecoration(DividerItemDecoration(list_view.context,(list_view.layoutManager as LinearLayoutManager).orientation))
        list_view.adapter = adapter
    }

    override fun onResume() {
        super.onResume()
        frame_shimmer.startShimmer()
    }

    override fun onPause() {
        frame_shimmer.stopShimmer()
        super.onPause()

    }
}
Take forcus on the following code below to stop the shimmering effect and get the recyclerview to become visible after the network request is executed and data populate in the recyclerview
override fun onResponse(responses: List<User>) {
    frame_shimmer.stopShimmer()
    frame_shimmer.visibility = View.GONE
    list_view.visibility = View.VISIBLE
    adapter.addData(responses)
    adapter.notifyDataSetChanged()
}
Done
This is all that is needed to fire the application. Hope you enjoyed the read if you need anything else message me for additional assistance.
Happy Learning!!
- Published in Android, Kotlin, Programming Languages
Android, SQLite & Kotlin

The name of the database in Android is SQLite. SQLite is the name of the open-source sql database that stores the data in the text file in the device. Here, we will be review and explaining how to execute them with the Kotlin language.
Before diving into the implementation we are going to review a little in details regarding the SQLite class. There are many methods available in the SQLiteDatabase class but the ones we will use are below
| Method | Description |
| execSQL(): Unit | Executes the SQL query, this is not to be mistaken for a select query |
| insert(): Long | Insert a record into the database |
| update(): Int | Fires the update request on a select row |
| delete(): | |
| query(): Cursor | Returns a cursor over the resultset |
HandlerDB
First we are going to create a class that extends to the SQLiteOpenHelper and override its onCreate(), onUpgrade() functions.
- CreatePerson – will insert the data by passing the ContentvValues to object to the insert() method
- UpdatePerson – will update the record by passining the ContentValues to the update() method
- DeletePerson – will delete the record by passing the Content
- ViewPerson – Will create a list adding the records to return to the view
package com.programmingninja.coeus.helper

import android.content.ContentValues
import android.content.Context
import android.database.Cursor
import android.database.sqlite.SQLiteDatabase
import android.database.sqlite.SQLiteException
import android.database.sqlite.SQLiteOpenHelper
import com.programmingninja.coeus.model.PersonModel
import java.time.LocalDateTime

import kotlin.collections.ArrayList

class HandlerDB (context: Context): SQLiteOpenHelper(context, DATABASE_NAME,null,DATABASE_VERSION) {
    companion object {
        private val DATABASE_VERSION = 1
        private val DATABASE_NAME = "ProjectTitan"
        private val TABLE_NAME = "Person"
        private val KEY_ID = "userid"
        private val KEY_USERNAME = "username"
        private val KEY_FIRST_NAME = "firstname"
        private val KEY_LAST_NAME = "lastname"
    }

    override fun onCreate(db: SQLiteDatabase?) {
        //creating the table and columns
        val CREATE_PERSON_TABLE = ("CREATE TABLE $TABLE_NAME (" +
                "$KEY_ID TEXT PRIMARY KEY," +
                "$KEY_USERNAME TEXT," +
                "$KEY_FIRST_NAME TEXT," +
                "$KEY_LAST_NAME TEXT," +
                "timestamp DEFAULT CURRENT_TIMESTAMP)")
        db?.execSQL(CREATE_PERSON_TABLE)
    }

    override fun onUpgrade(db: SQLiteDatabase?, oldVersion: Int, newVersion: Int) {
        db!!.execSQL("DROP TABLE IF EXISTS $TABLE_NAME")
    }

    //method to read data
    fun ViewPerson(): List<PersonModel> {
        val personList:ArrayList<PersonModel> = ArrayList()
        val personCandidates = "SELECT * FROM $TABLE_NAME"
        val db = this.readableDatabase

        val cursor: Cursor?
        try {
            cursor = db.rawQuery(personCandidates, null)
        } catch (e: SQLiteException) {
            db.execSQL(personCandidates)
            return ArrayList()
        }

        var userId: String
        var userName: String
        var fName: String
        var lName: String

        if (cursor.moveToFirst()) {
            do {
                userId = cursor.getString(cursor.getColumnIndex("userid"))
                userName = cursor.getString(cursor.getColumnIndex("username"))
                fName = cursor.getString(cursor.getColumnIndex("firstname"))
                lName = cursor.getString(cursor.getColumnIndex("lastname"))

                val person = PersonModel(userId = userId, userName = userName, fName = fName, lName = lName)
                personList.add(person)
            } while (cursor.moveToNext())
        }
        return personList
    }

    //method to create data
    fun CreatePerson(person: PersonModel): Long {
        val db = this.writableDatabase
        val cv = ContentValues()
        cv.put(KEY_ID, person.userId)
        cv.put(KEY_USERNAME, person.userName)
        cv.put(KEY_FIRST_NAME, person.fName)
        cv.put(KEY_LAST_NAME, person.lName)

        //now insert into the db
        val successfulInsert = db.insert(TABLE_NAME, null, cv)
        db.close()
        return successfulInsert
    }

    //method to update data

    fun UpdatePerson(person: PersonModel): Int {
        val db = this.writableDatabase
        val cv = ContentValues()

        cv.put(KEY_USERNAME, person.userName)
        cv.put(KEY_FIRST_NAME, person.fName)
        cv.put(KEY_LAST_NAME, person.lName)

        val whereClause = "${KEY_ID} = ?"
        val whereArgs = arrayOf(person.userId.toString())

        //attempt to update the record
        val successfulUpdate = db.update(TABLE_NAME, cv, whereClause, whereArgs)
        db.close()
        return successfulUpdate
    }

    //method to delete data
    fun DeletePerson(person: PersonModel): Int {
        val db = this.writableDatabase
        val cv = ContentValues()
        cv.put(KEY_ID, person.userId)

        val whereClause = "${KEY_ID} = ?"
        val whereArg = arrayOf(person.userId.toString())
        //delete candidate
        val successfulDelete = db.delete(TABLE_NAME, whereClause, whereArg)
        db.close()
        return successfulDelete
    }
}
activity_main.xml
Now we are going to work on the main xml layout. This is going to be the main display the user interacts with
<?xml version="1.0" encoding="utf-8"?>
<androidx.constraintlayout.widget.ConstraintLayout
    xmlns:android="http://schemas.android.com/apk/res/android"
    xmlns:app="http://schemas.android.com/apk/res-auto"
    xmlns:tools="http://schemas.android.com/tools"
    android:layout_width="match_parent"
    android:layout_height="match_parent"
    tools:context=".MainActivity">

    <androidx.appcompat.widget.LinearLayoutCompat
        android:layout_width="match_parent"
        android:layout_height="match_parent"
        android:layout_marginBottom="8dp"
        android:layout_marginEnd="8dp"
        android:layout_marginStart="8dp"
        android:layout_marginTop="8dp"
        android:orientation="vertical">

        <TableLayout
            android:layout_width="match_parent"
            android:layout_height="wrap_content">
            <TableRow>
                <androidx.appcompat.widget.AppCompatTextView
                    android:layout_width="wrap_content"
                    android:layout_height="wrap_content"
                    android:hint="User ID"
                    android:layout_column="1"/>
                <androidx.appcompat.widget.AppCompatTextView
                    android:layout_width="wrap_content"
                    android:layout_height="wrap_content"
                    android:id="@+id/tv_userId"
                    android:layout_marginLeft="20dp"
                    android:layout_marginStart="20dp"
                    android:width="150dp"/>
            </TableRow>
            <TableRow>
                <androidx.appcompat.widget.AppCompatTextView
                    android:layout_width="wrap_content"
                    android:layout_height="wrap_content"
                    android:hint="Username"
                    android:layout_column="1"/>
                <androidx.appcompat.widget.AppCompatEditText
                    android:layout_width="match_parent"
                    android:layout_height="wrap_content"
                    android:id="@+id/et_userName"
                    android:layout_marginLeft="20dp"
                    android:layout_marginStart="20dp"
                    android:width="150dp"/>
            </TableRow>
            <TableRow>
                <androidx.appcompat.widget.AppCompatTextView
                    android:layout_width="wrap_content"
                    android:layout_height="wrap_content"
                    android:hint="First Name"
                    android:layout_column="1"/>
                <androidx.appcompat.widget.AppCompatEditText
                    android:layout_width="match_parent"
                    android:layout_height="wrap_content"
                    android:id="@+id/et_fName"
                    android:layout_marginLeft="20dp"
                    android:layout_marginStart="20dp"
                    android:width="150dp"/>
            </TableRow>
            <TableRow>
                <androidx.appcompat.widget.AppCompatTextView
                    android:layout_width="wrap_content"
                    android:layout_height="wrap_content"
                    android:hint="Last Name"
                    android:layout_column="1"/>
                <androidx.appcompat.widget.AppCompatEditText
                    android:layout_width="match_parent"
                    android:layout_height="wrap_content"
                    android:id="@+id/et_lName"
                    android:layout_marginLeft="20dp"
                    android:layout_marginStart="20dp"
                    android:width="150dp"/>
            </TableRow>

        </TableLayout>
        <androidx.appcompat.widget.LinearLayoutCompat
            android:layout_width="match_parent"
            android:layout_height="wrap_content"
            android:layout_marginTop="20dp">

            <ListView
                android:id="@+id/listView"
                android:layout_width="wrap_content"
                android:layout_height="350sp"
                android:longClickable="false" />
        </androidx.appcompat.widget.LinearLayoutCompat>

        <androidx.appcompat.widget.LinearLayoutCompat
            android:layout_width="wrap_content"
            android:layout_height="wrap_content"
            android:layout_marginTop="40dp"
            android:orientation="horizontal"
            android:layout_gravity="center">
            <androidx.appcompat.widget.AppCompatButton
                android:layout_width="wrap_content"
                android:layout_height="wrap_content"
                android:text="View"
                android:id="@+id/pressMe"
                android:onClick="ViewRecord" />
            <androidx.appcompat.widget.AppCompatButton
                android:layout_width="wrap_content"
                android:layout_height="wrap_content"
                android:text="Save"
                android:onClick="SaveRecord" />
            <androidx.appcompat.widget.AppCompatButton
                android:layout_width="wrap_content"
                android:layout_height="wrap_content"
                android:text="Update"
                android:onClick="UpdateRecord" />
            <androidx.appcompat.widget.AppCompatButton
                android:layout_width="wrap_content"
                android:layout_height="wrap_content"
                android:text="Delete"
                android:onClick="DeleteRecord" />
        </androidx.appcompat.widget.LinearLayoutCompat>
    </androidx.appcompat.widget.LinearLayoutCompat>
</androidx.constraintlayout.widget.ConstraintLayout>
Update Person Alert
//creat the layout to display an alertdialog to update request item
<?xml version="1.0" encoding="utf-8"?>
<LinearLayout xmlns:android="http://schemas.android.com/apk/res/android"
    android:layout_width="match_parent"
    android:layout_height="match_parent"
    android:padding="10dp"
    android:orientation="vertical">

    <androidx.appcompat.widget.AppCompatTextView
        android:layout_width="match_parent"
        android:layout_height="wrap_content"
        android:id="@+id/tv_userId_update"
        android:ems="10"
        android:text="User Id"/>

    <androidx.appcompat.widget.AppCompatEditText
        android:layout_width="match_parent"
        android:layout_height="wrap_content"
        android:id="@+id/et_nameUser_update"
        android:ems="10"
        android:hint="username"/>

    <androidx.appcompat.widget.AppCompatEditText
        android:layout_width="match_parent"
        android:layout_height="wrap_content"
        android:id="@+id/et_firstname_update"
        android:ems="10"
        android:hint="first name"/>

    <androidx.appcompat.widget.AppCompatEditText
        android:layout_width="match_parent"
        android:layout_height="wrap_content"
        android:id="@+id/et_lastname_update"
        android:ems="10"
        android:hint="Last Name"/>
</LinearLayout>
Delete Person Alert
<?xml version="1.0" encoding="utf-8"?>
<LinearLayout xmlns:android="http://schemas.android.com/apk/res/android"
    android:layout_width="match_parent"
    android:layout_height="match_parent"
    android:orientation="vertical"
    android:padding="10dp">

    <androidx.appcompat.widget.AppCompatTextView
        android:layout_width="match_parent"
        android:layout_height="wrap_content"
        android:id="@+id/tv_userId_delete"
        android:textSize="20dp"
        android:text="userid" />

    <androidx.appcompat.widget.AppCompatTextView
        android:layout_width="match_parent"
        android:layout_height="wrap_content"
        android:id="@+id/tv_Name_delete"
        android:textSize="20dp"
        android:text="Name"/>

</LinearLayout>
MainActivity.kt
Now we are focusing on the MainActivity.kt class and we are going to add the following code. In this class, the following functions are going to be added:
- saveRecord() function which creates the records.
- viewRecord() function will read all the records and displays them into ListView,
- updateRecord() function updates the record on the basis on id, and
- deleteRecord() function deletes the record.
The val db = DatabaseHandler(this) creates the instance of HandlerDB class calls the SQLite database logic.
package com.programmingninja.coeus

import android.content.DialogInterface
import androidx.appcompat.app.AppCompatActivity
import android.os.Bundle
import android.view.View
import android.widget.AdapterView
import android.widget.EditText
import android.widget.TextView
import android.widget.Toast
import androidx.appcompat.app.AlertDialog
import androidx.appcompat.widget.AppCompatButton
import androidx.appcompat.widget.AppCompatEditText
import androidx.appcompat.widget.AppCompatTextView
import com.programmingninja.coeus.helper.HandlerDB
import com.programmingninja.coeus.helper.MyListadapter
import com.programmingninja.coeus.model.PersonModel
import kotlinx.android.synthetic.main.activity_main.*
import kotlinx.android.synthetic.main.activity_main.view.*
import kotlinx.android.synthetic.main.update_person.*
import java.util.*

class MainActivity : AppCompatActivity() {
    override fun onCreate(savedInstanceState: Bundle?) {
        super.onCreate(savedInstanceState)
        setContentView(R.layout.activity_main)
    }

    //method for reviewing records
    fun ViewRecord (view:View) {
        //creating the instance of the db handler
        val dbHandler = HandlerDB(this)
        //calling the person view
        val person: List<PersonModel> = dbHandler.ViewPerson()
        val personArrayId = Array<String>(person.size){"0"}
        val personArrayUsername = Array<String>(person.size){""}
        val personArrayFirst = Array<String>(person.size){""}
        val personArrayLast = Array<String>(person.size){""}

        for ((index, p) in person.withIndex()) {
            personArrayId[index] = p.userId
            personArrayUsername[index] = p.userName
            personArrayFirst[index] = p.fName
            personArrayLast[index] = p.lName
        }
        //creating custom adapter
        val listAdapter = MyListadapter(this, personArrayId, personArrayUsername, personArrayFirst, personArrayLast)
        listView.adapter = listAdapter
        listView.onItemClickListener = AdapterView.OnItemClickListener {
                adapterView, view, position, id ->
            //Toast.makeText(applicationContext, "${person[position].userId}",Toast.LENGTH_LONG).show()
            UpdateRecord(person[position].userId)
        }
        listView.onItemLongClickListener = AdapterView.OnItemLongClickListener {
            adapterView, view, position, l ->
            DeleteRecord(person[position].userId, person[position].fName + " " +  person[position].lName)
        }
    }
    //method for deleting a record
     fun DeleteRecord(deleteUserId: String, deleteUserName: String): Boolean {
        //create AlertDisplay
        val alertDialog = AlertDialog.Builder(this)
        val inflater = this.layoutInflater
        val dv = inflater.inflate(R.layout.delete_person, null)

        alertDialog.setView(dv)

        val delete_id = dv.findViewById<AppCompatTextView>(R.id.tv_userId_delete)
        val delete_name = dv.findViewById<AppCompatTextView>(R.id.tv_Name_delete)
        delete_id.text = deleteUserId
        delete_name.text = deleteUserName
        val deletePersonId = delete_id.text

        alertDialog.setTitle("Delete User")
        alertDialog.setMessage("Are you sure you want to delete the user")
        alertDialog.setPositiveButton("Yes, Delete", DialogInterface.OnClickListener { _,_->
            //creating the instance of the handler
            val db = HandlerDB(this)

            //calling the delete method within the handler
            val status = db.DeletePerson(PersonModel(deletePersonId.toString(),"","",""))
            if (status > -1) {
                Toast.makeText(applicationContext, "User has been deleted", Toast.LENGTH_LONG).show()
                val buttonPress = findViewById<AppCompatButton>(R.id.pressMe)
                buttonPress.performClick()
            }
        })

        alertDialog.setNegativeButton("Cancel", DialogInterface.OnClickListener { _, _->

        })
        val b = alertDialog.create()
        b.show()
        return false
    }

    //method for updating a record
     fun UpdateRecord(updatingUser: String) {
        val alertBuilder = AlertDialog.Builder(this)
        val inflater = this.layoutInflater
        val dv = inflater.inflate(R.layout.update_person, null)
        val uPersonUserId = dv.findViewById(R.id.tv_userId_update) as AppCompatTextView
        val uPersonUsername = dv.findViewById(R.id.et_nameUser_update) as AppCompatEditText
        val uPersonFirstName = dv.findViewById<AppCompatEditText>(R.id.et_firstname_update)
        val uPersonLastName = dv.findViewById(R.id.et_lastname_update) as AppCompatEditText
        uPersonUserId.text = updatingUser
        val updatePersonId = uPersonUserId.text
        val updatePersonUsername = uPersonUsername.text
        val updatePersonFirst = uPersonFirstName.text
        val updatePersonLast = uPersonLastName.text

        alertBuilder.setTitle("Update Person")
        alertBuilder.setMessage("Update person data")
        alertBuilder.setPositiveButton("Update", DialogInterface.OnClickListener { _, _->
            //creating an instance of the handler class
            val db = HandlerDB(this)
            if (!updatePersonUsername.isNullOrEmpty() && !updatePersonFirst.isNullOrEmpty() && !updatePersonLast.isNullOrEmpty()) {
                val status = db.UpdatePerson(PersonModel(updatePersonId.toString(), updatePersonUsername.toString(), updatePersonFirst.toString(), updatePersonLast.toString()))

                if (status>-1) {
                    Toast.makeText(applicationContext,"Record Update", Toast.LENGTH_LONG).show()
                    val buttonPress = findViewById<AppCompatButton>(R.id.pressMe)
                    buttonPress.performClick()
                }
            } else {
                Toast.makeText(applicationContext, "username, first and last name required", Toast.LENGTH_LONG).show()
            }
        })

        alertBuilder.setNegativeButton("Cancel", DialogInterface.OnClickListener { di, which ->  })
        alertBuilder.setView(dv)
        val b = alertBuilder.create()
        b.show()
    }

    //method for saving the records
    fun SaveRecord (view: View) {
        val id = UUID.randomUUID()
        val uName = et_userName.text.toString()
        val fName = et_fName.text.toString()
        val lName = et_lName.text.toString()
        val db_handler: HandlerDB = HandlerDB(this)

        if (uName.trim().isNotEmpty() || fName.trim().isNotEmpty() || lName.trim().isNotEmpty()) {
            val status = db_handler.CreatePerson(PersonModel(id.toString(), uName, fName, lName))
            if (status > -1) {
                Toast.makeText(applicationContext, "Person saved", Toast.LENGTH_LONG).show()
                et_userName.setText("")
                et_fName.setText("")
                et_lName.setText("")
            }
        } else {
            Toast.makeText(applicationContext, "Username, First Name and Last Name is required", Toast.LENGTH_LONG).show()
        }
    }
}
PersonModel.kt
package com.programmingninja.coeus.model

class PersonModel (var userId: String, val userName: String, val fName: String, val lName: String) {
}
custom_list.xml
//create a custom row layout for displauong the list items in the ListView
<?xml version="1.0" encoding="utf-8"?>
<LinearLayout xmlns:android="http://schemas.android.com/apk/res/android"
    android:layout_width="match_parent"
    android:layout_height="match_parent"
    android:orientation="vertical"
    android:id="@+id/lLayout">
    <androidx.appcompat.widget.AppCompatTextView
        android:layout_width="match_parent"
        android:layout_height="wrap_content"
        android:id="@+id/tv_userId"
        android:text="User Id"
        android:textAppearance="@style/TextAppearance.AppCompat.Medium" />

    <androidx.appcompat.widget.AppCompatTextView
        android:layout_width="match_parent"
        android:layout_height="wrap_content"
        android:id="@+id/tv_nameU"
        android:text="Username"
        android:textAppearance="@style/TextAppearance.AppCompat.Medium" />

    <androidx.appcompat.widget.AppCompatTextView
        android:layout_width="match_parent"
        android:layout_height="wrap_content"
        android:id="@+id/tv_nameF"
        android:text="First Name"
        android:textAppearance="@style/TextAppearance.AppCompat.Medium" />

    <androidx.appcompat.widget.AppCompatTextView
        android:layout_width="match_parent"
        android:layout_height="wrap_content"
        android:id="@+id/tv_nameL"
        android:text="Last Name"
        android:textAppearance="@style/TextAppearance.AppCompat.Medium" />

</LinearLayout>
MyListadapter
//Now, we create the adapter that will populate the data model within the listview
package com.programmingninja.coeus.helper

import android.app.Activity
import android.content.Context
import android.view.View
import android.view.ViewGroup
import android.widget.ArrayAdapter
import androidx.appcompat.widget.AppCompatTextView
import com.programmingninja.coeus.R

class MyListadapter (private val context: Activity, private val idUser: Array<String>, private val nameUser: Array<String>, private val userFirst: Array<String>, private val userLast: Array<String>)
    : ArrayAdapter<String>(context, R.layout.custom_list, nameUser)
{
    override fun getView(position: Int, view: View?, parent: ViewGroup): View {
        val inflater = context.layoutInflater
        val rowView = inflater.inflate(R.layout.custom_list, null, true)

        val idUserTxt =  rowView.findViewById(R.id.tv_userId) as AppCompatTextView
        val nameUserTxt =  rowView.findViewById(R.id.tv_nameU) as AppCompatTextView
        val nameFTxt =  rowView.findViewById(R.id.tv_nameF) as AppCompatTextView
        val nameLTxt =  rowView.findViewById(R.id.tv_nameL) as AppCompatTextView

        idUserTxt.text = "User Id: ${idUser[position]}"
        nameUserTxt.text = "Username: ${nameUser[position]}"
        nameFTxt.text = "First Name: ${userFirst[position]}"
        nameLTxt.text = "Last Name: ${userLast[position]}"
        return rowView
    }
}
- Published in Android, Kotlin, Programming Languages
When over Switch in Kotlin

Good afternoon Programming Community, I am glad to welcome you to another Kotlin edition. we will look upon the replacement of switch with the when keyword. Firstly, we will look on to some examples of switch and after that, we will look at how the when keyword makes our task or code easier and more understandable. So, let’s get started.
Standard Conditional
if (number == 1) {
   println("value: 1")
} else if (nummber == 2) {
   println("value: 2")
} else if (number == 3) {
   println("value: 3")
} else if (number == 4) {
   println("value 4")
} else {
   println("value greater 5")
}
A traditional switch is basically just a statement that can substitute a series of simple if/else that make basic checks as displayed above. However it cannot replace all sort of if/else sequences but just those which compare a value with some constant. So, you can only use a switch to perform an action when one specific variable has a certain precise value.
To remove this difficulty, switch-case was introduced, where we pass the variable to be compared with-in the switch statement (in our example, that variable is number) and compare it with various case statements present corresponding to it and do the operation.
‘switch’
switch (number) {
   case 1:
      println("value: 1")
      break;
   case 2:
      println("value: 2")
      break;
   case 3:
      println("value: 3")
      break;
   case 4:
      println("value: 4")
      break;
   default:
      println("value greater 5")
      break;
}
So, in the above code in order to print the numbers in word, you have to use various conditional statements and this results in a large number of lines of code. Think of a situation when you have to print the words representation of numbers up to 100 or 1000. If you are using conditional statements then you have to use 1000 conditional statements.
In the above code, number is passed in switch statement and cases are used to compare that number. For example, if the number is 1 then case 1 will be executed, if number is 2 then case 2 will be executed and so on. But if the number is not equal to any of the case present then the default block will be executed.
‘when’
when {
   number == 1 -> {
       println("value: 1")
   }
   nummber == 2 -> {
       println("value: 2")
   }
   number == 3 -> {
       println("value: 3")
   }
   number == 4 -> {
       println("value 4")
   }
   else -> {
       println("value greater 5")
   }
}
So, if you are moving from Java to Kotlin, then you will find some changes in the syntax part also. In Java we use switch but in Kotlin, that switch gets converted to when. when is also used for conditional representation but it does the things in a very smarter and easier way. Whenever you are having a number of possibilities then you can use when in your code.
In the above code, like in switch, the number is passed in when and then we compare that number with various options available. In our case, if the number == 1, then “one” will be printed and so on. If more than one match is found then the match that occurs first will be considered only. If no match to the number is found then the else part will be executed.
When in doubt use ‘when’
- no complex case/break groups, only the condition followed by ->
- it can group two or more equivalent choices, separating them with a comma
Wrapping Things Up
we learned how to use when in place of switch in Kotlin. We saw that, if we are having a number of possibilities for a particular variable then we can make use of when to handle all the possibilities. Also, we can use when for multiple or more than one choices.
- Published in Android, Kotlin, Programming Languages
Android Navigation Drawer

Hello programming world, today it looks like you are interested in trying to implement a navigational drawer within you application. Within this tutorial we are going to be focusing on drawer implementation with Kotlin but if you are interested in learning how in Java or Swift. NavigationDrawer or also known NavigationView which is a panel that shows you the menu but is hidden until the user swiping from the left or right or user touches the hamburger icon( )
To begin the development open your Android IDE and select “Empty Actvity” then select the “NEXT” button.
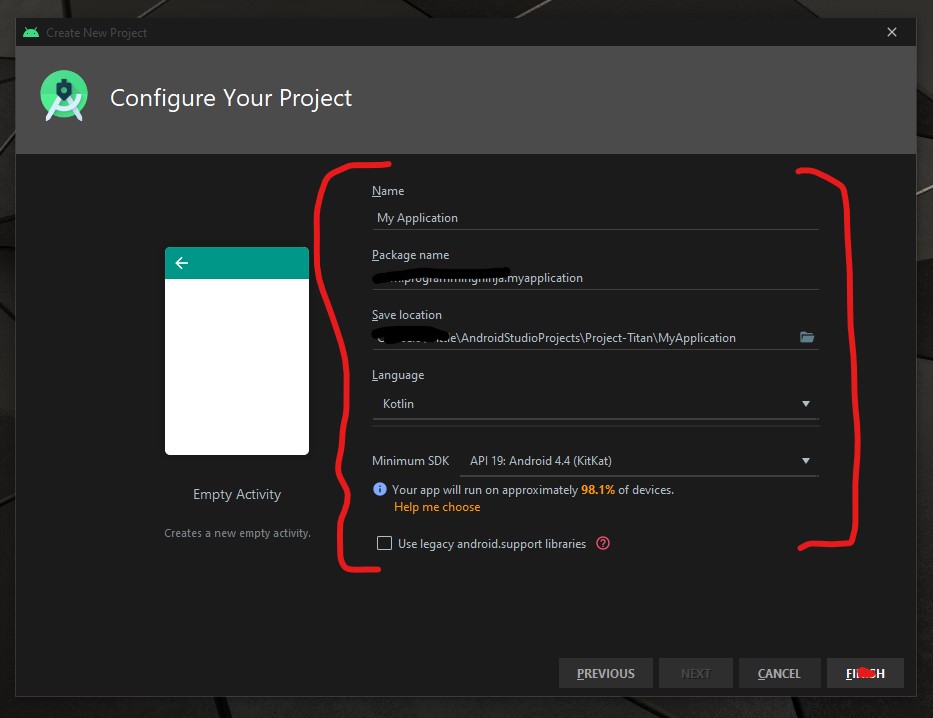
Now it is time to configure the project with changing the following fields Name and Language as seen in the image below.
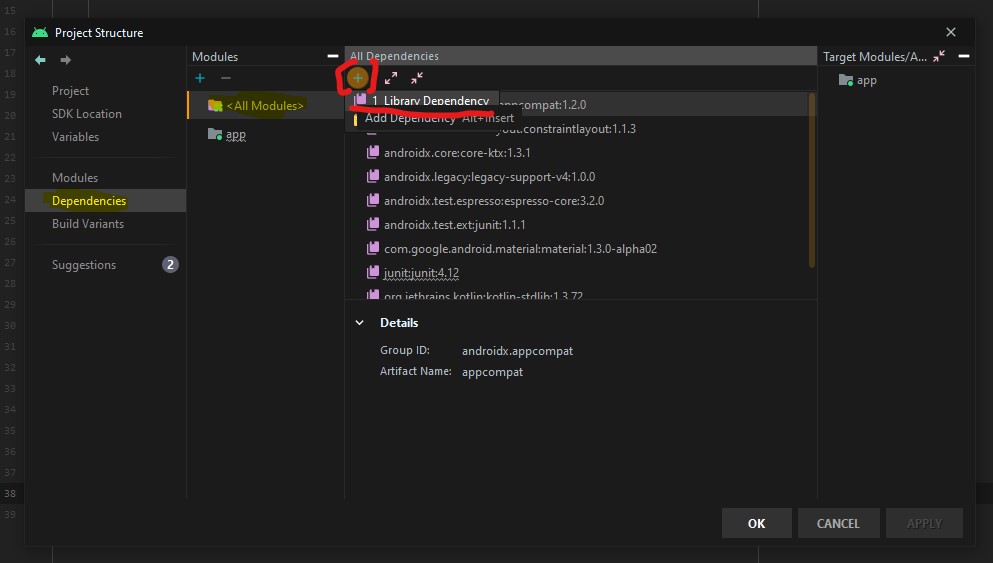
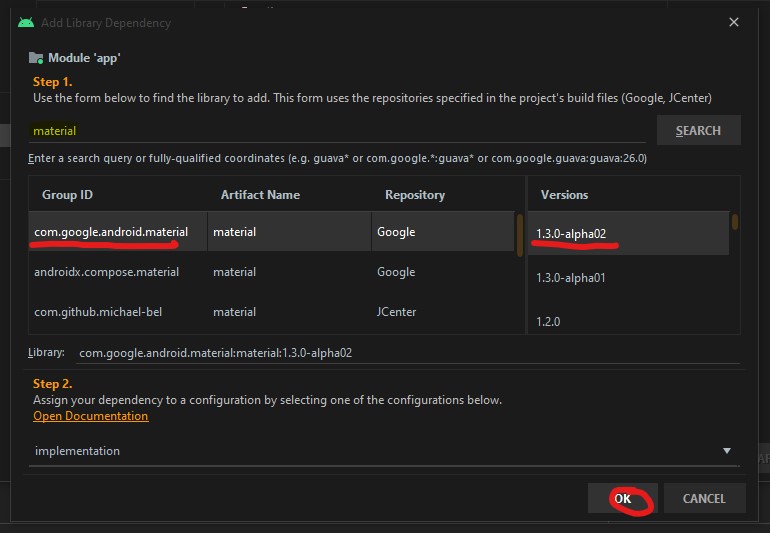
Now we need to add the material dependency into the project which has the NavigationView and then sync the project. You do have two options to accomplish this task.
the first way is adding to the build.gradle (Module: app)
implementation 'com.google.android.material:material:1.3.0-alpha02'
Or the second way is using the “Dependencies” selector. To achieve this select File -> Package Structure.. (Ctrl+Alt+Shift+S) ->
Now that the dependency is add we are going to focus on the main activity layout and this is where the navigation menu is going to be displayed.
<androidx.drawerlayout.widget.DrawerLayout
        xmlns:android="http://schemas.android.com/apk/res/android"
        xmlns:tools="http://schemas.android.com/tools"
        xmlns:app="http://schemas.android.com/apk/res-auto"
        android:layout_width="match_parent"
        android:layout_height="match_parent"
        android:id="@+id/drawer"
        tools:openDrawer="start"
        tools:context=".MainActivity">

    <RelativeLayout
            android:layout_width="wrap_content"
            android:layout_height="wrap_content">

        <androidx.appcompat.widget.Toolbar
                android:layout_width="match_parent"
                android:layout_height="wrap_content"
                android:id="@+id/tb_toolbar"
                app:title="Coeus Drawer Demo"
                app:titleTextColor="@color/cardview_light_background"
                android:background="@color/colorAccent" />

        <FrameLayout
                android:layout_width="match_parent"
                android:layout_height="match_parent"
                android:id="@+id/frame_container" />
    </RelativeLayout>

    <com.google.android.material.navigation.NavigationView
            android:layout_width="wrap_content"
            android:layout_height="match_parent"
            android:id="@+id/nv_menu"
            app:menu="@menu/ico_menu"
            app:headerLayout="@layout/nav_header"
            android:layout_gravity="start" />
</androidx.drawerlayout.widget.DrawerLayout>
Now that we have the DrawerLayout as the parent view and this draw the view for the child items
- Line 20
- Line 29
Within the NavigationView there are two attributes that we need there purpose as follow
- Line 33*: declare items which we need to show in the navigation view, the list of menu
- Line 34*: define the layout which is the header layout in the navigation view, the top part of the navigation view which is mostly used to describe user details or app details (Lets create the layout that is be referenced here, please see code beow)
***Note: when short to creating to new resource “ALT+SHIFT+ENTER”
<?xml version="1.0" encoding="utf-8"?>
<androidx.appcompat.widget.LinearLayoutCompat
    xmlns:android="http://schemas.android.com/apk/res/android"
    android:layout_width="match_parent"
    android:layout_height="wrap_content"
    android:orientation="vertical"
    android:background="@color/colorAccent">

    <androidx.appcompat.widget.AppCompatImageView
            android:layout_width="wrap_content"
            android:layout_height="wrap_content"
            android:id="@+id/img_user_image"
            android:src="@mipmap/ic_launcher_round"/>

    <androidx.appcompat.widget.AppCompatTextView
            android:layout_width="wrap_content"
            android:layout_height="wrap_content"
            android:id="@+id/tv_user_name"
            android:text="User Name"
            android:textSize="30dp"
            android:textColor="@color/cardview_light_background" />

    <androidx.appcompat.widget.AppCompatTextView
            android:layout_width="wrap_content"
            android:layout_height="wrap_content"
            android:id="@+id/tv_user_details"
            android:text="user details"
            android:textSize="20dp"
            android:textColor="@color/cardview_light_background" />
</androidx.appcompat.widget.LinearLayoutCompat>
No we need to modify ActionBar within the style.xml so we don’t run into a complication since we are using our own type of toolbar. We will be modifying the line 2 from DarkActionBar to NoActionBar
<!-- Base application theme. -->
    <style name="AppTheme" parent="Theme.AppCompat.Light.NoActionBar">
        <!-- Customize your theme here. -->
        <item name="colorPrimary">@color/colorPrimary</item>
        <item name="colorPrimaryDark">@color/colorPrimaryDark</item>
        <item name="colorAccent">@color/colorAccent</item>
    </style>
Now that we have completed the layout and now need to focus on the kotlin class (.kt). Select the MainActivity class and everything is going to take place within the OnCreate(), so we’ll begin by setting our new toolbar as the actionbar.
val tb = findViewById<Toolbar>(R.id.tb_toolbar)
setSupportActionBar(tb)
Now it is time to set the actionBar to fire the toggle state, the user wants to ‘open’ and ‘close’ the navigation view.
val nav: NavigationView? = findViewById(R.id.nv_menu)
val drawer: DrawerLayout? = findViewById(R.id.drawer)
val toggle: ActionBarDrawerToggle? = ActionBarDrawerToggle(this, drawer,tb, R.string.open, R.string.close) //create string arguements
Setup a handler to respond to click events on the navigation elements and swap out the fragment. This can be put into the activity directly:
***To understand what a fragment check out the fragment post:
supportFragmentManager.beginTransaction().replace(R.id.frame_container, HomeFragment()).commit()
nav?.setCheckedItem(m_home)
And set the specific action on menuItem clicks. Here, we are showing the toast message for anything that doesn’t have a fragment already create. Ideally, you this is where can start a new activity, or open fragment etc.
nav?.setNavigationItemSelectedListener(object : NavigationView.OnNavigationItemSelectedListener {
     var temp: Fragment? = null

     override fun onNavigationItemSelected(item: MenuItem): Boolean {
          when (item.itemId) {
              m_home -> temp = HomeFragment()
              m_calls -> Toast.makeText(applicationContext, "You have clicked the call", Toast.LENGTH_SHORT).show()
              m_settings -> Toast.makeText(applicationContext, "You have clicked the settings", Toast.LENGTH_SHORT).show()
          }
supportFragmentManager.beginTransaction().replace(R.id.frame_container, temp!!).commit()
drawer.closeDrawer(GravityCompat.START)
                return true
            }
        })
What is the user press back button, the application should check the navigationView and make sure the drawer is closed first and then the app. For this, we will override the onBackPressed() method.
override fun onBackPressed() {
        if (drawer.isDrawerOpen(GravityCompat.START)) {
            drawer.closeDrawer(GravityCompat.START)
        } else {
            super.onBackPressed()
        }
    }
Now check for any errors and if all is good then let’s run the app. If everything compiles correctly then it should be working fine. There is much more in NavigationView like icons in the menu items etc. Try to explore more and share us with on our twitter or slack channel.
- Published in Android, Kotlin, Programming Languages
Val vs Var

Any programming language a variable is referred to a location in memory(storage area) to stored data. The type of variable defines the range of value that the variable can hold. So indicate a storage space, each variable should be given a unique identifier.
Basically, val and var both are used to declare a variable. var is like a general variable and can be assigned multiple times and is known as the mutable variable in Kotlin. Whereas val is a constant variable and can not be assigned multiple times and can be Initialized only single time and is known as the immutable variable in Kotlin.
Declaring a variable in Kotlin
Var
is short for variable – The object stored in the variable could change (vary) in time.
private val adapter: HomeAdapter? = null
After the Initialized It will not throw me an error because var is a mutable and it can be assigned multiple times.
Val
is short for value – The object stored in val, could not vary in time. Once assigned the val becomes read only, like a constant in Java Programming language.
private var adapter: HomeAdapter? = null
After the Initialized It will throw me an error like “Val can not be reassigned”
So to conclude we have learnt about Val vs Var in Kotlin that var could be changed at any level. Whereas val once assigned, could not be changed, but its properties could be changed.
- Published in Android, Kotlin, Programming Languages, Uncategorized
Android w/ Fragments

A fragment is an Android component that holds part of the behavior and/or UI of an activity. As the name would suggest, fragments are not independent entities, but are tied to a single activity. In many ways, they have functionality similar to activities.
In the same way that you don’t actually need an army of little helpers to do your bidding, you don’t have to use fragments. However, if you use them well, they can provide:
- Modularity – Diving complex activity code across fragments for better maintenance
- Adaptability – representing sections of a UI within the different fragments while utilizing different layouts that relys on the screen orientation and size
- Reusability – placing behavior or UI parts within the fragments that multiple activities can share
Fragment Lifecycle of Android
As you already know like activity, a fragment has a lifecycle with events that occur when the status changes within the framents. For example, when an event fires becasue a fragment becomes visible and active, or is not used or removed. Just as in a regular activity you are able to add code and behavior to the callbacks for the events.
Below you will see the fragment lifescycle diagram:

Understanding the lifecycle
- onAttach : the fragment attaches to its host activity
- onCreate : When a new fragment initializes, which always happens after it attaches to the hosts.
- onCreateView : creates its portion of the view hierarchy, which then added to the activity’s hierarchy of view
- onActivityCreated : fragment’s activity has finished on its own onCreate
- onStart : fragment becomes visible and starts after its activity starts
- onResume : fragment is visible and interactable that resumes only after its activity resumes and often resumes immediately after the activity does.
- onPause : user may not interact
- onStop : this is fired when the fragment is no longer visible; the fragment will get change with another fragment or it gets removed from actvity or fragment’s is stopped
- onDestroyView : this is fired when the view and other resources created within the onCreateView() are removed from the activity’s view hierarchy and destroyed.
- onDestroy : fired when the fragment does the final clean up.
- onDetach : fires when the fragment is detached from the activity host
If you want to learn more details regarding please read “Droid Fragments Life”.This is all about how the fragment come up within the activity and goes out. Cool!!
- Published in Android, Java, Kotlin, Programming Languages
Java Or Kotlin Language: Deciding Which Option to Use for Android Development

If my math is not wrong Java has been around for over 20+ years now and has no intention of going away. It holds a supreme position in the list of most popular programming languages following the C and C++ =, setting the highest usability record with millions of developers and systems.
Random Fact:
James Gosling, Mike Sheridan, and Patrick Naughton initiated the Java language back in 1991. Java has been the primary language for Android app development along with a few of its companions: Scala, Groovy and stepping up is Kotlin.
Kotlin Background
Let first you will need to understand what exactly is Kotlin so it is considered as statically typed programming language that runs on JVM(Java Virtual Machine) and JavaScript. It is developed by JetBrains and open-source community. The ‘Kotlin’ name came from Kotlin Island located near Saint Petersburg. It is supported by leading IDEs and compatible with Java 6 or Java 8. Kotlin is described as a general-purpose language and introduces functional features to support Java interoperability. The Kotlin project was born out of the aspiration for heightened productivity. The goal was to improve the coding experience in a way that was both practical and effective.
A central focus of Kotlin is to enable mixed-language projects. Kotlin also introduces improved syntax, as well as concise expressions and abstractions. Using Kotlin with Java reduces excessive boilerplate code, which is a huge win for Android developers. Kotlin came when Android development needed a more modern language to add to the qualities of java and aid in mobile development. This allows developers to not only easily update old Java apps to Kotlin, but also carry on their old work in Java to Kotlin.
Here’s a brief example Kotlin language
package hello
fun main() {
  println("Hello World")
}
It’s that simple! Kotlin uses developer-friendly coding structures and norms that are easy-to-understand and use. When considering this example from the develops’ perspective, you will be able to understand why Kotlin is loved by developers around the world. It is concise, effective, and faster compared to Java.
Is Java Dead?
Based on the group that I program with it appears that Java is currently in the area with us developers. Java is a reputable programming language with vast open-source tools and libraries to help developers. With that said, no language is without fault and even Java is subject to complications that can make a developer’s job tedious. If anything the objective for Kotlin is to supposedly introduce solutions to the common programming headaches and improve the Java ecosystem as a whole.
Strict Trial And Error
Kotlin has some milage under itself and has become a more stable and congruous development option especially within the Android Studio IDE. Some developers seem to believe that Kotlin will oust Java for Android development in future years. Other reviewers seem to believe Kotlin and Java should be coexisting without one outweighing the other.
This is a quality Java is not known for; however, readability should always take priority over concision. Yes, the succinct nature of Kotlin simplifies a developer’s job and mitigates the risk for error, but Kotlin doesn’t practice concision for concision’s sake. So let’s take the example below and compare the difference in the languages presents.
public class MathLife {
   public static double calculate () throws Exception {
      switch(op) {
         case "add":
            return a + b;
         case "subtract":
            return a - b;
         case "multiply":
            return a * b;
         case "divide":
            return a / b;
         default:
            throw new Exception();
      }
   }
}
Above is a simple calculator function written in Java. For comparison, here is the same calculator in Kotlin:
fun calculate(a: Double, op: String, b: Double): Double {
   when (op) {
      "add" -> return a + b
      "subtract" -> return a - b
      "multiply" -> return a * b
      "divide" -> return a / b
      else -> throw Exception()
   }
}
It may not seem like much, but the Kotlin version of this calculator is written in half the lines of code it took to program the function in Java. Brevity is a crucial factor in productivity. Writing large projects becomes easier when a developer is given more power for every line of code. A key observation here is Kotlin does not overlook comprehension for the sake of brevity. The syntax is concise, readable and still substantial.
The Winner: Java or Kotlin
In all fairness, chances are that you have been taught, learn and embraced Java. Switching to Kotlin at a time can be a bit of shock, so it is important to do this transition slowly to make sure you understand. having said that, Kotlin is the new official language and owing to its modern nature, it will become widely adopted in the future, so learning it and starting development with it right now would be a good idea. Understand java will continue to be a popular language for several years to come and isn’t likely to be entirely replaced. So take your time and make the switch gently.
At the end of the day, it’s all about what you feel comfortable with. As stated previously to be a true blood Androidian, you will need to have a working knowledge of the language Java. But if you already do have that then the Kotlin language of the future, so you might as well spend some time getting accustomed to it.
- Published in Android, Java, Kotlin, Language, Programming Languages
Integrating Google’s reCAPTCHA w/Android

Introduction
Google’s reCAPTCHA API protects your website/app from malicious traffic. You might have seen the reCAPTCHA integrated on web pages. You can integrate the same in your Android apps too using SafeNet API. The service is free to use and it will show a captcha to be solved if the engine suspects user interaction to be a bot instead of a human.
Within this post, I will explain and build a simple button click application that will integrate captcha to avoid bots from submitting forms on there own. But understand that this method is not only limited to form usage but a user can integrate any this module into any app
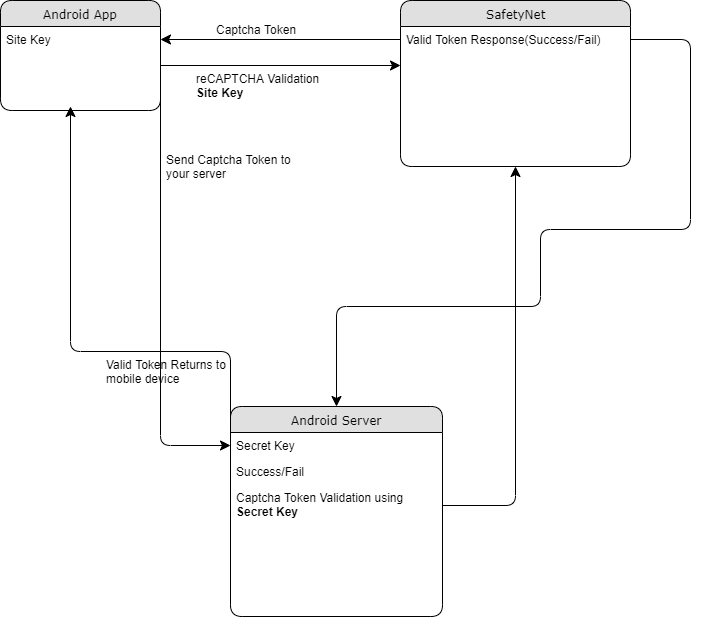
How it works
The following point will explain the simple flow of reCAPTCHA in Android with SafetyNet API.
- First, a user needs to obtain the SafetyNet key pair by registering your app. After completing this a Site & Secret Key.
- The Site Key will be integrated into an Android app and it can be public. Secret Key should be kept on your server and it shouldn’t be exposed.
- When reCAPTCHA is invoked, it will show the Captcha challenge to a user it necessary. In this step, it communicates with the captcha server and returns “User Response Token” using Site Key.
Registering your App w/SafetyNet
To begin before diving into the application creation we need to get the keys that will be validated against.
Fist go to the site following site and sign up if you do not already have an account
- https://www.google.com/recaptcha/intro/v3.html
- After accessing your account create
- Register a new account
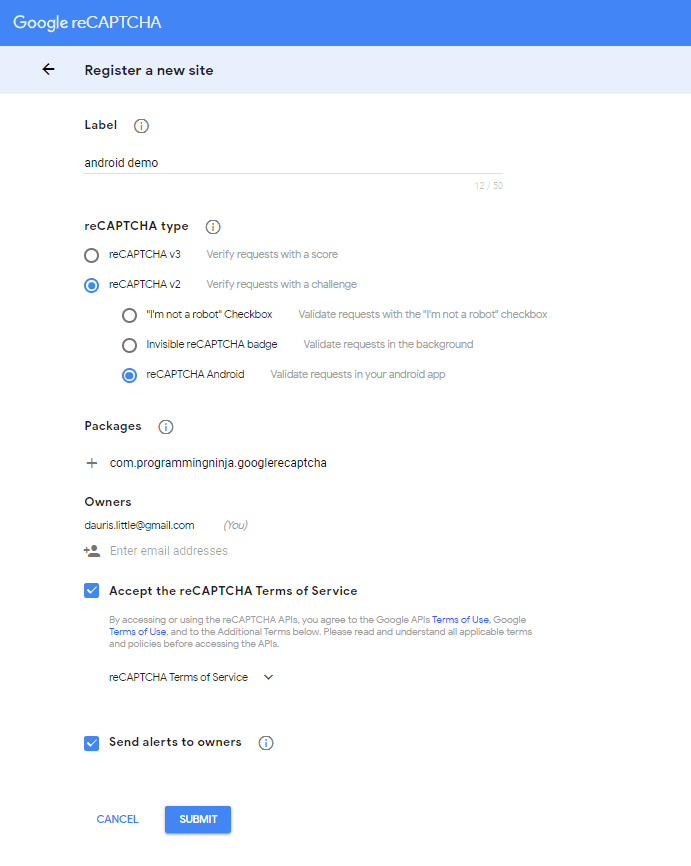
- Now enter your label, reCAPTCHA type, domains and then accept “Terms of Service”
NOTE: Regarding the label the title be anything that identifies the api key to yourself
NOTE: Regarding the selecting reCAPTCHA if working with android select reCAPTCHA v2 then reCAPTCHA Android
NOTE: Regarding populating the domain should be your Package Name in Package Names Section
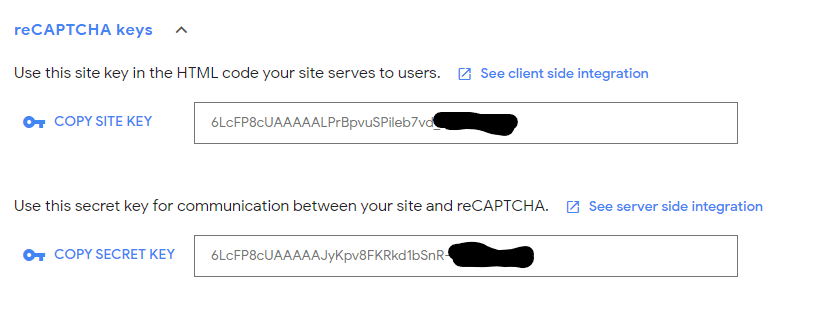
Then, you will get the site key and secret key from SafetyNet API Server and it as well as shows client and server-side integration code snippets. The following figures show the same.
Step 1 – Create New Project w/Android Studio
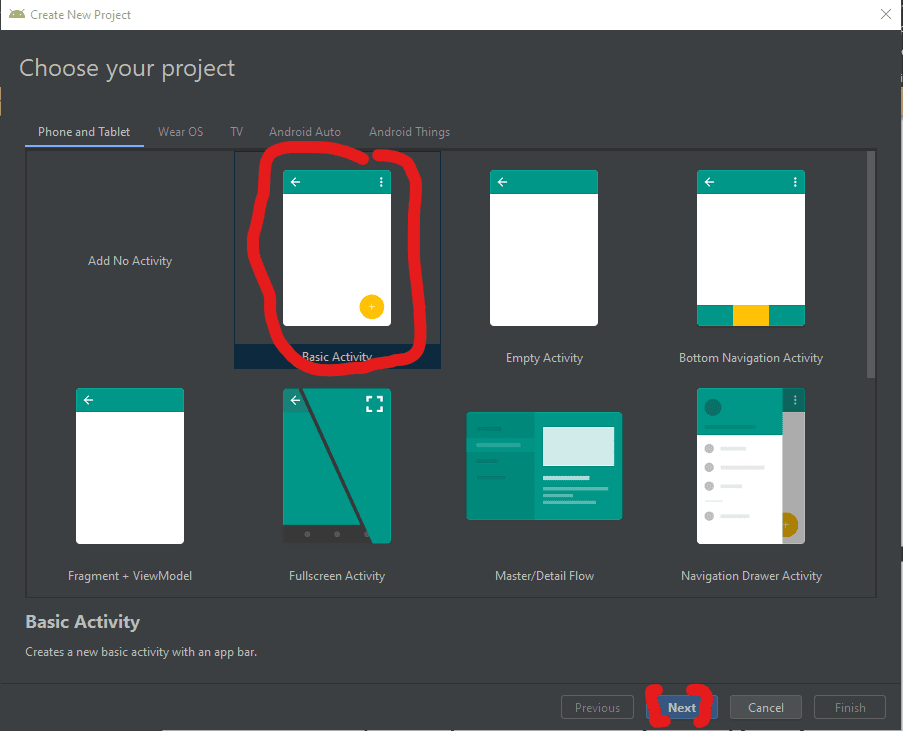
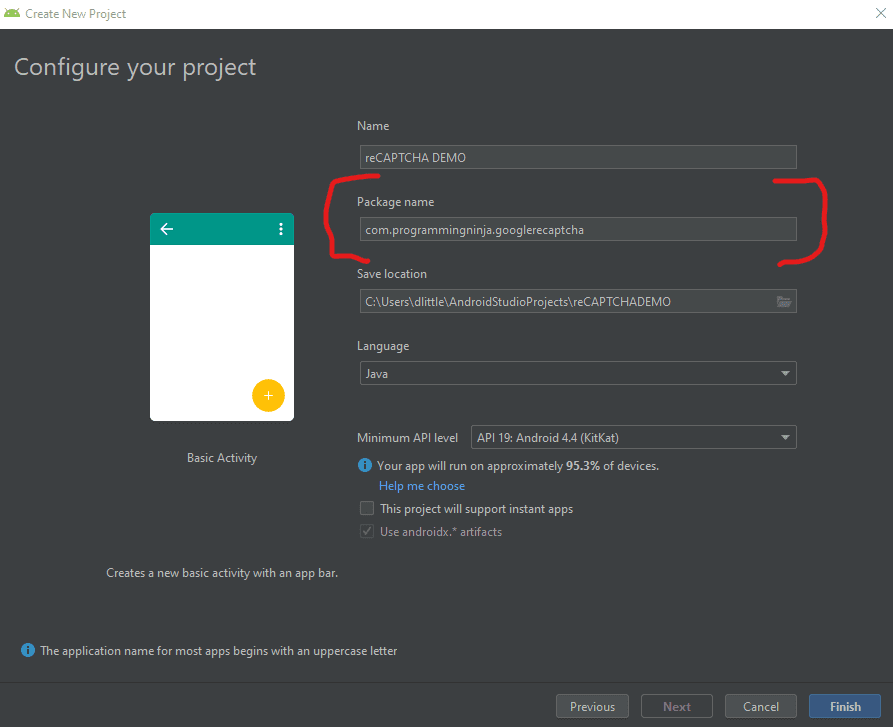
Now lets begin with the fun stuff and to begin you will begin by open Android Studio and then “Create New Project”
- Begin by Start a new Android Studio Project èselect Basic Activity from templates.
NOTE: While creating, use the package name you have registered on reCAPTCHA dashboard.
Step 2 – Setting up the library & AndroidMainfest for the project
Add SafeNet and the Volley dependency to your build.gradle and rebuild the project. Here, I used the following dependency. You can change as per your Android SDK.
NOTE: Volley is used to send HTTP call to our server to validate the captcha token on the server side.
build.gradle
dependencies {
    implementation fileTree(dir: 'libs', include: ['*.jar'])
    implementation 'androidx.appcompat:appcompat:1.1.0'
    implementation 'androidx.constraintlayout:constraintlayout:1.1.3'
    implementation 'com.google.android.material:material:1.0.0'
    testImplementation 'junit:junit:4.12'
    androidTestImplementation 'androidx.test.ext:junit:1.1.1'
    androidTestImplementation 'androidx.test.espresso:espresso-core:3.2.0'

    //dependency for recaptcha (safetynet)
    implementation 'com.google.android.gms:play-services-safetynet:17.0.0'

    //dependency for fast networking for networking
    implementation 'com.android.volley:volley:1.1.0'
}
Now we need to add the app manifest file with the following permission(s). SafetyNet library is used to create the captcha validation in android. Volley library is an HTTP Networkinf library used here for validating captcha response.
AndroidManifest.xml
<uses-permission android:name="android.permission.INTERNET"/>
Step 3 – Implementation of SafetyNet API
If you are still with me then let’s dive into the Java part of the project. We will first ensure that we have all the modules that will be used in the application
Required modules
import android.os.Bundle;
import android.util.Log;
import android.view.View;
import android.widget.Button;
import android.widget.TextView;

import androidx.appcompat.app.AppCompatActivity;
import androidx.annotation.NonNull;

//volley
import com.android.volley.DefaultRetryPolicy;
import com.android.volley.RequestQueue;
import com.android.volley.Request;
import com.android.volley.Response;
import com.android.volley.VolleyError;
import com.android.volley.toolbox.StringRequest;
import com.android.volley.toolbox.Volley;


import com.google.android.gms.common.api.ApiException;
import com.google.android.gms.common.api.CommonStatusCodes;
import com.google.android.gms.safetynet.SafetyNet;
import com.google.android.gms.safetynet.SafetyNetApi;
import com.google.android.gms.tasks.OnFailureListener;
import com.google.android.gms.tasks.OnSuccessListener;

import org.json.JSONObject;

import java.util.HashMap;
import java.util.Map;

import android.view.Menu;
import android.view.MenuItem;
Step 3 – Implementation of SafetyNet API (Continue)
If you are still with me then let’s dive into the Java part of the project. We will first ensure that we have all the modules that will be used in the application
- Replace “Site_Key” and “Site_Secret_Key” with your appropriate “Site Key” and “Secret Key” get from SafetyNet API while registering app.
- The API will check the Server and it has a separate callbacks from success and failure.
- At Success, we will get Captcha Response Token which will be used to validate the user interaction is made by a bot or real human.
- We will discuss how to validate the token with SafetyNet API Server in next step.
NOTE: the call on the created click event
protected void onCreate(Bundle savedInstanceState) {
        super.onCreate(savedInstanceState);
        setContentView(R.layout.activity_main);

        btn = findViewById(R.id.reCaptcha);
        txtV = findViewById(R.id.verifyText);
        btn.setOnClickListener(this);

        requestQueue = Volley.newRequestQueue(getApplicationContext());
    }

    public void onClick(View view){
        SafetyNet.getClient(this).verifyWithRecaptcha(Site_Key)
                .addOnSuccessListener(this, new OnSuccessListener <SafetyNetApi.RecaptchaTokenResponse>(){
                    @Override
                    public void onSuccess(SafetyNetApi.RecaptchaTokenResponse response){
                        if (!response.getTokenResult().isEmpty()){
                            handleCaptchaResult(response.getTokenResult());

                        }
                    }
        })
                .addOnFailureListener(this, new OnFailureListener() {
                    @Override
                    public void onFailure(@NonNull Exception e) {
                        if (e instanceof  ApiException){
                            ApiException apiException = (ApiException)e;
                            Log.d(TAG, "Error Message: " + CommonStatusCodes.getStatusCodeString(apiException.getStatusCode()));
                        } else {
                            Log.d(TAG, "Unknown error type or error" + e.getMessage());
                        }
                    }
                });
    }
Step 4 – Captcha Response Token Validation
- We have to verify the token getting from the server using the secret key.
- It can achieve by using the following.
-
- API Link – https://www.google.com/recaptcha/api/siteverify
- Method – POST
- Params – secret, response (We have to pass the “SECRET_KEY” and “TOKEN” respectively)
NOTE: Volley has
- RequestQueue to maintain the server calls in queue.
- RetryPolicy to retry the server call if it is fail with TimeOut and Retry Count. We can change those values.
- StringRequest is used for getting Response as JSON String.
- Method.POST denotes the call as POST method.
- Params are passed to server using Map, HashMap.
The SafetyNet API provides the response respective to the parameters passed and the success is Boolean Datatype.
void handleCaptchaResult(final String responseToken){
        String url = "https://www.google.com/recaptcha/api/siteverify"; //consider using global variable here
        StringRequest request = new StringRequest(Request.Method.POST, url, new Response.Listener<String>() {
            @Override
            public void onResponse(String response) {
                try {
                    JSONObject jsonObject = new JSONObject(response);
                    if (jsonObject.getBoolean("success")) {
                        txtV.setTextSize(35);
                        txtV.setText("Congratulations! You're not a robot anymore");
                    }
                } catch (Exception ex) {
                    Log.d(TAG, "Error message: " + ex.getMessage());
                }
            }
        },
                new Response.ErrorListener() {
                    @Override
                    public void onErrorResponse(VolleyError error) {
                        Log.d(TAG, "Error message: " + error.getMessage());
                    }
                })
        {
            @Override
            protected Map<String,String> getParams(){
                Map<String,String> params = new HashMap<>();
                params.put("secret", Site_Secret_Key);
                params.put("response", responseToken);
                return params;
            }
        };
        request.setRetryPolicy(new DefaultRetryPolicy(50000,DefaultRetryPolicy.DEFAULT_MAX_RETRIES,DefaultRetryPolicy.DEFAULT_BACKOFF_MULT));
        requestQueue.add(request);
    }
Full Review / Conclusion
In this blog tutorial, I was able to show you how to use Google’s reCAPTCHA in our Android app. Understand using reCAPTCHA in any app, we need to get one Site key and one Secret key and after that, we request for the captcha from the reCAPTCHA server. Once we get the reCAPTCHA and the user has entered the captcha, we send the entered value to the reCPATCA server and get the captcha token. This token is sent to our server and our server along with the secret key send the token to the reCAPTCHA server again. After that, we get some success message and that message is conveyed to our Android app.
NOTE: I have also displayed below the code for the layout for the main activity as well. This is the just a simple layout but the practical could be implemented with very little ease.
import android.os.Bundle;
import android.util.Log;
import android.view.View;
import android.widget.Button;
import android.widget.TextView;

import androidx.appcompat.app.AppCompatActivity;
import androidx.annotation.NonNull;

//volley
import com.android.volley.DefaultRetryPolicy;
import com.android.volley.RequestQueue;
import com.android.volley.Request;
import com.android.volley.Response;
import com.android.volley.VolleyError;
import com.android.volley.toolbox.StringRequest;
import com.android.volley.toolbox.Volley;


import com.google.android.gms.common.api.ApiException;
import com.google.android.gms.common.api.CommonStatusCodes;
import com.google.android.gms.safetynet.SafetyNet;
import com.google.android.gms.safetynet.SafetyNetApi;
import com.google.android.gms.tasks.OnFailureListener;
import com.google.android.gms.tasks.OnSuccessListener;

import org.json.JSONObject;

import java.util.HashMap;
import java.util.Map;

import com.google.android.material.floatingactionbutton.FloatingActionButton;
import com.google.android.material.snackbar.Snackbar;

import androidx.appcompat.widget.Toolbar;


import android.view.Menu;
import android.view.MenuItem;

public class MainActivity extends AppCompatActivity implements View.OnClickListener {

    String TAG = MainActivity.class.getSimpleName();
    Button btn;
    TextView txtV;
 // TODO - replace the SITE KEY with yours
    String Site_Key = "6LcFP8cUAAAAALPrBpvuSPileb7vd"; //consider making global variable(this will not work not a valid key)
 // TODO - replace the Secret KEY with yours
    String Site_Secret_Key = "6LcFP8cUAAAAAJyKpv8FKRkd1bSnR-"; //consider making global variable(this will not work not a valid key)
    RequestQueue requestQueue;

    //application space controls
    @Override
    protected void onCreate(Bundle savedInstanceState) {
        super.onCreate(savedInstanceState);
        setContentView(R.layout.activity_main);

        btn = findViewById(R.id.reCaptcha);
        txtV = findViewById(R.id.verifyText);
        btn.setOnClickListener(this);

        requestQueue = Volley.newRequestQueue(getApplicationContext());
    }

    @Override
    public void onClick(View view){
        SafetyNet.getClient(this).verifyWithRecaptcha(Site_Key)
                .addOnSuccessListener(this, new OnSuccessListener <SafetyNetApi.RecaptchaTokenResponse>(){
                    @Override
                    public void onSuccess(SafetyNetApi.RecaptchaTokenResponse response){
                        if (!response.getTokenResult().isEmpty()){
                            handleCaptchaResult(response.getTokenResult());

                        }
                    }
        })
                .addOnFailureListener(this, new OnFailureListener() {
                    @Override
                    public void onFailure(@NonNull Exception e) {
                        if (e instanceof  ApiException){
                            ApiException apiException = (ApiException)e;
                            Log.d(TAG, "Error Message: " + CommonStatusCodes.getStatusCodeString(apiException.getStatusCode()));
                        } else {
                            Log.d(TAG, "Unknown error type or error" + e.getMessage());
                        }
                    }
                });
    }

    void handleCaptchaResult(final String responseToken){
        String url = "https://www.google.com/recaptcha/api/siteverify"; //consider using global variable here
        StringRequest request = new StringRequest(Request.Method.POST, url, new Response.Listener<String>() {
            @Override
            public void onResponse(String response) {
                try {
                    JSONObject jsonObject = new JSONObject(response);
                    if (jsonObject.getBoolean("success")) {
                        txtV.setTextSize(35);
                        txtV.setText("Congratulations! You're not a robot anymore");
                    }
                } catch (Exception ex) {
                    Log.d(TAG, "Error message: " + ex.getMessage());
                }
            }
        },
                new Response.ErrorListener() {
                    @Override
                    public void onErrorResponse(VolleyError error) {
                        Log.d(TAG, "Error message: " + error.getMessage());
                    }
                })
        {
            @Override
            protected Map<String,String> getParams(){
                Map<String,String> params = new HashMap<>();
                params.put("secret", Site_Secret_Key);
                params.put("response", responseToken);
                return params;
            }
        };
        request.setRetryPolicy(new DefaultRetryPolicy(50000,DefaultRetryPolicy.DEFAULT_MAX_RETRIES,DefaultRetryPolicy.DEFAULT_BACKOFF_MULT));
        requestQueue.add(request);
    }
}
<androidx.constraintlayout.widget.ConstraintLayout
    xmlns:android="http://schemas.android.com/apk/res/android"
    xmlns:app="http://schemas.android.com/apk/res-auto"
    xmlns:tools="http://schemas.android.com/tools"
    android:layout_width="match_parent"
    android:layout_height="match_parent"
    tools:context=".MainActivity">
    <LinearLayout
        android:layout_height="match_parent"
        android:layout_width="match_parent"
        android:orientation="vertical">

        <Button
            android:id="@+id/reCaptcha"
            android:layout_height="wrap_content"
            android:layout_width="wrap_content"
            android:text="Show reCAPTCHA"/>

        <TextView
            android:id="@+id/verifyText"
            android:layout_width="wrap_content"
            android:layout_height="wrap_content"
            android:capitalize="characters"
            android:text="Hello World"
            android:textSize="24sp" />

    </LinearLayout>
</androidx.constraintlayout.widget.ConstraintLayout>
- Published in Android, API, blog, Java, Mobile Development, Programming Languages
Using Snackbar

Android Snackbar is an interesting component introduced with the Material Design. Snackbars are very similar to the Toast messages with a few exceptions but the biggest is that provide action to interact with. Snackbar will be displayed at the bottom of the screen and can be swiped away in order to dismiss them.
Major Difference between Toast and Snackbar messages
- Toast message can be customized as well as displayed anywhere on the screen, however, Snackbar can be only shown at the bottom
- Toast messages cannot display action controllers but Snackbars optionally can display them
- Toast message remains on the screen until their time limit is mean but Snackbars can be swiped off before time expiring
note: similar to toast you have three different values for time limit
Implementing Snackbar
To begin this project is being created in Android Studio but any IDE that has the SDK for development can produce the same result. We begin by opening the ide and selecting “Create New Project”. Select “Empty Activity” and fill out the detail of the application and make sure with “Language” you select Java.
note: if you’re using Kotlin please review this tutorial
After the project is created open build.gradle and add the latest stable Material Design Dependency.
dependencies {
     implementation 'com.google.android.material:material:1.3.0'
}
By using the material dependency, you can also create components like Cardview, Recyclerview, and other things as well… If interested in learning to incorporate other material components review the below links.
Styling the App
<style name="AppTheme"
    parent="Theme.MaterialComponents.Light.NoActionBar">
    <item name="colorPrimary">@color/colorPrimary</item>
    <item name="colorPrimaryDark">@color/colorPrimary</item>
    <item name="colorAccent">@color/colorPrimary</item>
</style>
Method Creation
Open your MainActivity.java and we will begin by creating the following methods:
- Basic Snackbar
- As you can see the syntax is the default setup of the Snackbar. Please take note of the make function which accepts the following parameters. View, expected message to display and then the duration of the message to display.
public void basicSnack(View v){
    Snackbar sb = Snackbar.make(cl, "This is a basic Snackbar Display", Snackbar.LENGTH_SHORT);
    sb.show();
}
- Action Basic Snackbar
- Within this method, we reference a callback interaction using setAction(). This allows you to take a certain action when the user interacts with a Snackbar
public void basicActionSnack(View v) {
    Snackbar sb = Snackbar.make(cl, "Snackbar with Action Feature", Snackbar.LENGTH_SHORT);
    sb.setAction("Undo", new View.OnClickListener() {
        @Override
        public void onClick(View v) {
            Toast.makeText(getApplicationContext(), "Undo action", Toast.LENGTH_SHORT).show();
        }
    });
    sb.show();
}
- Custom Basic Snackbar
- By default, Snackbar text color is set to white with the default background #323232 but these features can be overwritten
public void basicCustomSnack( View v) {
    Snackbar sb = Snackbar.make(cl, "Custom Snackbar", Snackbar.LENGTH_SHORT);
    sb.setAction("Undo", new View.OnClickListener() {
        @Override
        public void onClick(View v) {
            Toast.makeText(getApplicationContext(), "Undoing Action", Toast.LENGTH_SHORT).show();
        }
    });

    sb.setActionTextColor(Color.CYAN);
    View sbv = sb.getView();
    TextView tv = sbv.findViewById(R.id.snackbar_text);
    tv.setTextColor(Color.GREEN);

    sb.show();
}
Let’s check the completed code
<!-- main activity xml-->
<?xml version="1.0" encoding="utf-8"?>
<androidx.coordinatorlayout.widget.CoordinatorLayout
    xmlns:android="http://schemas.android.com/apk/res/android"
    xmlns:app="http://schemas.android.com/apk/res-auto"
    android:layout_width="match_parent"
    android:layout_height="match_parent"
    android:id="@+id/app_Coordinator"
    android:fitsSystemWindows="true"
    android:orientation="vertical">

    <com.google.android.material.appbar.AppBarLayout
        android:layout_width="match_parent"
        android:layout_height="wrap_content"
        android:background="?attr/colorPrimary">

        <androidx.appcompat.widget.Toolbar
            android:layout_width="match_parent"
            android:layout_height="?attr/actionBarSize"
            android:id="@+id/toolbar"
            android:theme="@style/ToolbarStyle"
            app:title="@string/app_name"
            app:popupTheme="@style/ThemeOverlay.AppCompat.Light" />

    </com.google.android.material.appbar.AppBarLayout>
    <include layout="@layout/app_content" />

    <com.google.android.material.floatingactionbutton.FloatingActionButton
        android:layout_width="wrap_content"
        android:layout_height="wrap_content"
        android:layout_gravity="bottom|end"
        android:layout_margin="10dp"
        android:src="@drawable/ic_add_black"
        android:contentDescription="TODO" />
</androidx.coordinatorlayout.widget.CoordinatorLayout>
<!--container xml -->
<?xml version="1.0" encoding="utf-8"?>
<androidx.appcompat.widget.LinearLayoutCompat xmlns:android="http://schemas.android.com/apk/res/android"
    android:layout_width="match_parent"
    android:layout_height="wrap_content"
    xmlns:app="http://schemas.android.com/apk/res-auto"
    app:layout_behavior="@string/appbar_scrolling_view_behavior"
    android:padding="10dp"
    android:orientation="vertical">

    <androidx.appcompat.widget.AppCompatButton
        android:layout_width="match_parent"
        android:layout_height="wrap_content"
        android:text="@string/basic_snack"
        android:onClick="basicSnack" />

    <androidx.appcompat.widget.AppCompatButton
        android:layout_width="match_parent"
        android:layout_height="wrap_content"
        android:text="@string/basic_action_snack"
        android:onClick="basicActionSnack" />

    <androidx.appcompat.widget.AppCompatButton
        android:layout_width="match_parent"
        android:layout_height="wrap_content"
        android:text="@string/basic_custom_snack"
        android:onClick="basicCustomSnack" />

</androidx.appcompat.widget.LinearLayoutCompat>
// main activity
public class MainActivity extends AppCompatActivity {
    private CoordinatorLayout cl;
    private Toolbar tb;

    @Override
    protected void onCreate(Bundle savedInstanceState) {
        super.onCreate(savedInstanceState);
        setContentView(R.layout.activity_main);

        cl = findViewById(R.id.app_Coordinator);
        tb = findViewById(R.id.toolbar);
        setSupportActionBar(tb);
    }

    public void basicSnack(View v){
        Snackbar sb = Snackbar.make(cl, "This is a basic Snackbar Display", Snackbar.LENGTH_SHORT);
        sb.show();
    }

    public void basicActionSnack(View v) {
        Snackbar sb = Snackbar.make(cl, "Snackbar with Action Feature", Snackbar.LENGTH_SHORT);
        sb.setAction("Undo", new View.OnClickListener() {
            @Override
            public void onClick(View v) {
                Toast.makeText(getApplicationContext(), "Undo action", Toast.LENGTH_SHORT).show();
            }
        });

        sb.show();
    }

    public void basicCustomSnack( View v) {
        Snackbar sb = Snackbar.make(cl, "Custom Snackbar", Snackbar.LENGTH_SHORT);
        sb.setAction("Undo", new View.OnClickListener() {
            @Override
            public void onClick(View v) {
                Toast.makeText(getApplicationContext(), "Undoing Action", Toast.LENGTH_SHORT).show();
            }
        });

        sb.setActionTextColor(Color.CYAN);

        View sbv = sb.getView();
        TextView tv = sbv.findViewById(R.id.snackbar_text);
        tv.setTextColor(Color.GREEN);

        sb.show();
    }
}
To conclude
I hope you found this reading helpful and if you need further assistance don’t hesitate to contact me for additional assistance. If you are also interested in seeing other tutorials that are not present please hit my line and with
- Published in Android, Java, Programming Languages, Tutorial
- 1
- 2